How to configure the BIOS to boot from a disk or flash drive. Setting up the BIOS on a computer American megatrends bios setting up RAM
Read also
Hello, I wanted to write detailed instructions for installing Windows, as I remembered that some may have difficulties installing boot from disk. Therefore, in this article I will tell you how to set the BIOS to boot from disk.
There are different types of BIOS and some people are initially confused about where to boot from disk. Now I will try to show you, and after this article I think you yourself will be able to install boot from disk in any bios.
Types of BIOS

How can I set the BIOS to boot from disk?
The main types are Award BIOS And on I will show them based on how to boot into BIOS from CD-ROM to boot Windows from a CD or DVD. I also recently updated the article, so it’s possible that your BIOS will be there too.
Award BIOS
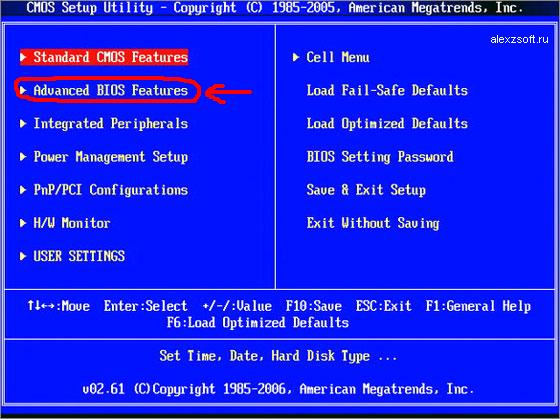
Here we choose Advanced BIOS Features

This is where we set the download from CD-ROM, then save ( F10 yes).
AMI BIOS (American Megatrends, Inc.)
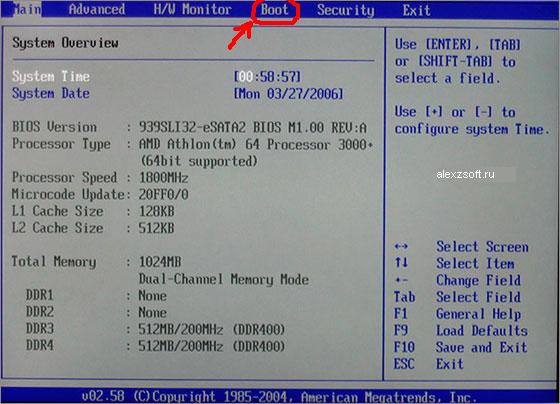
Select a tab BOOT.

Click Boot Device Priority And Enter.

Choose CDROM. After save (F10).
What other types of cr-rom installation are there?
In addition to selecting Enter, there are other selection keys, for example these:

If you don’t know English, I’ll explain what’s written on the right: Press the Up or Down arrow to select a device, then press F6 to move the device up the list or F5 to move equipment down the list. Click ESC, to exit to the menu.
Therefore, use the arrows to select CD-ROM and then click F6 until the CD-ROM device is at the very top. Sometimes the choice is the plus keys (+) and minus (-). And sometimes a list of active and inactive devices appears. In which pressing the key R you set the CD-ROM to be active to enable booting from disk. After all installations save (F10+enter).
Modern BIOS
In modern BIOS everything is simpler. There are several options to choose from. The first one is when the BIOS loads, you can simply drag the disk to the first place with the mouse and save the changes by pressing F10. But if you don’t have such a function, then go to advanced settings (Advanced Mode) or if there is a boot tab.

In the advanced settings, go to the boot tab and go down until you see the device boot lines. We go to point number 1 enter.

Download options will appear. Select DVD-ROM and save with F10.

Also, if you have a bios password, you can reset it by removing the battery on the motherboard for about 10 minutes. If that doesn’t help, you can use. You can also try calling the initial device boot dialog before loading Windows. To do this, before loading Windows, you need to press the boot key of the device, they may be different for everyone F1 to F12, and can also be a key Enter.
Don’t be afraid to do something extra, you can always leave without saving, and from experiments, your experience and knowledge only increase =)
I think after studying the article I will put boot from CD-ROM It won’t be difficult, what do you think?
Today I will dwell in more detail on what types of BIOS there are, because it is difficult for a novice user to understand this. Although, in fact, everything is quite simple - you just need to understand it a little. Moreover, despite the differences in appearance, in terms of setting up functions and principles of operation, they are all similar. I will tell you what types there are and show it all in pictures.
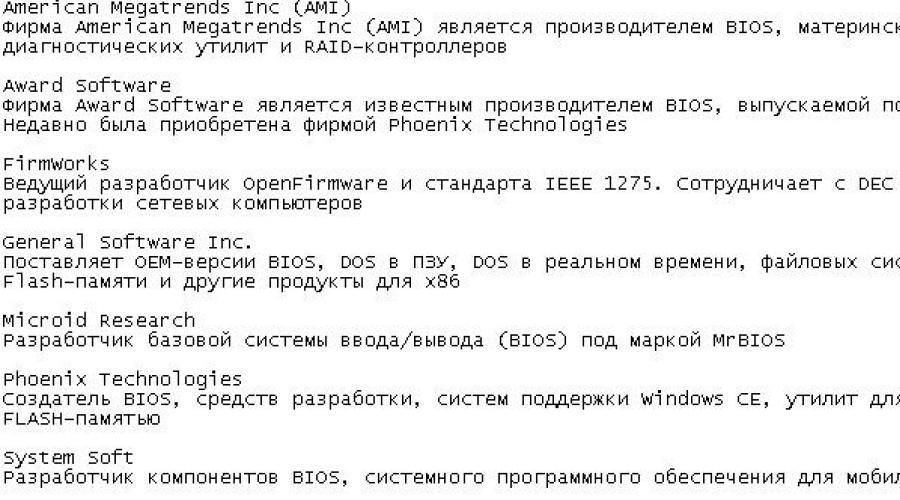
Currently, there are 3 main types of BIOS, differing by manufacturer.
1.AMI BIOS
American Megatrends inc. - This is probably the oldest developer. AMI BIOS was running back in my childhood on ancient 286 and 386 computers. Then, for some time, this species disappeared. But in recent years it has reappeared, and AMI is the most common type of BIOS on ASUS, MSI, and Lenovo laptops. Currently there are two main branches:
- version 2.XX. It looks like this:
This version of AMI BIOS differs from all others in the structure of the main menu and the gray-blue color scheme.
This branch is already externally and in its structure more reminiscent of the classic input-output system from AWARD.
2. Phoenix BIOS, aka Award
Previously, these were two different companies, each producing its own system. Avard's system has been the market leader for many years. But the Phoenix BIOS was not particularly popular among motherboard manufacturers. But then interesting events happen - AWARD Software was purchased by Phoenix. Now it is one company. Here are a few brands:
- Award BIOS
There are almost no differences between them - the interface is completely identical. There is, however, an exception - the Phoenix-Award version for laptops. She looks very similar to AMI:
Today, this type of BIOS is used on 90% of desktop computer motherboards.
Intel puts its own branded BIOS on its branded boards. Or rather, it’s not exactly theirs - it’s a modified version of AMI. For some time, motherboards had the Intel/AMI 6.0 version, and later, when it was even more significantly redesigned, the options were changed and the interface was redesigned - this type of BIOS began to be called Intel.
The latest versions generally became visually more similar to UEFI and were called “Intel Visual BIOS”:
4.UEFI
I'll start, perhaps, with the most modern type of BIOS - UEFI (Unified Extensible Firmware Interface). This is not even a variety, but an heir or successor, as you prefer to call it. UEFI is the next step in BIOS development. Now, in fact, it is no longer just an input-output system - it is more like an operating system, both externally and internally.
Finally added mouse support! Among the key features are an extensible set of capabilities, a pleasant visual interface, the ability to securely boot “Secure Boot”, ease of updating the firmware, and fast loading of the operating system.
In this guide you can find descriptions of different BIOS settings in pictures, because it is the complexity or simply the fear of this firmware that prevents many from installing Windows on their own.
An example would be setting up the ASUS BIOS of the P5QL SE motherboard.

What is BIOS
BIOS is a special program written on the motherboard chip. This is where all system settings are stored. This microcircuit can be classified as a volatile memory device, but at the same time it remains a permanent memory device. You might think that when you turn off the power to the PC, all the settings stored in the BIOS will be lost, but this is not the case, because the BIOS has its own power source - a battery, which is also installed in the motherboard. The main task of the BIOS is to identify all connected devices to the computer (video card, processor, RAM, etc.), check their functionality, and start them with certain parameters, after which the BIOS transfers control to the operating system bootloader. Thus, the BIOS is the basic input/output subsystem, and an intermediary between the computer hardware and the operating system, i.e. The BIOS allows devices to communicate with each other and with the operating system.
There are currently several versions of BIOS, the most popular of which are the Phoenix Award BIOS and the American Megatrends (AMI) BIOS. To configure your BIOS, if you have never done this before, then it is better to find out the version and model of your BIOS and look up the configuration details on the Internet. This article describes BIOS AMI setup.
What should I do to open the BIOS settings menu?
Immediately after turning on the PC, the BIOS starts loading first. After quickly loading, it begins to perform the POST procedure, with the help of which it queries all connected devices for functionality and readiness for use. If all connected devices are ready for use and are working normally, a short beep will sound from the speaker located in the BIOS. After this short signal, you should quickly press the “del” or “F10” key on your keyboard. If you do not hear the signal, for some reason, then you can press these keys while various data will be displayed on the screen on a black background, which are the result of the POST being carried out to ensure that the devices are ready. To be sure that you will get into the BIOS, you can press the keys many times, immediately after the computer starts to turn on. If, when you turn on the computer, you hear, instead of the usual short BIOS signal, a signal that is longer or repeated, then during the POST procedure, it turned out that one or more connected devices are not working correctly or have failed.
Once you have successfully entered the BIOS settings window, in BIOS AMI 02.61 (and many other AMI versions), you will see:
MAIN section

In this section, you will be given the opportunity to independently configure the system time and date, as well as configure connected hard drives and other storage devices. Typically, the BIOS will automatically detect all connected devices, so you won't need to enable them manually here, but you can change some settings when they are automatically enabled. To do this, select the hard drive or other drive you need and press “Enter” on the keyboard. After this, you will be taken to the settings menu for the selected drive. In our case, we see all the information about the hard drive connected to the first channel. If no device is connected to the channel, then we see the message “Not Detected”.
Once in the hard drive settings, to make your settings, you should change the “Type” parameter from Auto to User.
LBA/LargeMode– this parameter is responsible for supporting drives with a capacity of more than 504 MB. Thus, it is advisable to select AUTO here.
Block (Multi-Sector Transfer)– using this parameter, you can disable the transfer of data from several sectors at the same time, 512 bytes each, i.e., by disabling this parameter, the speed of the hard drive will sharply decrease, because only 1 sector equal to 512 bytes will be transferred at a time. For faster operation, it is better to set the AUTO mode.
PIO Mode – Using this parameter, you can force the hard drive to operate in legacy data exchange mode. Automatically, modern hard drives operate in the fastest mode, therefore, it is also better to set the value to AUTO here.
DMA Mode direct memory access. To achieve higher read/write speed, you should leave it at AUTO.
SMART Monitoring – Using this technology, you can monitor the status of your hard drive. In other words, it is a technology of self-observation, reporting and analysis. It is also better to set the value to AUTO.
32 Bit Transfer– if the value is Enabled, then data transmitted via the PCI bus will be transmitted in 32-bit mode. If this option is disabled, then in 16-bit.

SystemInformation
In the MAIN section, you can also find out some information about the system. To do this, select System Information in this section. In the window that opens, you will see the BIOS version and its production date, and there is also information about the processor and system memory.

StorageConfiguration
By selecting Storage Configuration in the MAIN section, we will go to the disk subsystem settings. Here, by changing the SATA Configuration parameters, we can disable the SATA controller, which is soldered into the motherboard, by selecting the Disabled option. By selecting Enhanced mode, the system will operate in the normal mode familiar to all modern operating systems. Finally, by selecting Compatible mode, the disk subsystem will operate in compatibility mode with legacy operating systems. (Windows 98.95, Me)
Configure SATA as. By changing this parameter, you can select IDE mode, using which you will see all connected drives as IDE devices, or you can select AHCI mode, which is supported by most modern operating systems. Choosing AHCI will allow you to use modern technologies such as Plug-in-Play.
Hard Disk Write Protect And SATA Detect Time out. The main purpose of these parameters is to protect disks from writing, i.e. It is better to leave the Hard Disk Write Protect option in Disabled mode. By changing the SATA Detect Time out parameter, you can change the time that the computer will spend searching for the disk subsystem when turned on. Accordingly, by setting a shorter time, the loading will be faster, but you don’t need to reduce it much, but rather, on the contrary, increase it a little or leave it at default, because with a short time, the disks simply may not have time to be detected by the system during the POST procedure.

Advanced section

By selecting the JumperFree Configuration item in this section, we find ourselves in the Configure System Frequency/Voltage section.
Configure System Frequency/Voltage
A.I.Overclocking By selecting the AUTO mode in this parameter, you can automatically overclock the processor, but if you select the Manual mode here, then the settings for overclocking the processor can be made manually.
DRAMFrequency This parameter allows you to set the memory bus frequency regardless of the processor bus frequency.
Memory Voltage and NB Voltage– these parameters allow you to manually adjust the supply voltage of memory modules and set the voltage of the system chipset.

By going from the Advanced section to CPU Configuration, a window will open Configure Advanced CPU Settings. In this section, you can change all settings related to the central processor, you can also monitor its operation and find out all the information about the central processor.

OnboardDevicesConfiguration
Here are the parameters that affect the operation of the built-in controllers and ports. For example, by changing the Onboard LAN values, we can disable or, conversely, enable the built-in network adapter.
Serial Port Address – allows you to assign one of the assigned addresses to the COM port and an interrupt number, which will be subsequently used by the operating system.
Parallel Port Address- assigns one of the assigned addresses to the LPT port, which will be used by the operating system in the future.
Parallel Port Mode- indicates the BIOS in which mode the computer's parallel port should operate.
Also in this section you can assign addresses to other ports.

USB Configuration
In this section you can make changes to the operation of the USB serial interface. Here you can also completely disable all USB connectors on your computer.

POWER section (power settings)
In the Power section, you can configure power-saving features and the power-on/shutdown pattern of your computer.
ACPI - Advanced Configuration and Power Interface - this advanced power management interface.

By going to the Hardware Monitor item, we will find all the information about the temperature of our processor or the speed of the fans. Also here you can find out information from all other computer sensors and make changes to some parameters of the power supply.

Boot section (boot options)
In this section you can make changes to the download parameters.

Let's go to the section Boot Device Priority.
Here we have the opportunity to configure which drive we will boot first. Thus, the figure shows that first of all we load information from the hard drive, i.e. When you turn on the computer, the operating system will start loading from the hard drive.

These parameters are not difficult to change, and from the next figure we see that information from the connected drive will begin to be loaded first. These settings should be changed if you are using a portable version of the operating system or when reinstalling the OS.

HardDiskDrivers
This option will allow you to change the hard drive from which the operating system will initially boot.
This option should be used when your computer has multiple hard drives.

Boot Setting Configuration (Boot)
This is a section that contains settings that affect the operating system boot process, keyboard and mouse initialization, error handling, etc.
Quick Boot– an option, by activating which, every time you turn on the computer, the BIOS will conduct a RAM test, which will lead to faster loading of the operating system.
Full Screen Logo– by activating this option, every time you restart the computer, a graphic image will be displayed on the monitor, instead of text information, on which you can see information about the processor, video card, RAM and other PC components.
AddOnROMDisplayMode – an option that determines the order in which information about devices that are connected via expansion cards and have their own BIOS appears on the screen.
Bootup Num-Lock– an option that determines what state the “Num Lock” key should be in when turning on the PC
WaitFor'F1′IfError– enabling this option will force the user to press the “F1” key if an error is detected at the initial stage of loading the PC.
Hit ‘DEL’ Message Display– an option that controls the appearance (or hiding) of an inscription on the screen that indicates which key should be pressed to open the BIOS settings window. It is no secret to many users that in order to get into the BIOS, you must press the “del” key, so this function can be disabled.

Security Setting– protection settings.
Supervisor Password– this function allows you to change, delete, or set a new administrator password for accessing the BIOS.
UserPassword - This function allows you to change the password, create a new one or delete it, only for ordinary users.
The difference between these functions is that by logging into the BIOS using a user password, you will only have the ability to view all the settings installed there without making any changes, but if you log into the BIOS as an administrator, then you will have access to change all BIOS parameters .
When you press the “del” key after starting the computer to get into the BIOS, each time a window will pop up asking you to enter a password.

Tools section
ASUS EZ Flash – Using this option, you have the opportunity to update the BIOS from such drives as: floppy disk, Flash disk or CD.
A.I.NET– using this option, you can obtain information about the cable connected to the network controller.

Exit section
Exit &SaveChanges (F10) – used to exit the BIOS while saving all changes made.
Exit &DiscardChanges- exit with the cancellation of all changes made.
DiscardChanges– cancels all changes made.
LoadSetupDefaults– setting default values.

That's all in general terms. After you read this BIOS guide, you can set up your computer, be able to configure the BIOS to install Windows, enable or disable built-in devices such as audio or network card without any help. By the way, do not forget to read about the new version of BIOS UEFI, it will soon be installed in all modern motherboards.
BIOS is a system program that is built into the computer chips. It ensures normal startup of the PC and system. In this article I will talk about how to configure the BIOS for installing Windows. These instructions are suitable for any operating systems.
Here I will only talk about how to install Windows from two types of BIOS - AMI and AWARD (Phoenix). These versions are the most common, but there are others. If you need to configure a BIOS version that I have not talked about, then write to me and I will create a separate article for you with instructions or add to this one.
But enough words, it's time to get down to business.
In order to configure the BIOS for installing Windows, you need to get into it. As a rule, entering the BIOS is done using the same method regardless of the version. To do this, you need to restart the computer and click on the desired button while it boots.
In order to find out which button should be pressed to enter the BIOS, you need to pay attention to the inscription that appears after turning on the PC - Press “key” to enter SETUP (where the “key” is the same button that enters the BIOS ).
The following keys can usually be used to enter the BIOS: esc, del, ctr+alt+esc, F1, F2, F3, F10. I repeat – what exactly to press will be written in the message when you turn on the computer. You should press the key while this message is displayed; it is recommended to press periodically, every 3-5 seconds.
If you couldn’t get into the BIOS right away, don’t despair. Reboot again and try again. It will definitely work.
If we are installing Windows from the BIOS, then before setting it up it is necessary that there is a disk with the distribution in the drive or that a bootable USB flash drive is connected.
Installing Windows with AMI BIOS
With AMI BIOS, Windows installation begins by going to the “Boot” tab. To do this, you need to move the cursor using the arrow keys on your keyboard. The mouse does not work in BIOS.
Here you need to select the device from which the installation will be carried out: “CD-ROM drive” if from a CD or some USB device if Windows is installed via a flash drive. It should appear in the list when the bootable USB flash drive is connected.
When a device is selected, it must be moved to the first place. This is done using the “+” key on the keyboard.
Now you need to save the AMI BIOS settings for installing Windows. To do this, press the F10 key, agree with the message by pressing the “Y” key, and then press “Enter”. The computer will restart and boot from the specified device will begin.
Installing Windows with Award BIOS
Award, aka Phoenix BIOS, is also controlled by the keyboard arrows. In order to configure the Phoenix BIOS for installing Windows, you must select the Advanced bios Features item.
Then in the First Boot Device line you need to select the CDROM item if you are using a CD or USB device to boot, if Windows will be installed via a bootable USB flash drive.
In order for Award Bios to install Windows from the selected device, you must save. To do this, press F10, then “Y” for consent, and “Enter”. The computer will exit the BIOS and begin booting from the desired device.
How to set the BIOS to default
If suddenly you did something wrong in the options, and the computer began to work worse or does not work at all, then set the BIOS settings to default. Any version has such a button.
Often PC users are forced to delve into the BIOS settings. Many questions and problems arise here, since various motherboards have built-in different types of BIOS. The menu items differ in name and location, but generally perform similar functions.
Their own type of BIOS is integrated by the motherboard developers themselves or by third-party companies that have entered into an agreement with the manufacturers. Third party companies dominate the market.
There are three main types of BIOS:
- AWARD
Let’s look at these types and take a closer look at the interface and distinctive features.
AWARD BIOS:
Is a leader in this field. Back in 1998, Award Software was purchased by Phoenix, but the BIOS is still labeled as Award.
Traditionally, the base system shell has a blue (gray) background with English menu items. The interface is different in different versions.
For example, in version 4.51 PG the navigation is visually divided into two vertical sections. At the very bottom are the control keys.
If we consider version 6.0, then surprisingly the appearance looks different. Gray color scheme predominates. Menu items differ in name. The main sections are arranged horizontally. The column on the right contains brief background information.
Takes an honorable second place. It is the property of American Megatrends Incorporated, hence the acronym AMI. In all respects there is a noticeable similarity with AWARD BIOS. The names and locations of the main sections are the same, but not always.
The presence or absence of BIOS options primarily depends on the manufacturer of the motherboard and its functions. Therefore, it is impossible to unambiguously identify specific features of AMI. Also, different versions have different interfaces.
Appearance of BIOS versions 2.5x(2.6x)

This is what BIOS 3.31 looks like

UEFI BIOS:
The third type of BIOS is a truly modern technology. It has a graphical interface, somewhat reminiscent of an operating system.
The menu is made in the form of pictures with inscriptions. Without knowing English, you can intuitively guess what this or that section is responsible for.

Has a big advantage over older types. As you know, a traditional BIOS, due to its functional limitations, can see no more than 2 TB. UEFI breaks the limits as there are virtually no capacity restrictions.
The new software boasts a rich set of system utilities. It is possible to backup data or optimize RAM performance. The following features should be highlighted:
- User-friendly interface;
- Ability to control the mouse;
- Expanding functionality by adding new utilities;
- Update via Internet;
Of course there are many more advantages. Large manufacturers have already begun the transition to a new type of BIOS. UEFI technology has proven itself only from the best side, it is not for nothing that such giants as Intel and Microsoft became interested in it.
How to find out the type and version of Bios
There are times when you need to find out the current BIOS version. This can be done in the operating system Windows 7, XP. To do this, click “start” - “all programs” - “standard” - “utility” - “system information”. In the window that opens, find and read the “BIOS version” item.
Another common method is when you turn on the PC before loading the operating system, when the hardware is checked, below you can see what BIOS you have. Read the post on how to find out the BIOS version.
At its core, there is no big difference between AMI and AWARD. They perform the same function; the distinctive differences were discussed above. Particular attention should be paid to UEFI, since this type of BIOS is a new technology with high functionality.