Where to enable ahci. Enabling AHCI hard drive mode without reinstalling Windows. Features of activating AHCI mode in different versions of Windows
Read also
In order to get a fast computer, sometimes it is not enough to simply buy a solid-state SSD drive and install the system on it. In some cases, additional fine-tuning of the operating system and computer BIOS is required. One of these tweaks is the inclusion of AHCI mode, which is necessary for the correct operation of some functions.
What is AHCI mode? Advanced Host Controller Interface is a special technology that is used in the Serial ATA protocol through which the PC hard drive is connected. It allows you to use certain advanced functions that are essential for the correct and fast operation of solid-state drives. For example, NCQ (Native Command Queuing), which makes it work much faster.
How to switch the controller to AHCI mode?! The current operating mode of the SATA controller is changed in the parameters of the Basic I/O System. To do this, you need to go into the BIOS or UEFI when you boot your computer. Depending on the system version, the SATA controller configuration parameters in the BIOS may be located in the “Integrated Periferals” section:
Or in the “Main”>>”Storage Configuration” section.
In UEFI BIOS everything is almost the same. You need to find the SATA Controller configuration section either in the main settings:
Or in extended mode - “Advanced Mode”.
Among the three available modes you must choose AHCI mode. All that remains is to save the configuration settings and restart your computer or laptop.
Enabling AHCI on Windows 10
If you want to change the operating mode of the controller on an already installed Windows operating system, then you also need to set a couple of parameters in it. To do this, you need to call the Windows Registry Editor and open the branch:
HKEY_LOCAL_MACHINE\SYSTEM\CurrentControlSet\Services\storahci
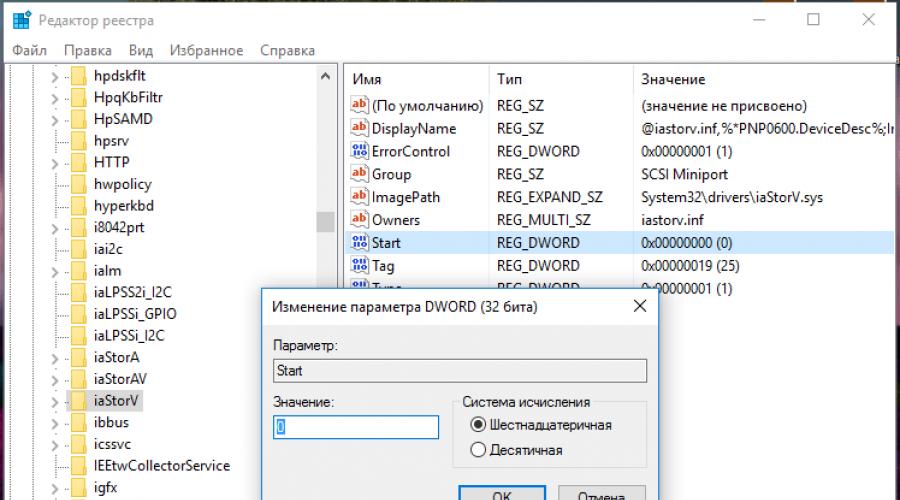
In it you need to double-click on the parameter Start to open its properties for modification:
Set the parameter to “0” and click on the OK button.
Next, open the thread:
HKEY_LOCAL_MACHINE\SYSTEM\CurrentControlSet\Services\iaStorV
There should also be a parameter here Start:
It also needs to be set to “0”.
Close the registry editor and restart your computer or laptop so that the AHCI mode works.
Note: If you are still using the old Windows 7, then enabling AHCI is not done using the “msahci” registry branch instead of “storahci”. Otherwise, everything is exactly the same.
If you installed Windows 10, with the disk controller set to IDE in bios, you can't switch it to AHCI, Windows 10 will not work correctly. After you change the controller mode in the BIOS, Windows 10 will no longer be available. To avoid this, you must follow the instructions in this article.
How to switch from IDE mode to AHCI in Windows 10
This operation is very simple and does not involve editing the registry or other complex tasks. You must do the following.
Need to download " Windows 10 in safe mode" as described in the following, or use any other method to boot into failsafe mode:
- Start Windows 10 in Safe Mode
- Without waiting for the system to boot, press another key to enter BIOS your computer - F2, F10, Del. Find in settings and change disk controller mode from IDE on AHCI.
- Save your BIOS settings and continue booting Windows 10 into Safe Mode.
- After Windows 10 starts in safe mode, restart your computer and start it normally. The system should boot without any problems and is already in AHCI.
To increase the performance of hard drives and SSDs, a special one is used. It has many useful functions, such as hot disconnection and connection of disks, NCQ and more. In the previous article we looked at how to enable it through the registry in the Windows 10 operating system.
If you are just reinstalling the system, and your BIOS is set to IDE mode, then it is recommended to change it to AHCI. In modern laptops and computers, this mode is usually enabled by default; if you use, then using AHCI is only a plus.
Beginners should take this manual very seriously, as unnecessary actions and inattention may result in the system not starting. You must be able to use BIOS and UEFI and be able to fix problems that arise due to your fault.
Before starting the process, you need to find out whether AHCI mode is enabled; you may not need this article right now. You can view it in the BIOS or from Windows.
Go to Device Manager (you can get there by right-clicking the Start menu) and open the tab "IDE ATA/ATAPI Controllers", if there is the word AHCI, then the mode is enabled, if IDE, then this mode is used.
So, if AHCI is not active, then let's proceed to enable it.
How to enable AHCI on Windows 10 through the registry?
We launch, to do this, press the hot keys Win + R and enter the command regedit .
As in the previous article, we need to go to the iaStorV section: HKEY_LOCAL_MACHINE\SYSTEM\CurrentControlSet\Services\iaStorV. On the right side of the window, find the Start option and double-click on it. Change the value to 0, click OK.

In the Services section, find the section iaStorAV open it, there should be a section StartOverride. On the right, find parameter 0, double-click on it and change the value to 0.

We are looking in the section Services chapter storahci, in which the value of the Start parameter is changed to 0.

Finishing touch. There should be a section in the storahci section StartOverride, we change the value of parameter 0 to 0.

You can close the Registry Editor. Restart your computer and enter the BIOS. It’s better, of course, to do it. This can be done if you open the Run window and enter the command msconfig, where go to the “Boot” tab and check the “Safe Mode” checkbox.

When you go to the BIOS you need to find the SATA parameters and select AHCI mode there.
As soon as you save the changes and exit the BIOS, the driver installation will begin. The computer needs to be restarted again.
Good day.
Quite often I am asked about how to change the AHCI to IDE parameter in the BIOS of a laptop (computer). Most often they encounter this when they want to:
Check your computer's hard drive with Victoria (or similar). By the way, such questions were in one of my articles: ;
Install “old” Windows XP on a relatively new laptop (if you don’t switch the parameter, the laptop simply won’t see your installation distribution).
So, in this article I want to look at this issue in more detail...
Difference between AHCI and IDE, mode selection
IDE is an outdated 40-pin connector that was previously used to connect hard drives, floppy drives, and other devices. Today, this connector is not used in modern computers and laptops. This means that its popularity is falling and it is necessary to use this mode only in certain rare cases (for example, if you decide to install the old Windows XP OS).

The IDE connector has been replaced by SATA, which is superior to IDE due to its increased speed. AHCI is an operating mode for SATA devices (for example, disks) that ensures their normal functioning.
What to choose?
It is better to choose AHCI (if you have such an option. On modern PCs it is everywhere...). You need to choose an IDE only in specific cases, for example, if SATA drivers are not “added” to your Windows OS.
And by choosing the IDE mode, you seem to be “forcing” a modern computer to emulate its operation, and this certainly does not lead to an increase in productivity. Moreover, if we are talking about a modern SSD drive, when using it, you will get a speed gain only on AHCI and only on SATA II/III. In other cases, you don’t have to bother installing it...

You can read about how to find out what mode your disk is operating in in this article:
How to switch AHCI to IDE (using the example of a TOSHIBA laptop)
For example, I’ll take a more or less modern laptop brand TOSHIBA L745 ( By the way, in many other laptops the BIOS settings will be similar!).
To enable IDE mode in it, you need to do the following:
1) Go to the laptop BIOS (how this is done is described in my previous article:).
3) Then, in the Advanced tab, go to the System Configuration menu (screenshot below).
4) In the Sata Controller Mode tab, change the AHCI parameter to Compatibility (screen below). By the way, you may have to switch UEFI Boot to CSM Boot mode in the same section (in order for the Sata Controller Mode tab to appear).
Actually, it is the Compatibility mode that is similar to the IDE mode on Toshiba (and some other brands) laptops. You don’t have to look for the IDE lines - you won’t find it!
Important! On some laptops (for example, HP, Sony, etc.), IDE mode cannot be enabled at all, since manufacturers have greatly reduced the functionality of the device BIOS. In this case, you will not be able to install old Windows on your laptop ( however, I don’t quite understand why to do this - after all, the manufacturer doesn’t release drivers for old OS anyway...).
If you take an “older” laptop (for example, some Acer) - then, as a rule, switching is even simpler: just go to the Main tab and you will see Sata Mode in which there will be two modes: IDE and AHCI (just select the one you need, save the BIOS settings and restart the computer).
This concludes the article, I hope that you can easily switch one parameter to another. Good luck!
Greetings to all readers of my blog and this is Denis Trishkin again.
There are many tools to increase the operating system speed. And one of them is improving the processing of information on the hard drive - Advanced Host Controller Interface technology. But how to enable AHCI mode in Windows 7? In this article I will share this information with you.
So, it’s worth starting by getting to know the technology itself. Advanced Host Controller Interface is a standard proposed by Intel Corporation that allows you to significantly increase the speed of reading and writing information from a hard drive. True, this is only provided for hard drives connected via a SATA connector. So, if your equipment has just such an interface, and the motherboard allows the corresponding technology to work, you can increase the speed of your computer.
It should be noted that the latest versions of Windows already have built-in automatic support for this technology. Therefore, during installation of the operating system, the driver appears independently. Older motherboards that provide AHCI, this mode is blocked in the BIOS.
Inclusion( )
There are several ways to enable the system we need.
Convert to AHCI in BIOS before reinstalling Windows. The fact is that if for some reason you decide to reload the operating system on your device, then it is at this moment that you can take all the necessary actions.


Of course, this is only possible if two conditions are met:
SATA connector for hard drive;
The motherboard allows you to connect the function.
So, when we launch the BIOS to set the system startup priority, we do not immediately exit it:

This procedure can be done while your system is in fully running mode. But then you will see that it will not load and will most likely show a blue screen of death.
The option involves enabling the desired function without reinstalling the operating system.
To do this, we need to make all changes in the registry:

As a result, the operating system will have to install the driver and reboot on its own. After this, everything should work as we want.