Bootable Windows 10 USB flash drive using winsetupfromusb. Instructions for using WinSetupFromUSB - Full description. Preparation and characteristics of the flash drive
Read also
You can install Windows 10 from any media that has the Windows installation program on it. The storage medium can be a USB flash drive that meets the parameters described below in the article. You can turn a regular flash drive into an installation drive using third-party programs or the official application from Microsoft.
Preparation and characteristics of the flash drive
The flash drive you use must be completely empty and work in a certain format; we will achieve this by formatting it. The minimum size to create a bootable flash drive is 4 GB. You can use the created installation media as many times as you like, that is, you can install Windows 10 on several computers from one flash drive. Of course, you will need a separate license key for each of them.
Preparing a flash drive
The flash drive you choose must be formatted before you begin placing the installation software on it:
Second formatting method
There is another way to format a flash drive - through the command line. Expand the command prompt using administrator rights, and then run the following commands:
- Enter one by one: diskpart and list disk to see all the disks available on the PC.
- To select a disk, write: select disk No., where No. is the disk number specified in the list.
- clean.
- create partition primary.
- select partition 1.
- active.
- format fs=FAT32 QUICK.
- assign.
- exit.
Obtaining an ISO image of the operating system
There are several ways to create installation media, some of which will require an ISO image of the system. You can download the hacked build at your own risk from one of the sites that distribute Windows 10 for free, or get the official version of the OS from the Microsoft website:
- https://www.microsoft.com/ru-ru/software-download/windows10).
- Select OS language, version and bit depth. You should choose the version based on your needs. If you are an average user who does not work with Windows at a professional or corporate level, then install the home version; there is no point in taking more sophisticated options. The bit depth is set to the one supported by your processor. If it is dual-core, then choose the 64x format; if it is single-core, then choose 32x.
- When prompted to select media, check the ISO file option.
- Specify where to save the system image. Done, the flash drive is prepared, the image is created, you can start creating the installation media.
Creating installation media from a USB flash drive
The easiest method can be used if your computer supports UEFI mode - a newer BIOS version. Typically, if the BIOS opens as a menu, then it supports UEFI. You can also find out whether your motherboard supports this mode or not on the website of the company that made it.
- Insert the USB flash drive into the computer and only then start rebooting it.
- As soon as the computer turns off and the startup process begins, you need to enter the BIOS. Most often, the Delete key is used for this, but other options are possible, depending on the model of motherboard installed on your PC. When the time comes to enter the BIOS, a prompt with hot keys will appear at the bottom of the screen.
- Change the boot order: by default, the computer starts from the hard drive if it finds the OS on it, but you must install your UEFI: USB flash drive first. If the flash drive is displayed, but there is no UEFI signature, then this mode is not supported by your computer and this installation method is not suitable.
- Save the changes you made to the BIOS and start your computer. If everything is done correctly, the OS installation process will begin.
If it turns out that your board is not suitable for installation via UEFI mode, then use one of the methods below to create universal installation media.
Media Creation Tool
You can also create Windows installation media using the official Media Creation Tool.
- Go to the official Windows 10 page and download the installation program from Microsoft from it (https://www.microsoft.com/ru-ru/software-download/windows10).
- Run the downloaded program, read and agree to the standard license agreement.
- Select the option to create installation media.
- As described earlier, select the OS language, version and bit depth.
- When prompted to select media, indicate that you want to use a USB device.
- If several flash drives are connected to your computer, select the one you prepared in advance.
- Wait until the program automatically creates installation media from your flash drive. After this, you will need to change the boot method in the BIOS (put the installation flash drive in the first place in the “Boot” section) and proceed to install the OS.
Using unofficial programs
There are many third-party programs that create installation media. They all work according to the same scenario: they write a Windows image that you created in advance onto a flash drive so that it turns into bootable media. Let's look at the most popular, free and convenient applications.
Rufus
Rufus is a free program for creating bootable USB drives. It runs on Windows operating systems starting with Windows XP SP2.
- Download and install the program from the developer’s official website: http://rufus.akeo.ie/?locale.
- All program functions fit in one window. Specify the device to which the image will be written.
- In the “File system” line, specify the FAT32 format, since this is what we formatted the flash drive in.
- In the system interface type, set the option for computers with BIOS and UEFI if you are sure that your computer does not support UEFI mode.
- Specify the location of the pre-built system image and select a standard Windows installation.
- Click on the “Start” button to start the installation media creation process. Done, after completing the procedure, change the boot method in the BIOS (in the “Boot” section you need to put the flash card in first place) and proceed to install the OS.
Ultra ISO
UltraISO is a very multifunctional program that allows you to create and work with images.
- Buy or download a trial version, which is quite enough to complete our task, from the official website of the developer: https://ezbsystems.com/ultraiso/.
- While in the main menu of the program, expand the “File” menu.
- Select “Open” and specify the location of the pre-created image.
- Select "Burn Hard Disk Image".
- Specify which flash drive you want to use.
- Leave the recording method as USB-HDD.
- Click on the “Record” button and wait for the process to complete. After completing the procedure, change the boot method in the BIOS (put the installation flash drive in the first place in the “Boot” section) and proceed to installing the OS.
WinSetupFromUSB
WinSetupFromUSB is a utility for creating a bootable USB flash drive with the ability to install Windows, starting with version XP.

Is it possible to use MicroSD instead of a USB flash drive?
The answer is yes, you can. The process of creating an installation MicroSD is no different from the same process with a USB flash drive. The only thing is that you must make sure that your computer has a suitable MicroSD port. To create this type of installation media, it is better to use third-party programs described above in the article, rather than the official Microsoft utility, as it may not recognize MicroSD.
Errors during creation of the installation flash drive
The installation media creation process may be interrupted for the following reasons:
- There is not enough memory on the drive - less than 4 GB. Find a flash drive with more memory and try again,
- The flash drive is not formatted or formatted in the wrong format. Go through the formatting process again, carefully following the instructions above,
- The Windows image recorded on the USB flash drive is damaged. Download another image, it is best to take it from the official Microsoft website,
- if one of the methods described above does not work in your case, then use another option. If none of them work, then the problem is with the flash drive and should be replaced.
Video: creating an installation flash drive with Windows 10
Creating installation media is an easy process and is mostly done automatically. If you use a working flash drive, a high-quality system image and use the instructions correctly, then everything will work out, and after restarting the computer you can begin installing Windows 10. If after installation is complete you want to save the installation flash drive, then do not move any files to it, then can be used again.
More than five years have passed since I published the article ““ on the blog. Then I talked in detail about the process of creating a bootable USB flash drive using a utility for the subsequent installation of the Windows XP, Vista or Seven operating system from it.
Much has changed since then: the program itself has been updated several times; and now the process of creating a bootable USB flash drive has become much easier. And most importantly, the new Windows 10 operating system has been released.
To prepare Bootable USB flash drive for installation on a Windows 10 computer, you just need to do a few steps:
First, find and download it on the Internet. Windows 10 OS as an image. I think you already know where exactly to download Windows. By the way, you don’t have to look for it on torrents– today Windows 10 can be downloaded absolutely legally on the official Microsoft website.
Then insert your flash drive into the computer (in my case Silicon Power flash drive on 16 GB defined in the system as drive K).
After that, download the program from the official website (or from Yandex.Disk).
Run the downloaded file. Unpack the archive into the same folder by clicking the button Extract: Open the folder that appears:
If you record to a flash drive Windows 10 64-bit, then run the file WinSetupFromUSB_1-8_ x64.exe (if you have a 32-bit version of Windows, then run another file accordingly: WinSetupFromUSB_1-8.exe): 
The main program window will open. We check that our flash drive is selected in the top line (in my case drive K).
Then check the box Auto format it with FBinst
and a marker in the paragraph FAT32. We leave everything else here as default: 
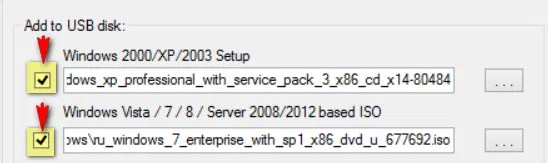
Just below we put a checkmark in the line Windows Vista / 7 / 8 / 10 /Server 2008/2012 based ISO
and click on the button to the right of it: 
We find the downloaded image with Windows 10 on our computer - select it and click the “Open” button: 
After this, click the “ button in the main program window GO”:
We will be warned twice that all data on the flash drive will be deleted (if it was there) - in both windows we press the “ button Yes”:

The process of copying Windows installation files to the USB flash drive will begin:

Upon completion, a window will appear with the inscription “ Job done" Click “OK” there.
The bootable USB flash drive for installing Windows 10 is ready! Now we insert it into the computer on which we are going to install the system. In Bios we set our flash drive as the first boot device (I already told you how to do this). Next, the Windows installation process proceeds as usual.
Everyone knows that it is possible to reinstall the operating system or replace it with another distribution. But many don't know how to do this. And this is done through a bootable USB flash drive. The article will talk about the WinSetupFromUSB program: how to use it and what functions it has. It is this program that will help us create that same bootable USB flash drive, which we subsequently need to use to install a new operating system.
Where to download the program
Before we talk about WinSetupFromUSB and how to use it, it’s worth talking about where to download this program. Indeed, despite all the awareness about the correct downloading of applications from the Internet, the user often makes serious mistakes. Now let’s figure out exactly how and where to download the program.
By entering a search request for this program into the search engine, you will be given a bunch of links to choose from where you can download it to your computer, but this does not mean that you need to do this from the first resource you come across. Firstly, most likely, on such a site you will be confused which Download button to press. Before you download WinSetupFromUSB, you may download a bunch of unnecessary programs. Secondly, the program itself may contain some kind of malware, and a bunch of useless ones will be installed along with it.

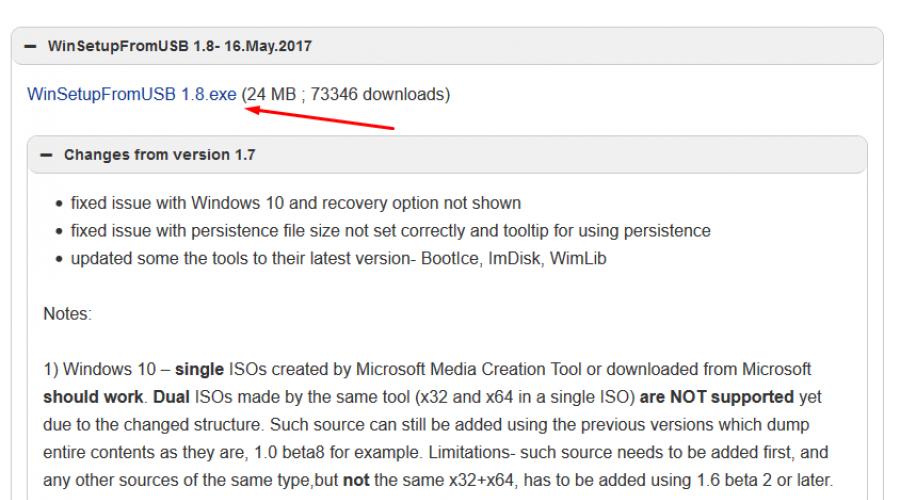
To prevent this from happening, it is recommended to download from the official developer website - www.winsetupfromusb.com/download. At the moment, the latest version is WinSetupFromUSB 1.6, dated November 28, 2015. This is exactly what we will consider.
Installation and launch
While talking about WinSetupFromUSB (how to use the program), you also need to tell us how to install it. The fact is that this process is slightly different from the more usual one using the installer. Now let's take a closer look.
By downloading the file from the official website, an archive containing program files will be downloaded to your computer. Once you launch it, a window will appear in which you can select a folder for unpacking, start the process, or cancel all actions. Everything is simple here. In the Extract to line, specify the path to download the files. In order not to enter it manually, you can use the "..." button, which is located to the right.
Once you have selected a folder, you can safely click on the Extract button. After this, the unpacking process will begin. It won't last long. After that, by going to the folder you specified, you should find a new one named WinSetupFromUSB-1-6. Enter it. The WinSetupFromUSB program is launched by opening one of the files attached to this folder. If you have a 64-bit system, then run the one with this number after the name; if you have a 32-bit, then without the marking.
Creating a bootable USB flash drive
We have already explained where to download the program from and how to install it. Continuing the conversation about WinSetupFromUSB, instructions for creating a bootable USB flash drive will be provided right now.
To get started, you will need to have only two things with you - the flash card itself and an image of the downloaded operating system from the Internet. Make sure the extension is ISO. If you have this, then we can get started.

- First of all, insert the flash card into the computer. In the program window, select its name. If the flash drive is not found, try updating the information by clicking the Refresh button.
- Now we need to determine the operating system that will be written to this flash drive. To do this, check the box next to the appropriate version of the distribution and, by clicking the "..." button, specify the path to the downloaded ISO image.
- All that remains is to press the GO button to start recording the WinSetupFromUSB bootable flash drive.
We figured out how to burn a flash drive, now let’s move on to the special function that this program provides.
Creating a multiboot flash drive
We continue to talk about WinSetupFromUSB. You already know how to use this program, but I would like to tell you about some of its features and functions. We'll start by creating a multiboot flash drive. Let's describe the process itself and tell you what it is.
As you may have already noticed, in the Add to USB disk column, there are several checkboxes that can be checked; accordingly, it is possible to select several operating system images at once. This function is quite functional and involves creating a multiboot flash drive. After recording it, when installing the OS, you will be given a choice of which OS you will work with in the future.
Working with various distributions
I would also like to talk about the choice of items in this menu. There are five options. Now let's talk about each one separately.
- Windows 2000/XP/2003 Setup. In WinSetupFromUSB Windows can be written starting from version 2000. To do this, you need to specify the folder in which the Windows distribution itself is located. But since most often you can only find an ISO image of the system on the Internet, you can use some tricks. Using the Daemon Tools program, mount the image and specify its letter. Or use an archiver to extract all files from the ISO image.
- Windows Vista/7/8/10/Server 2008/2012 based ISO. Everything is simple here. This item must be selected if you want to record one of the listed versions of Windows. To do this, you need to specify the path to the downloaded ISO image of one of the distributions.
- UBCD4Win/WinBuilder/Windows FLPC/Bart PE. This item is intended for boot disks based on WinPE. In this case, you will need to specify the path to the folder where the folder called I386 is located.
- LinuxISO/Other Grub4dos compatible ISO. This item is needed if you want to install Linux distributions. In addition, by selecting it, you can burn a number of programs such as Kaspersky Rescue Disk, RBCD, Hiren's Boot. To start recording, you need to specify the path to the ISO file.
- SysLinux bootsector/Linux distribution using SysLinux/IsoLinux. Also necessary for recording Linux distributions, but for those that are installed using the syslinux boot loader. To start recording, you need to specify the path to the folder, which contains a folder called SYSLINUX.
Having dealt with all the components of this category, you can safely select distributions and start recording them on a flash drive.
Additional options
You might also notice three options just below: Advanced options, Test in QEMU and Show Log. Let's also talk about them in a little more detail.

- Advanced options. The most extensive option. Its essence is to make some adjustments to the process of writing to a flash drive. By checking the box next to it, a window will appear in which you can mark a number of adjustments to be made. So, Custom menu names for Vista/7/8/Server Source will make sure that all OS menu item names are standard. And Prepare Windows 2000/XP/2003 to be installed on USB to properly prepare the selected distributions for recording.
- Test in QEMU. Everything is simple here. By checking this box, after finishing recording the flash drive, the program will check it for errors.
- Show Log. It's even easier here. A window will appear summarizing all your actions within the program after opening it.
As you can see, these three options can be very useful, so don't hesitate to use them.
The process of formatting a flash drive into a USB Flash Drive
Now let's talk about how to format a flash drive in the WinSetupFromUSB program. Instructions included.

- In the program window, in the USB disk selection and format tools column, click on the FBinst Tool button.
- In the window that appears, click on the Boot tab in the top panel. Select Format option from the menu.
- Now, in the window that appears, check the boxes next to zip and force. Then click the Format button.
- As you can see, a file called PartitionTable.pt will appear. You need to enter the program folder in Explorer and go to the files folder. Find the grub4dos file there. Use the mouse to drag it into the program window where PartitionTable.pt is located.
- Now on the top panel, click Fbinst Menu. You should see three lines: 1st - "default 0", 2nd - "timeout 0" and 3rd - "menu F1 grldr "grldr"". If this is not the case, then enter them manually.
- Press Ctrl+S to save changes.
That's all, you now know how to format a flash drive into a USB Flash Drive using the WinSetupFromUSB program.
Format conversion process
Now we will figure out how to convert the flash drive format to MBR. This operation should be done if the flash drive is very old. The fact is that in this case its format will be GPT, which will cause conflicts when installing the OS.

So, to carry out the conversion, you will need to click on the Bootice button, which is located next to the FBinst Tool. After clicking, a window will open. In it you need to go to the Physical Disk tab. On it you should see a number of buttons, among which should be Process MBR. By the way, if your flash drive already has this format, it will not be highlighted. As you might guess, to convert your flash drive to MBR, you will need to press this very button.
In the window that appears, select which MBR type you want and click the Current MBR Type button. That's it, your flash drive has now been transformed.
RMPrepUSB program
You may have found the RMPrep USB button next to the previous two buttons. If you are wondering why it is needed, then you will find out below in the text. But the list of its functions is so large that it will take an enormous amount of time to explain each of them, so we won’t go into detail.

By clicking on the button, a window will open in front of you. Please note that of the entire program, only this is in Russian. If this is not the case, you can change it in the upper right corner.
This program provides the following tools:
- recovering deleted data from a flash drive;
- changing or creating a new file system (you can select all known file systems that currently exist);
- unzipping files directly to a flash drive;
- creating ISO images;
- testing;
- cleaning the flash card;
- copying system files.
And this is not the entire list of this utility, so if you are an experienced user, be sure to check it out.
Where can I get the Russian version?
We have looked at almost all the functions of the program, now let's step aside a little and talk about the Russification of WinSetupFromUSB. There is no Russian version. It’s worth pointing this out right away, because that’s how it is. Of course, you can find pages on the Internet where they will claim the opposite, but most likely this is a hoax, and by downloading such a program, you will introduce a virus to your computer. Moreover, at the very beginning of the article it was said that the program must be downloaded from the official website of the developer, but as you can see, this site is in English, and it cannot be switched to Russian. Accordingly, all versions of the programs will also be in English.
When entering in a search engine: WinSetupFromUSB RUS, do not believe sites that offer you to download a program in Russian or use a Russian translation. In general there is no need. After all, this article described all the processes of this program. Simply following them, you can burn a bootable USB flash drive. And over time, you will hone your skills to such an extent that you won’t even need instructions.
I have already touched upon the free program WinSetupFromUSB, designed for creating a bootable or multiboot flash drive, more than once in articles on this site. In addition, many other thematic resources may draw your attention to this tool as one of the most functional when it comes to recording bootable USB drives.
Where to download WinSetupFromUSB
First of all, I would like to draw your attention to the fact that by asking the appropriate request in a search engine, you will most likely stumble upon a site on which there will be many green Download buttons leading inexplicably to where, and after the required download link is found , it turns out that when installing WinSetupFromUSB, several more “junk” programs of dubious usefulness were installed on the computer.To prevent this from happening, just go to the official website of the program http://www.winsetupfromusb.com/downloads/ and download it. The final version 1.0 was released a little less than a month ago (October 17, 2013), and it is this version that we will consider (before that, WinSetupFromUSB 1.0 beta6 and beta8 were the most frequently used).
Update 2015: The current version is 1.4, working with the program has not changed. Below in the article there are video instructions for using WinSetupFromUSB 1.4.
 By the way, the program does not require installation: you need to unpack the archive with it and run the desired version - 32-bit or x64.
How to make a bootable USB flash drive using WinSetupFromUSB
Despite the fact that creating a bootable flash drive is not all that can be done using this utility (which actually includes at least 3 additional tools for working with USB drives), this task is still the main one. Therefore, I will demonstrate the fastest and easiest way to do it.In the main program window, in the top field, select the USB drive to which recording will be made. Please note that all data on it will be deleted. Also check the AutoFormat it with FBinst checkbox - this will automatically format the flash drive and prepare it to become bootable when you start. In fact, this can be done manually using the Bootice and RMPrepUSB utilities, but, as I already said, the instructions are for beginners and we will use the simplest method.
Note: However, you should check the box for automatic formatting only if this is your first time writing images to a flash drive using this program. If you already have a bootable USB flash drive created in WinSetupFromUSB and you need to add, for example, another Windows installation to it, then simply follow the steps below, without formatting.
The next step is to indicate what exactly we want to add to the flash drive. This can be several distributions at once, as a result of which we will get a multi-boot flash drive. So, tick the required item or several and indicate the path to the files necessary for WinSetupFromUSB to work (to do this, click the button with the ellipsis to the right of the field):
- Windows 2000/XP/2003 Setup- we use it to place the distribution kit of one of the specified operating systems on a flash drive. As the path, you need to specify the folder in which the I386/AMD64 folders (or only I386) are located. That is, you need to either mount an ISO image with the OS on the system and specify the path to the virtual disk drive, or insert a disk with Windows and, accordingly, specify the path to it. Another option is to open the ISO image using an archiver and extract all the contents into a separate folder: in this case, you will need to specify the path to this folder in WinSetupFromUSB. Those. Usually, when creating a bootable Windows XP USB flash drive, we just need to specify the drive letter with the distribution kit.
- Windows Vista/7/8/Server 2008/2012- to install the specified operating systems, you need to specify the path to the ISO image file with it. In general, in previous versions of the program it looked different, but now it has been made simpler.
- UBCD4Win/WinBuilder/Windows FLPC/Bart PE- also, as in the first case, you will need the path to the folder that contains I386, intended for various WinPE-based boot disks. A novice user is unlikely to need it.
- LinuxISO/Other Grub4dos compatible ISO- will be required if you want to add the Ubuntu Linux distribution (or other Linux) or any disk with utilities for computer recovery, virus scanning and the like, for example: Kaspersky Rescue Disk, Hiren’s Boot CD, RBCD and others. Most of them use Grub4dos.
- SysLinux bootsector- designed to add Linux distributions that use the syslinux boot loader. Most likely it won't be useful. To use, you must specify the path to the folder in which the SYSLINUX folder is located.
Update 2015: the latest version of WinSetupFromUSB now has the ability to record ISO over 4 GB on a FAT32 UEFI flash drive.
Video instructions for using WinSetupFromUSB
I also recorded a short video that shows in detail how to make a bootable or multiboot flash drive using the program described. Perhaps it will be easier for someone to understand what's what.Conclusion
This completes the instructions for using WinSetupFromUSB. All that's left for you is set boot from flash drive in BIOS computer and use the newly created drive and boot from it. As I already said, these are not all the capabilities of the program, but in the vast majority of cases the points described will be quite sufficient.And maybe this will be interesting:
To create a multiboot USB drive using the WinSetupFromUSB utility you need:
- computer with Microsoft operating system installed
- iso images of operating systems that are required for a multiboot USB drive, for example, MS Windows XP, 7, 10, Acronis Disk Director 11, Kaspersky Rescue Disk 10.
- WinSetupFromUSB utility
- a blank USB drive with a capacity of at least 8 GB for the above ISO images
Program WinSetupFromUSB designed to create a bootable or multiboot USB drive. You can download this program from our website:
Supported systems:
- operating systems Microsoft Windows XP/2000/2003/7/8/8.1/2008/2012/10
- operating systems Linux / *BSD / *nix
- Ubuntu – 13.04 (32 and 64 bits) / 13.10 Server / 12.04.03 Server LTS
- Debian 7.1 Netinst i386, AMD64/7.2/7.6
- Linux Mint – 15 cinnamon dvd 32bit
- Mageia – 3 Dual CD
- CentOS – 6.4 LiveCD i386
- Fedora – Live Desktop 19 x86_64
- OpenSuse – 12.3 GNOME Live i686
- PCLinuxOS – KDE MiNime 2013.10
- SlackWare – 14.0 x86 DVD ISO
- OpenBSD – 5.3 Minimal, 5.3 Full
- m0n0wall – 1.34 CD-ROM
- ArchLinux – 2013.10.01-Dual
- Beini – 1.2.1, 1.2.5
- CloneZilla – 2.1.2-43-i686-pae
- DamnSmallLinux (DSL) – 4.4.10, 4.11.rc2
- Elementary OS – stable-amd64.20130810
- Gentoo – x86-minimal-20131022 , amd64-minimal-20140313
- GParted – gparted-live-0.18.0-2-i486
- Inquisitor – v3.1-beta2 Live CD (x86), 3.1-beta2 Live CD (x86_64)
- Knoppix – 7.2.0 CD EN, Adriane 7.2.0F EN
- Manjaro – openbox-0.8.7.1-i686
- Ophcrack – xp-livecd-3.6.0
- Antivirus systems:
- Avast Rescue Disk
- Sophos Bootable Anti-Virus
- Other:
- Acronis True Image
- Acronis Disk Director
- HDD Regenerator 2011
- Memtest86+ – v5.01
- MS-DOS – 7.1
- Paragon Hard Disk/Partition Manager
- UltimateBootCD – 5.20, 5.26
1. Download the utility WinSetupFromUSB
2. Download iso images of operating systems that are required for a multiboot USB drive
3. Unpack the archive with the utility WinSetupFromUSB
4. Launch the program WinSetupFromUSB
5. In the window that opens WinSetupFromUSB Select the desired USB drive from the drop-down list
Fig.2 Selecting a USB drive in the program WinSetupFromUSB
6. Check the checkbox AutoFormat it with FBinst to automatically format a USB drive.
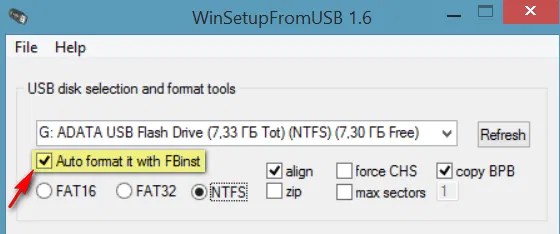
Fig.3 Setting up automatic formatting of a USB drive in the program WinSetupFromUSB
If you have previously used this program to create a multiboot flash drive for this drive and there is a need to add several more operating system images, check the box AutoFormat it with FBinst no need to install.
7. Select the required file system.
8. To add an operating system Microsoft Windows XP, you must first unpack the ISO image of the system or mount it into a virtual drive, check the checkbox Windows 2000/ XP/2003 Setup and indicate the path to the folder or drive in which the folder is located I386 .
9. To add an operating system Microsoft Windows 7 (or others) you need to check the checkbox Windows Vista/7/8/ Server 2008/2012 based ISO and specify the path to the iso image of the desired operating system.
10. To add an operating system Ubuntu(or other Linux operating system) you need to check the checkbox Linux ISO / Other Grub4 dos compatible ISO and indicate the path to iso image of the required operating system.
11. After completing the process of adding the required distributions, you must click the button Go.
12. Upon completion of creating a multiboot USB drive, in the Done pop-up window, click the button OK.
13. To exit the program, press the button EXIT.
14. To add distributions to the created multiboot drive the next time you start the program WinSetupFromUSB you must specify the desired drive, do not check the checkbox AutoFormat it with FBinst and indicate the path to them.