Where is the startup folder? Windows 10 autorun panel
Read also
After installing various types of programs, in most cases they are added to Windows 10 startup. In some of them, the user does not even agree to add programs to startup. There are also malicious programs that are installed with regular ones and immediately end up in the operating system startup.
This article will tell you how to open startup in Windows 10. Every user needs to know how to work with startup programs in the system. In general, disabling programs at startup improves the performance of the operating system as a whole. We recommend simply removing unnecessary things from startup in Windows 10. If necessary, the user has the option to return it.
Starting with Windows 10 version 1803, Startup settings were added to new options. Here you can disable and enable autoloading of any application with just one click. Applications can be configured to launch when you log in. In most cases, they are launched in a minimized form or begin to perform only a background task. To open startup you now only need to:
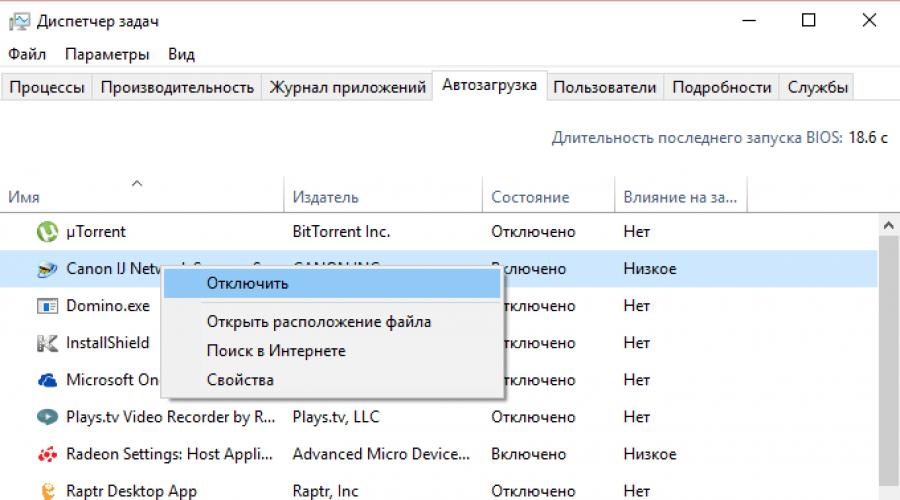
Unlike Windows 7, in new versions of the Windows operating system they decided to move the startup section to the task manager. Previously, a similar startup section was located in the classic system configuration application. Now, in the startup section, the user will see a link to go to the task manager.

Here we see all the programs that are added to the system startup. And also right there you can disable autoloading of all programs on Windows 10. We would like to draw your attention to the column opposite the application impact on system startup is the degree of influence of CPU and disk activity, measured at boot time and updated at each reboot. We recommend disabling applications with a high impact on startup, as well as all unnecessary applications that are in startup.
The startup folder is also present in earlier versions of Windows; by adding an application shortcut to it, it will autostart. Open the startup folder by running the command shell:startup in the window Win+R. Well, or just go along the path: C:\ Users\ Username\ AppData\ Roaming\ Microsoft\ Windows\ Main Menu\ Programs\ Startup.


In order to add a program to Windows 10 startup, you need to create a string parameter. You can give the parameter any name. By double-clicking on this parameter, in the line Meaning You must specify the path to the program's executable file. An example of adding a parameter to the registry can be seen in the image above.
There are many programs that allow you to both add and remove programs from startup. CCleaner is a free program for cleaning junk on your computer; it allows you to control startup programs on Windows 10. You can download it without any problems on the program’s official website. 
Conclusion
Each user must be able to work with startup programs in the Windows 10 operating system. At a minimum, you need to know how to open, enable, and disable startup programs. Since removing programs from startup improves system performance as a whole.
Indeed, cleaning startup in the operating system allows the user to save a lot of time. We also recommend additionally to improve performance.
Many programs have a built-in automatic launch function along with the operating system - you can enable it in the settings. But not all applications have it. What should we do in this case if we want to add a program to Windows 10 startup?
Users quite often install small applications or tools that, for example, make changes to the appearance of the system or add other useful components for comfortable work at the computer.
However, these programs cannot always be automatically launched with the system and you have to enable them manually after each reboot. Fortunately, any application can be added to the automatic launch list. Let's look at several ways to add a program to startup.
Method 1: Adding a shortcut to startup
Every version of Windows has a Startup folder. Everything that is in it automatically starts when the system starts. There you can add shortcuts to some utilities that we want to include when starting the computer. In Windows 10, this folder is not as easily accessible as in Windows 7, but you can get to it in several other ways.
To see which applications are launched when the OS starts, you need to go to the Task Manager using the Ctrl+Shift+Esc key set. Then go to the “Startup” tab, where a list of them is displayed. Here you can disable them; to do this, right-click and select the appropriate item from the drop-down menu.
The folder itself is located along the path:
By default, this folder is hidden in Windows 10 and to access it you need to remove the “Hidden” attribute.
An easier way to access the Startup folder is through the Run window. To open it, press Windows +R, and then enter:
shell:common startup(access to the Startup folder for all users)
or
shell:startup(current user only)
After clicking OK, the Startup folder will open. It may already contain programs that are loaded when the system starts.
To add a new program, create a shortcut for it or drag it (for example, from the desktop) to the Startup folder. Now it will turn on when Windows 10 boots.
Method 2: Create an autoload task in the task scheduler
Now let's look at the method of adding a program to startup through the Task Scheduler.
Go to the Start menu and type the corresponding name in the search or in the Run window (Win + R) enter the command taskschd.msc
Then in the scheduler window, select “Actions - Create a simple task.” The New Task Wizard will then appear.
The first step will ask you to enter a name for the created task (for example, the name of the application). In the second, we select the time when we need to start it - set “At system startup”.
In the third step, select the Action tab and check the “Run a program” checkbox. Then we specify the path to the exe file. Afterwards, the application will automatically run every time you turn on the computer.
Method 3: How to add to autorun via Registry Editor
Let's look at another way to add a program to startup through the Windows 10 registry editor. To do this, call the Run window using Win + R and enter the regedit command. Go to:
Here you can see a list of all utilities that run with the system. To add, right-click on an empty field, select New, then in the String parameter specify the name of the utility and the path to it.
In order for it to load for all users, you need to go to the same path above, but the section is not in HKEY_CURRENT_USER, but in HKEY_LOCAL_MACHINE.
Some programs are so useful that you have to work with them constantly. It would be very convenient if you turned on the computer and they were already running. The second applications launch on their own, although there is no need for them. To select the right programs, you need to change your startup settings.
What are the effects of startup settings?
The term “startup” in Windows 10 hides a list of programs that start automatically after logging into the system. That is, as soon as all system services are loaded after turning on the computer, applications included in the list of startup utilities begin to turn on.
On the one hand, allowing some programs to deploy themselves is worth it, since you can press one button that turns on the computer, wait a little, and immediately start using the programs you need. On the other hand, the more applications your computer needs to open, the longer it will take to start up. It is necessary to walk the line between convenience and burden.
Utilities that are recommended to be allowed to start automatically include only antivirus. It should always turn on by itself, since you can forget about it and catch several viruses while it is deactivated. You can create the rest of the startup list based on your needs.
List management
Windows 10 has several methods built into it that allow you to customize the list of programs that start automatically. No matter which one you use, the result will be that you will be able to add or remove startup applications.
Using a dispatcher
Task Manager is a standard utility that allows you to monitor running programs and the amount of resources they consume. Startup options are also available in the manager:
You cannot add new applications to the list using this method. If you need this feature, use one of the methods below.
Using a folder
A special folder is allocated for programs from startup, located in the system partitions.

There are cases when the described folder is empty, although in fact there are several programs that launch on their own. Therefore, you should not rely solely on this method if you need to get accurate information.
Using the registry
The registry contains all system parameters. You need to work with it extremely carefully, since by changing the wrong value, you can harm Windows by causing a critical error.
- To open the registry, hold down the Win + R combination to open the “Run” window and enter the regedit request.
 Execute the regedit request
 - Using the folder tree on the left side of the window, find yourself in the HKEY_CURRENT_USER\Software\Microsoft\Windows\CurrentVersion\Run section. Having reached the last folder, you will see a list of files, each of which is responsible for the autorun of a specific application. To remove the program, right-click on the file and use the “Delete” function.
 Select the file and delete it
 - To add a new application, start creating a DWORD parameter (right-click on an empty space in the list, use the “Create” method in the context menu). Specify any name (it is recommended to specify the name of the program to be added), and in the value indicate the path to the folder in which the program is installed, enclosing it in quotes.
 Create a DWORD parameter
Using parameters
“Settings” is a utility built into Windows 10 that allows you to change system settings in the most convenient interface. Using it, you can also remove applications from the list, but only if you have Windows version 1803 and higher installed, since this option did not exist before it.
- Using the system search bar, find and expand the Settings application.
 Expanding computer settings
 - Go to the "Applications" block.
 Open the “Applications” section
 - Go to the “Startup” sub-item. Once you see the list, move the sliders to “Disabled” for those applications that should not turn on on their own. You cannot add new programs to the list in this window, but you can remove existing ones.
 Move the slider to the “Disable” state
Using a new task
Any process cannot start on its own - it must wait for certain conditions to occur. The built-in Task Scheduler program is responsible for the criteria and tracking their implementation. Through it you can manage tasks related to startup programs.
- Using the system search bar, find and expand the planner.
 Open the task scheduler
 - The scheduler library will expand, containing a list of all tasks scheduled for execution. Sort it by the third column, Triggers, to get a list sorted by program launch type. We are interested in all applications whose trigger is the condition “On user login”. They are the ones that start automatically after turning on the computer.
 We are looking for tasks with the trigger “When user logs in”
 - To give any program startup rights, go to create a simple task.
 Let's start creating a new task
 - Come up with a custom name and description. It is advisable to write something that will be clear to you in the future.
 Name the task and describe it
 - In the “Trigger” step, specify the value “When you log on to Windows,” since we are creating a task that should be executed every time the computer is turned on.
 Specify the trigger “When logging into Windows”
 - Enter the path to the file that launches your utility. The path should go exactly to the exe file itself, and not to the folder in which it lies. Specify additional arguments as you wish, they are not required.
 Specify the path to the launch file
After you confirm that the entered data is correct, the system will save the task described above and begin launching the selected application every time you log in.
Video: Managing autorun in Windows 10
Third-party startup management programs
In addition to the tools built into Windows, there are third-party programs that allow you to manage the startup list. They are worth using if for some reason standard methods do not work. Also, external applications are more functional, that is, they can not only edit the list of self-launching applications, but also work with other computer parameters.
CCleaner
CCleaner is a fairly popular application known for its ability to clean your computer and registry of junk. But he also has one more ability that we need. Download and install the free version, which can be accessed on the official website - https://www.ccleaner.com.
After launching the utility, expand the “Service” block - you will see programs that are currently starting on their own. Here you can remove the application from the list using the button of the same name, or temporarily disable it using the “Turn off” button.
 In the “Service” tab we manage autorun
 Autorun Organizer
This application is different in that it allows you to obtain a huge amount of information regarding autorun. In it you can see how long it took the system to boot with different numbers of autostart programs, which utilities slow down the system the most, how the application was added to the startup list and whether other users remove it from this list. Using Autorun Organizer, you can choose the most comfortable and optimal autorun option.
To add a new program, use the "Add" button. Specify the path to the desired application and save the changes. Other features of the utility are also intuitive. You can download it for free from the official website - https://www.chemtable.com/ru/autorun-organizer.htm.
 Autorun Organizer provides a wealth of information
 The good thing about adding programs to the startup list is that you can save time by instructing the system to perform routine steps to deploy the application on its own. But there is another side: the more applications are enabled when you log in, the longer it takes to log in. You will have to balance between these two conditions to get the most suitable effect.
When Windows starts, there are applications that start automatically. The more software you install on your PC, the longer Windows may take to boot. Many utilities add themselves to startup, and the list can be large.
You can change the startup list by customizing any application, file or folder. It will take longer to start Windows if you have many applications in startup. Some of them, starting at startup, slow down the process.
How to manage startup
You can change startup programs in the task manager. Here .
- To run, press Ctrl+Shift+Esc at the same time.
- Right-click on the taskbar at the bottom of the desktop and open “Task Manager” in the menu that opens.
To manage app downloads, review all of them and disable the ones you don't need.
“Startup” will display a complete list of programs that start automatically when the system starts. Using the Startup tab, you can easily prevent applications from running on your OS. If you see any programs and you don't need them, it's very easy to remove them. Right-click on the application in question, then select the Disable option from the pop-up menu.

To re-enable a disabled application, you simply need to right-click on it and select the “Enable” command from the drop-down context menu.
How to add or remove applications from startup
The current user's startup items are usually stored in two places: in the registry and in a special Startup folder. This is an easier way to control. To add or remove, do the following:
Hold down the Win + R keyboard shortcuts and enter the command in the “Run” field:

C:\Users\Username\AppData\Roaming\Microsoft\Windows\Start Menu\Programs\Startup
Just copy and paste the desired shortcut into it and the application will start when the operating system starts. To exclude a program, you must remove the shortcut for this application.
Excluding and adding programs using Registry Editor
In the "Run" field, enter the command
Open the following key:
HKEY_CURRENT_USER\Software\Microsoft\Windows\CurrentVersion\Run
There are autorun components for the current user. To exclude an element, right-click it and check "Delete" in the context menu that pops up. To add a new startup item, create a string value with whatever name you want and set its contents to the full path to the application you want to load at startup.

Automatic launch of programs is very convenient, because it is thanks to it that some necessary and not so necessary programs start automatically when the operating system boots. Any program can be added to startup or removed from there. You will learn how to do this and where startup is located in Windows 10 in this article.
Where is startup located or how to add a program to autostart Windows 10?
Since the days of Windows XP, many have become accustomed to the fact that the folder of automatically launched programs was located directly in the “ Start". To add a program there, it was enough to drag its shortcut to this folder.
In Windows 10, for some reason, the developers removed this very folder “” from the Start menu and thereby made life more difficult for ordinary users.
Still, in Windows 10 there is a “” folder, although the developers pushed it too far.
If you want to auto-launch the program for one specific user, then you need a folder in the following path:
C:\Users\<имя пользователя>

In Russian, the path to startup looks like this:
C:\Users\<имя пользователя>\AppData\Roaming\Microsoft\Windows\Main Menu\Programs\Startup\
If you want to automatically download the program for all computer users, then you need to add its shortcut to the folder in the following path:

In Russian:
C:\ProgramData\Microsoft\Windows\Main Menu\Programs\Startup\
How to add an application to startup in windows 10?
We will show you the process of adding a program to Windows 10 startup using an example. Aida64. Let's say you want this program to run on the processor and video card every time you turn on the computer.
First you need to go to the folder with the program that you want to add to startup. You can most likely find it in the folder Program Files (x86) on .
In the folder with the name of the program we find the executable file. (As a rule, this is a file with a program icon). Right-click on it and select “ Copy«.

Copying a program to Windows 10 startup
C:\Users\<имя пользователя>\AppData\Roaming\Microsoft\Windows\Start Menu\Programs\Startup\
C:\ProgramData\Microsoft\Windows\Start Menu\Programs\StartUp\
In it, right-click on any free space and select “ Insert shortcut«.

Adding to Windows 10 startup
That's all. Now the program whose shortcut you placed in one of the folders described above will launch along with the Windows 10 operating system.
How to remove a program from autorun on Windows 10?
In order to remove a program from Windows 10 startup, just delete it from the folders into which you copied the program shortcut. But it is worth considering that if a program was added to startup through its own settings, as, for example, we added to startup, then its shortcut will not be in these folders.
In this case, removal from startup occurs through the task manager. To call it, right-click on any free space on the taskbar (the panel on which the “ Start") and select "Task Manager" from the menu that opens.