How to make a drawing stick on your phone. Stylus for a capacitive screen: why it is and how to make it. The easiest way to create a stylus
A stylus is a fashionable and sometimes necessary addition to a tablet or phone. But you can’t always see styluses for sale in stores; you either have to wait a long time for an order or make a stylus yourself.
In order to build a handle for a tablet or phone, you will need very little time and materials.
How to make a stylus yourself
The most basic rule, without which you won’t get a stylus, is the use of conductive materials. Everything else doesn't matter. It turns out that the main conductive material is metal or aluminum. Naturally, this is not very convenient and practical, because metal pencils can scratch the screen of the gadget. Therefore, we will make the stylus from softer and more suitable materials. For example, regular cling film or foil.
What you need for work:
- foil;
- pencil or pen;
- cotton swab;
- paper;
- tape or tape;
- scissors.
The method for creating a stylus is extremely simple:
- You need to take the handle and unscrew the rod.
- The cotton swab must be cut with scissors so that half of the stick fits into the handle and fills the free space. Therefore, it is better to cut the stick at an acute angle.
- Now we insert part of the cotton swab into the middle of the ballpoint pen and wrap it with tape.
- It turns out that the soft cotton part will replace the rod.
- Then wrap the cotton swab tightly with a piece of aluminum foil so that a small cotton ball remains at the end.
- For reliability, the foil can be secured with adhesive tape so that it does not come off while working with a homemade stylus.
- To test the stylus, you will need a glass of water to wet the cotton tip of the pen.
- That's all, you can try the stylus in action.
The advantages of such a homemade stylus are the speed of creating a stick and a minimum of materials. Disadvantages - you will have to wet the cotton tip of the stylus in water from time to time. Features of operation - the stylus will be “active” when you hold the foil with your fingers, this is the only way static electricity will interact with the device screen. Therefore, you should not completely wrap the foil in adhesive tape.
How to make a stylus. Method two
This method of creating a stylus at home is more labor-intensive, but you can use a homemade stylus anywhere, because you don’t need water to contact the screen.
What you need to prepare for work:
- aluminum washer;
- thin aluminum stick;
- cotton threads;
- soldering iron
How to make a stylus:
- Using a soldering iron, you need to solder the washer to the tip of the aluminum stick at a right angle.
- Then wrap the entire free space of the washer with threads so that the winding is tight and the threads do not unwind when using the stylus.
- That's all, you can try the new device in action.
The advantages of this method: the stylus replaces the finger, it is convenient to work because you do not need to press on the screen, the screen is not scratched due to the wound threads. Cons: not everyone can solder an aluminum washer.
Now you know how at home, in just a few minutes, you can make a useful accessory - a stylus.


Hello to all DIYers. Today I will show and tell you how I made a stylus for a smartphone. This homemade product will be useful for artists, designers, etc. If there is no factory option, this homemade product will be an excellent solution. There are many such homemade products on the Internet, but they are not completed. Some use wet cotton wool, others use foil, etc., but they have the same operating principle. You need to use a conductor that is in contact with your hand. The body's electricity is transmitted through a conductor and the conductor, in contact with the screen, produces pressure, movement, etc. But they have little or no effect on a smartphone. But on the tablet there is generally zero reaction.
Of course, I’m not an artist or anything, but I like to draw sometimes. Well, in short, I forgot my stylus on the train, I was too lazy to go to the store (far away), there was nothing to do, so I decided to make a stylus with my own hands. An idea came to mind, what if instead of touching the conductor, connect a power source. There the current will be stronger, and maybe it will work better. Well let's get started.
To make this homemade product we will need


1. Foil
2. Handle
3. Lighter with flashlight. Namely, you need batteries, but you can use AA batteries.
4. Scotch tape
Step 1. Connect the foil and batteries


We unscrew the screw and carefully remove the batteries from the lighter body. Now cut the foil into two parts and roll both parts into a thin strip. We glue one strip with tape to the minus of the battery. We wrap another strip around the contact and insert the contact to the positive. Wrap the batteries and strips with tape.
Step 2. Body


We insert everything into the handle body. Wrap a little cotton wool on a cotton swab. Then we wrap foil on it. We connect the strips with the foil and insert a cotton swab into the body and secure it with a piece of tape.
Step 3.Test
Probably, many smartphone owners are interested in how to make a stylus with their own hands. This is explained by the fact that such parts are again beginning to be increasingly introduced into many devices. Typically, these unique products come bundled with tablets or phones, but if they are lost, you will have to buy new mini-pens, and they cost a lot of money.
The easiest way to create a stylus
How to make a stylus for a tablet with your own hands? This process is very simple and economical, since everyone has the necessary materials in their household. Thanks to the creation of such a part, it will become much more convenient to work with a smartphone. For the device to function effectively, it must be designed so that it can serve as a conductor of static charge between the fingers and the equipment display. Before you make a stylus for your smartphone, you need to prepare:

- thick aluminum foil;
- cotton swab;
- pen (ballpoint);
- scotch;
- scissors.
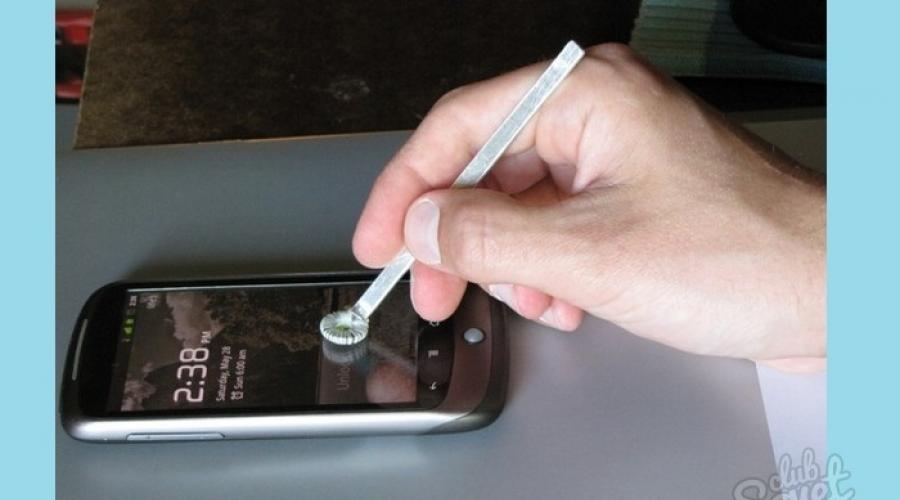
How to make a stylus yourself? To do this, you need to open the ballpoint pen and remove the rod from there. Then you need to take a cotton swab and cut it at an acute angle. After this process, you need to use the resulting element to replace the rod. You need to secure the stick using tape. At the end of this stage, you should take foil and wrap it around the handle a little higher than the cotton swab. It is recommended to wrap it tightly, after which you need to secure the upper part of the handle with tape. Next you need to moisten a cotton swab. After this you can start working. It is very important that your fingers touch the foil. This will allow static electricity to pass through, allowing you to interact with the screen. But such a homemade stylus has a small drawback: it requires periodic wetting of the cotton tip. Therefore, before creating it, you need to think about your convenience.
Stylus for capacitive touch screen with your own hands
You can make a stylus for a capacitive screen with your own hands. To make it thin and easy to use, you must use:
- steel washer;
- aluminum rod;
- skein of thread.

If you have the inventory list at hand and are completely satisfied with it, then you can proceed directly to creating a stylus. To do this, it is necessary to solder the handle/rod to the washer at an angle so that it becomes as compatible as possible with the natural position of the human limb. But such a design can scratch the display, and the thinner it is, the worse. This defect can be eliminated using threads. To do this, you need to wrap them around the ring-shaped edge of the device. To increase contact, you need to bring your finger close to the smartphone. This device does not leave scratches on the capacitive surface, and the thin screen responds very quickly, so there is no need to press on the device. Also, if you make a stylus for a smartphone or tablet with your own hands according to this scheme, then you don’t have to worry about the appearance of marks and scratches on the screen. It's easy to use and can even wipe the display, keeping it clean all the time.
Good day to you, dear Habro readers.
I would like to bring to your attention material that will, I hope, be of interest to handy enthusiasts. And it might even be useful to someone.
Some time after I became the owner of a mobile device with a capacitive touch screen, I had an obsessive thought that it was more convenient to perform some actions using a wonderful magic wand.
First of all, my research led me to a store where you can traditionally find such things. But to my disappointment, the blunt-ended samples that were available there aroused skepticism.
The shape and accuracy of the hit did not go far from the fingers, but the screen response was worse. The sensor picked up the touch only after slight pressure. The usefulness left doubts. I had to refuse the purchase.
According to my ideas, ideally the shape should have been pointed. Just like a drawing pencil, which can be used to make precise movements. But as far as I was able to find out, this shape is not suitable for a capacitive screen. Apparently it is oriented towards contact with a larger contact area, comparable to the touch of a finger.
We managed to find a couple of interesting articles and videos on this topic - use the negative terminal of the battery and roll the antistatic film into a tube. Unfortunately, both options did not suit me. The battery is as thick as a finger. And twisting a tube every time may be convenient for some, but it’s clearly not for me.
Doubts arose about the feasibility of the idea. Due to the wide spot, it will not be possible to accurately direct the touch. And conductive material, usually metal, will scratch the surface of the screen.
As a result, a solution was found.
It turns out that the ring-shaped shape is quite perceived by the sensor and the center is also visible. Thanks to this you can see where you are pointing and hit.
The secret of the miracle wand is simple: a steel washer (any other conductive material will do), an aluminum rod (this should also be a conductor) and a skein of thread.

Thanks to a cryptographic analyzer, which, by the way, this time was used for peaceful purposes. Thanks to improvised tools from home tools, we get something similar to a dentist’s tool.

The handle needs to be soldered at an angle that will be as compatible as possible with the natural position of the hand and ensure that the plane of the ring is completely adjacent to the surface of the screen.

Of course, we could stop there, but such a design will scratch the screen and has no chance of getting a high rating from Habra readers :)
This problem was successfully solved with the help of... thread.
The ring-shaped edge is good not only because it allows you to aim more accurately through the center, but also because it makes it possible to wrap yourself with thread. Some doubters will think that an additional layer of thread will worsen the sensitivity of the screen. But that's not true. As you know, the sensor does not need absolute contact to detect a touch. It is enough to bring your finger very close. In this case, there may not be a touch.

In conclusion, I will say that I was pleased with the result.
- The reaction is the same as to a finger. There is no need to press.
- Does not leave marks, does not scratch and even wipes the screen.
- Accurate aim.
Working with the Android shell
There are also disadvantages
- Because the operating principle is based on the passage of current through a metal stylus to the human body. That is, it will not work in parchats.
- On my communicator model, the lower touch buttons (“back”, “menu”, “home”, “search”) do not work as well as we would like.
Typing text
P.S. Believe it or not, after all this was written and all the accompanying pictures/videos were prepared, I learned that one Canadian manufacturer is already producing styluses of a similar design. I found out about this when I uploaded the first video to YouTube and it showed similar videos. The idea turned out to be not new and I began to doubt whether it was worth sending this article to the public, as I might be subject to attacks related to accusations of plagiarism. Then I decided that since such a solution was put into mass production, it means the design was successful and all this was not invented in vain. Despite the fact that there was a coincidence of a good idea, it is still worth talking about :)
P.S. v 2. Some readers were interested in the suitability of the design in the winter conditions of our harsh regions. It turned out that in this case this device can be useful, although the sensitivity of course worsens. I tried it with the thickest gloves I had. If you squeeze the handle harder, the response gets a little better.
And another example of handwriting notes:
Content
When they were just beginning to move away from push-button phones and touchscreen smartphones appeared, styluses were sold to use them - special sticks, the screen reacted to contact with them. Then monitors began to accept finger touches, and tools were abandoned - after all, they were often lost, and it turned out to be more convenient to type in a gadget simply by hand. Although this method is still the most common method for mobile phones, it is a different story with tablets due to the large screen size and intended use. Some things are really more convenient to do with a stylus.
What is a stylus for a tablet
Stylus is a Greek word meaning a stick with a pointed end. The term speaks for itself, because the device looks just like a small pen for a tablet. Using this little thing, it is convenient to control the device (take photos, type text) and draw on the display. Although some experts predicted the end of the era of styluses when touch screens began to appear that could be operated without them, this has not yet happened. Many well-known brands release new models of gadgets, which are difficult to work with without additional tools.
The tablet stylus has a slight resemblance to a pencil, and some people call it that. Other possible names are a pen or even just a stick. The main advantage of the tool is convenience. There are two disadvantages at once: the sticks break quickly and are also easily lost. The first disadvantage depends on the model and the accuracy of the owner, and manufacturers are trying to solve the second one programmatically: for example, the device starts beeping if the handle is far away.
What is it made of?
The principle of operation and what the stylus is made of depends on the type of gadget screen (resistive or capacitive). In the first case, the main thing for the tool is to have a pointed tip, since the monitor reacts to the pressure itself. In everyday life, a stylus for a resistive screen can be replaced with a pencil, a plastic card, or even a fingernail. The advantage of using a special device is that it is made of soft sliding materials, silicone or Teflon, so that it does not scratch the device.
In the second case (if the screen is capacitive), the main component of the stylus for the tablet is the tip, which has an electrical capacitance. The product is made of soft rubber or silicone, and inside the pencil contains a magnetically conductive ring, coil or metal filings. A capacitive screen will not respond to an ordinary metal stick, regardless of its thickness. Styluses for it are made at least 6 mm and blunter than for resistive displays.
Pen for tablet
This is a stylus that is used for typing on a tablet or surfing the Internet. Such gizmos are universal and can be both expensive and cheap (depending on functionality). The styluses look like regular pens, so they are convenient to use. Products can be purchased at any electronics store in Moscow, St. Petersburg or another city in the Russian Federation, or ordered online with home delivery. Simple models that are inexpensive are especially in demand:
- Model name: Ginzzu GH-990B;
- price: 290 rubles;
- characteristics: made of aluminum, for a capacitive screen, the kit includes two styluses: they differ in size and tip thickness;
- pros: compact, low cost, good responsiveness, suitable for any OS (Android, Apple);
- cons: users complain that the small stylus is less responsive.

Cheap, simple pens are convenient, but unreliable: due to the low cost, quality suffers. Not all users prefer to take risks, even if it’s a small amount, and pay attention to brands with a reputation. Samsung has a large selection of styluses, and they often have promotions, sales and discounts:
- model name: S Pen for Samsung Galaxy Note 4 (EJ-PN910BBEGRU);
- price: RUR 1,430;
- characteristics: pen for tablet with capacitive screen, tip 0.7 mm;
- pros: you can take notes when the screen is off, you can enter characters manually;
- cons: compatibility with other models other than Galaxy Note 4 is unknown.

Stylus for drawing on a tablet
This device comes in two types, depending on the tablet: a gadget that functions independently, or a stylus that is connected to a computer and, in conjunction with it, forms an input device. To draw on a tablet, you can try using a regular pen, but most likely it will not have enough functionality. It is better to consider specialized models:
- model name: TheJoyFactory Pinpoint Precision Stylus E1;
- price: 2,930 rubles;
- characteristics: drawing device, battery operated, does not require Bluetooth connection;
- pros: manufacturer's warranty, works with products of any brand;
- cons: high cost; does not support accidental touch recognition (you need to additionally install the application).

The stylus for the graphics tablet is sold with the device, but may need to be replaced. When choosing, it is important that the pencil and tablet are from the same manufacturer. Sometimes the specifications indicate that the device is suitable for use with a device of the same brand or a specific model:
- Model name: Wacom UP-610-74A-1;
- price: RUR 1,710;
- characteristics: pen for Wacom STU-500 graphics tablet;
- pros: thin, easily hits the desired pixel, responds to the degree of pressure;
- cons: no compatibility with other models.

How to choose a stylus for a tablet
The selection criteria depend on the purposes for which you decide to buy a stylus for your tablet. First of all, the pencil should be comfortable to use. It is important that the product fits well in the hand and is suitable in size and weight. For this reason, if you have not previously held or seen the device in person, it is not advisable to order it from an online store in order to receive the product by mail. Factors to consider when purchasing a product:
- Appearance. The most convenient way is a stylus in the form of a pen. It’s good if there is a special mount for the tablet case - this makes it more difficult to lose the tool, and a cap for the tip so that the product lasts longer.
- Quality of materials. The product should slide across the screen easily and freely, accurately hitting the desired keys and display locations. Read the composition on the packaging: the tip should be made of soft materials so as not to scratch the monitor.
- Purpose. If regular models are suitable for active surfing the Internet and typing, then you need to choose special ones for drawing. They will be much more convenient to use thanks to the thickness of the tip and built-in functions.
- Additional functionality. Some models have buttons, on others you can adjust the degree of pressing, and still others are programmatically linked to the Android or Windows device they are running on. All this must be taken into account when choosing.
- Price. There is no definite answer to how much a stylus costs. Price varies. The cheapest models are simple ones made in China, but even on them you shouldn’t skimp – a high-quality pen from a brand with a good reputation will last you longer.