Resolved: The installer was unable to create a new or find an existing system partition. Error: "Setup was unable to create a new or find an existing system partition. Windows installation failed."
Download video and cut mp3 - we make it easy!
Our website is a great tool for entertainment and relaxation! You can always view and download online videos, funny videos, hidden camera videos, feature films, documentaries, amateur and home videos, music videos, videos about football, sports, accidents and disasters, humor, music, cartoons, anime, TV series and many other videos are completely free and without registration. Convert this video to mp3 and other formats: mp3, aac, m4a, ogg, wma, mp4, 3gp, avi, flv, mpg and wmv. Online Radio is a selection of radio stations by country, style and quality. Online Jokes are popular jokes to choose from by style. Cutting mp3 into ringtones online. Video converter to mp3 and other formats. Online Television - these are popular TV channels to choose from. TV channels are broadcast absolutely free in real time - broadcast online.
Those users who independently downloaded the official installation image of the Windows 10 operating system are, of course, familiar with the special Media Creation Tool utility. This is a proprietary tool from Microsoft designed to create bootable media for installing and updating the operating system. But sometimes you may have a problem while launching Media Creation Tool. For example, the error “The installation program was unable to start correctly, please restart your computer.” Or the application does not start at all. There may be several reasons for this phenomenon.
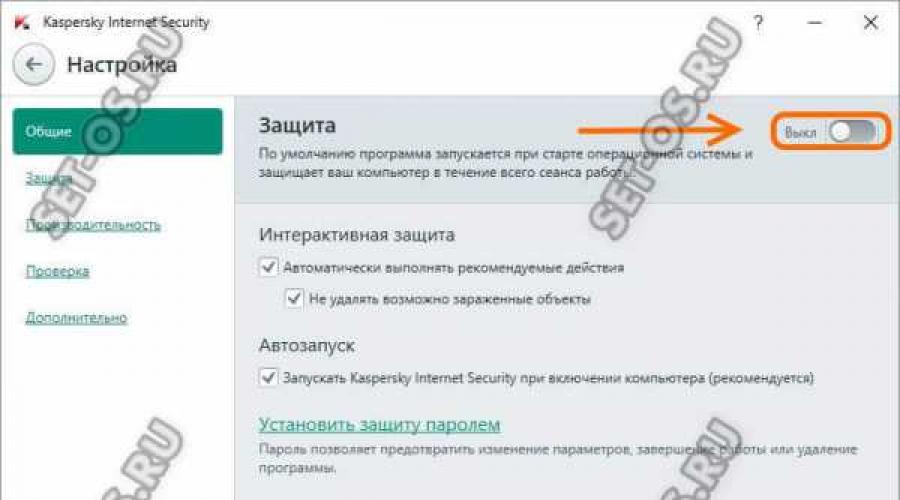
The most common reason is that Media Creation Tool does not work because your security system does not recognize it correctly and blocks any suspicious activity. Therefore, you should start by disabling your antivirus program and firewall.

Checking the work of Media Creation Tool. Did not help? Go ahead. The next possible reason is that your account does not have enough rights to run the program. Try right-clicking on its icon and selecting “Run as Administrator” from the menu that appears. Alternatively, you can try to create another Windows account with administrative rights and see if the utility will start now.
The next reason why the Media Creation Tool does not work is problems with the local network. Try the following. Launch a command prompt with Administrator rights. Then enter the following commands in turn: ipconfig/release Release the IP address if it is obtained automatically from the DHCP server.

Then: ipconfig/renew This will update our IP address.

And finally, clear the DNS cache: ipconfig/flushdns
Now you need to check that you have access to the Internet and then check the operation of Media Creation Tool.
Another way that sometimes also works to fix a problem when starting the Media Creation Tool is to clear temporary system files. To do this, you need to enter the following address in the address bar of Windows Explorer: %TEMP% Press the “Enter” key. A folder will open that contains temporary files of software that is running or has been running on the system. It looks something like this:

We completely clear its contents and reboot. Well, if even after that the Media Creation Tool does not work, then there is only one way out - download the installation image and create a boot disk on another computer, and then switch to this one and reinstall the OS.
set-os.ru
Windows 10 Technical Preview Build 10049 is now available!

Once again we get a new build on the Fast update channel! The company has indeed moved towards a pattern of faster updates. The new build is numbered 10049 and is available for download from Windows Update.
Let us remind you that the previous build was numbered 10041, which means that the current build has received only minor changes and improvements, because only a little more than a week has passed. But, this build includes the new Spartan browser for the first time!
This build, as usual, is not without errors. Some of the well-known ones include:
- After logging in, you may see a blue screen instead of the desktop. Lock your computer with a hardware button, or press the Win+L key combination and log in again. You can also try opening the task manager using the keyboard shortcut Ctrl+Shift+Esc.
- Checking for new messages in Outlook doesn't work
- It is not possible to run Hyper-V virtual machines on this build. This bug will be fixed when the update is released on the Slow channel.
- Visual Studio 2015 does not work stably. Emulators and XAML designer do not work. This issue will also be fixed with the release of the update on the Slow channel.
Well, happy updating! And if you are going to wait for the images, they will be posted in a few hours!
Write your reviews about the new build in the comments. You can discuss it both in the VKontakte group and on our forum.
Download/Download:
Windows 10 Build 10049 Pro Russian 64-bit:
Windows 10 Build 10049 Pro Russian 32-bit:
Windows 10 Build 10049 Pro English 64-bit:
Windows 10 Build 10049 Pro English 32-bit:
Attention! The file sizes are indeed smaller than usual. This is due to the fact that the image was converted not from install.wim, but from install.esd. This is the difference in size. Installation from these images is carried out as usual, which has been verified by the portal administrators.
Found a mistake? Select it and press Ctrl + Enter
thecommunity.ru
Windows Setup was unable to configure Windows to work with your hardware

When restoring the system to a new HDD using recovery disks, the architecture and contents of the partitions are restored to the factory state. But at the moment when Windows installation begins (preparing Windows for the first launch), the following happens:
Equipment installation -100%
MESSAGE:
"Windows Setup was unable to configure Windows to work with your computer's hardware."
I click OK, the computer reboots, the installation starts again...
and everything stops again,
MESSAGE:
"The installation process could not be completed. To install Windows, restart the installer." I click OK and the installation starts again.
and everything stops again
MESSAGE:
"The installation process could not be completed. To install Windows, restart the installer."
All you need to do if you see the message “Windows Setup was unable to configure Windows to work with the hardware on this computer” or “The installation process could not complete. To install Windows, restart the installation program" so do not click the "OK" button
But when you press the key combination, a black window with a command line will appear. In it you need to write the path to the executive file and run it. The file is called msoobe.exe and the full path to it looked like:
C:\Windows\System32\oobe\msoobe.exe
When installing on a laptop, you must also press the FN key
A window should appear asking you to enter an account name.
P.S. By the way, everything will work if your computer really supports Windows 7, although most likely it does.
Those users who independently downloaded the official installation image of the Windows 10 operating system are, of course, familiar with the special Media Creation Tool utility. This is a proprietary tool from Microsoft designed to create bootable media for installing and updating the operating system.
But sometimes you may have problem when starting Media Creation Tool. For example, the error “The installation program was unable to start correctly, please restart your computer.” Or the application does not start at all.
There may be several reasons for this phenomenon.
The most common reason is that Media Creation Tool does not work because your security system does not recognize it correctly and blocks any suspicious activity. Therefore, you should start by disabling your antivirus program and firewall.
Checking the work of Media Creation Tool. Did not help? Go ahead.
The next possible reason is that your account does not have enough rights to run the program. Try right-clicking on its icon and selecting “Run as Administrator” from the menu that appears. Alternatively, you can try to create another Windows account with administrative rights and see if the utility will start now.
The next reason why the Media Creation Tool does not work is problems with the local network. Try the following. Run . Then enter the following commands one by one:
ipconfig/release
We release the IP address if it is obtained from the DHCP server automatically.
Then:
ipconfig/renew
This will update our IP address.
And finally, clear the DNS cache:
ipconfig/flushdns
Now you need to check that you have access to the Internet and then check the operation of Media Creation Tool.
Another way that sometimes also works to fix a problem when starting the Media Creation Tool is to clear temporary system files. To do this, you need to enter the following address in the address bar of Windows Explorer:
%TEMP%
Press the “Enter” key. A folder will open that contains temporary files of software that is running or has been running on the system. It looks something like this:
We completely clear its contents and reboot.
Well, if even after that the Media Creation Tool does not work, then there is only one way out - download the installation image and create a boot disk on another computer, and then switch to this one and reinstall the OS.
If they want to install any of the modern versions of operating systems, be it Windows 10 or Windows 7, users encounter problems that drive them into a stupor. Here is an example of such a problem.
You insert a disk into the drive, or an installation flash drive into a USB connector, boot from them and see the loading of a particular system. Next, the installer window appears, where we must select the disk to install Windows. There are some parameters there that we could use, but they are of no use to us now. As soon as we click the “Next” button to start installing Windows, the worst happens - an error "Setup was unable to create a new or find an existing system partition".
There is an incredibly simple way to fix it on the Internet. It is as follows: you receive an error and immediately remove the flash drive or disk, and then close the installer by clicking on the cross. Next, we perform the installation again, try to install the Windows we need, get the same error, close it. Now we need to reinsert the installation flash drive or disk and start installing Windows.Unfortunately, this method, described just above, no longer helps, but there is another.
In order not to deal with such nonsense as plugging a flash drive, restarting something, etc., there is a more effective way. Its essence is that you need to transfer the files from the flash drive on which Windows is located to the disk or partition where you were going to install it. In other words, we make the future system partition an installation disk on which we will install Windows. Now let's move on to practice.
How to resolve the error “Setup was unable to create a new or find an existing system partition”?
Quick and easy, you just need to carefully read the instructions in this article.
- Insert it into your computer and boot from it;
- When a window appears asking you to select a disk, press the keys Shift+F10, to open the command line;
- On the command line we enter the command: diskpart;
- The command line now uses the DISKPART disk utility, then we write the command: list disk. This command shows all drives connected to the computer. We look for the required disk in the list (you can navigate by volume) and remember the number;
- select disk=0. With this command we select the disk. The number 0 is the number of the dick from the previous command; yours may be different.
When choosing a disk, be very careful, I recommend turning off other hard drives so that there are no problems later.
- Next we execute the command create partition primary size=XXXXX. In the place “XXXXX” you must enter the size of the system disk on which you will install Windows. In other words, a new partition will be created;
- select partition=1. Displays the partition of the disk we have selected;
- active. The selected section becomes active;
- format fs=ntfs quick. This command will quickly format the drive to the NTFS file system;
- assign. This command will assign a letter to the section; if it is not specified independently, then the free next letter will be selected;
- exit. Exit the DISKPART utility.
So, we have completed all the necessary commands to create a partition for installing Windows, but now we need to transfer files from the flash drive to this partition.
- Open the command line again. You need to find out what letter your Windows flash drive is designated by. Using the cd command. That is, on the command line you would enter, for example, "cd e:", where e: is the letter of the installation flash drive. ;
- You are in the flash drive directory. We write a command to copy files to the system disk: xcopy e: c: /e /h /k;
- You need to go to the boot directory on the partition itself, not the flash drive: cd boot;
- Using the bootsect command we will create boot code on the system disk: bootsect /nt60 c:. Where c: is the system drive, be careful, you may have a different letter;
- We made the system partition a boot disk. Now you can remove the USB flash drive, restart the computer and install Windows on the same disk. After installation, you can delete the installation files.
After installing Windows and loading it, you need to adjust a few things.
- Open the command line as administrator;
- We write the command bcdedit;
- Among the command results, find the line Windows Setup, where we copy identifier;
- Next we write the command bcdedit /delete (identifier).
Now you can use Windows without any problems.
Additional option
Alternatively, you can use the Boot Menu to resolve this error, if this function is supported. When you insert a flash drive, it may be in first place in the order of disks, or you did it yourself, because of this, Windows wants to write the MBR table not to the disk we need, but to the flash drive, but nothing comes of it, since it is in use you. Perhaps this is the reason for the above error.
To solve this, you can put the disk that will be the system disk in the first place in the BIOS, if it is not already there, then go to the Boot Menu (not in the BIOS), and simply boot from the installation flash drive. Of course, it’s not a fact that this method will help, but trying is not torture, you won’t lose anything from it. Boot Menu might look like this: 

From time to time, during Windows installation, the system reports that the installer was unable to create a new or find an existing system partition. This problem does not allow the installation to continue, and drives many into a stupor. However, there are some simple ways to solve it. But first, you need to understand the root causes of the problem.
What does this error mean?
Failed to create a new partition - how to get rid of it?
Let's consider several options.
Method 1
The easiest way to get rid of the error is to select a hard drive instead of a flash drive as the main boot device. But the question arises - how to start the installation? In fact, to boot from a flash drive there is no need to reconfigure the BIOS. Modern computers allow you to select startup devices directly during boot. To do this, press the F8 key when starting the computer. In the window, select the USB boot device without changing the settings for launching disks.
Method 2
When an error occurs, disconnect the flash drive. Then the computer will reboot, and due to the absence of an “interfering” USB drive, the machine reads the information from drive C. After this, you can connect the flash drive again and wait for the installation process to complete.
Installing OS from internal storage
If you couldn’t solve the problem using the above methods, try one more option: During installation, while partitioning, create one disk and leave the rest of the space as unallocated area. Format the potential partition for the OS. Using the SHIFT+F10 combination, go to the command line:
- First command: diskpart
- After it: list disk
The command displays a list of drives. Ideally, you will see two devices - the hard drive you created and the USB drive. Remember the number assigned to the disk. Let’s imagine that its number is “0”.
- Enter the command: select disk 0
- Now we display a list of disk partitions: list part
- Remember the partition number that you allocate for installing the OS. Enter the command: select partition 1
- We assign the disk the value “active”: active
- Format: format fs=ntfs quick assign exit
We've left the Diskpart utility, but will continue to work on the command line. We go to the root of the flash drive. Let's say the letter of the flash drive is “D”:
- Then enter the following command: cd d:
- Run the command to copy installation files: xcopy d: c: /e /h /k
- After the process is completed, enter: bootsect /nt60 c:
After this command, drive C becomes bootable. Now, unplug the flash drive and restart your computer. When the desktop starts, press the Win+R combination and enter:
Msconfig
In the window that appears, remove Windows Setup from the “Download” tab. Also, get rid of the installer files from drive C. If you have any questions . Indicate exactly what difficulties you encountered so that we can help.