Screensaver program for Windows 10. Mechanical Clock – screensaver with a mechanical clock
Read also
This article shows the steps that you can use to enable and configure the screen saver in the Windows 10 operating system.
Screen saver is a dynamic drawing or pattern that appears on the screen if the user does not perform any actions with the mouse or keyboard for a specified period of time. Screen savers were originally used to protect monitors from phosphor burnout while the computer was idle; this problem is no longer relevant and now screen savers are mainly used to customize a computer or to enhance its security using passwords.
How to open the screen saver settings window
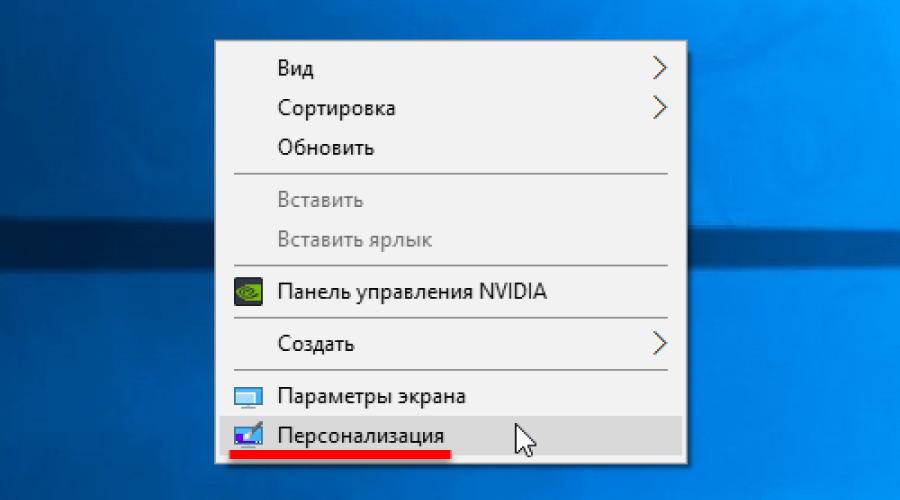
To open the Screen Saver Settings window, right-click on an empty area of the desktop and select Personalization from the context menu that appears.

In the “Options” window that opens, select the tab Lock screen, then scroll down the side scrollbar of the window and click on the link Screensaver options

Also, in order to open the “Screen saver settings” window, open:
Start ➯ Settings ➯ Personalization ➯ Lock screen ➯ Screensaver options
You can open the screen saver settings window using the search. To do this, click on the search icon on the taskbar or press + S, enter screensaver in the search bar and select from the search results Enable or disable the screen saver

You can also open the "Screen Saver Settings" window using the "Run" dialog box, to do this, press the key combination + R, in the window that opens, enter (copy and paste) control desk.cpl,1 and click OK

As a result of performing any of the above actions, the “Screen Saver Settings” window will open, which is shown in the image below.

How to enable or disable the screen saver
To enable a screen saver, select any available screen saver from the Screen saver drop-down list and click OK.

To disable the screen saver, select (none) from the Screen Saver drop-down list, then click OK.

You can also use the Screen Saver Options dialog box to preview what your screen saver will look like before a specified period of time has passed during which no user activity has occurred. To do this, click the View button. To finish viewing the screen saver, simply move your mouse or press any key on your keyboard.

Setting up screen savers
Most standard screen savers do not have customizable settings. When you click the Options button, instead of opening the screen saver settings window, only an informational message appears, which indicates that the selected screen saver does not have customizable settings.

Using the graphical interface, you can configure only two screen savers: the “Volume Text” and “Photos” screen savers.
The image below shows the window 3D Text Screensaver Options, in which you can enable the display of the current time or change the standard text to your own, as well as select the font, change the type of rotation and other parameters.

Also shown in the image below is the window Photo screensaver options in which you can choose which folder to show photos or images from, as well as the speed of the slideshow or enable a random order of displaying images. You can read more about how to install and configure photos as a screen saver in the article ➯

Setting up screen savers in Registry Editor
This method allows you to change various settings for screen savers and involves changing parameters in
Before making any changes to the registry, highly recommended
All standard screen savers can be customized using the system registry editor. Let's look at the settings of some screen savers, including those that can also be configured using the graphical interface (read above in the section)
All screen saver settings that can be changed use DWORD (32-bit) parameters.
● Screen saver Feeds
Description of parameters:
"CameraFOV"=dword:00000010
"RibbonWidth"=dword:3dfd2400
"NumRibbons"=dword:00000008
"Blur"=dword:00000001
● Parameter value CameraFOV
● Parameter Ribbon Width determines the maximum width of flying ribbons.
● Parameter NumRibbons is responsible for the number of ribbons that fly across the screen.
● Parameter Blur affects the tape trail. When setting the value to 0, the tape mark will not disappear. When set to a higher value, the tapes will rest on each other.
● Parameter values SpanMultiMon
● Parameter AllScreensSame used for computers with multiple monitors. There are only two values available for this parameter. If you set the value of this parameter to 1, then the same configuration file will be used on all monitors and an identical splash screen will be displayed.


● Screen saver Geometric Waltz
To change screen saver settings Geometric Waltz create and apply a registry file with the following content:
Windows Registry Editor Version 5.00Description of parameters:
"CameraFOV"=dword:00000002
"LineWidth"=dword:00000014
"NumLines"=dword:00000006
"SpanMultiMon"=dword:00000001
● Parameter value CameraFOV affects the camera's approach; the higher the parameter value, the closer the tapes are displayed.
● Parameter LineWidth defines the maximum width of the line trace.
● Parameter NumLines is responsible for the number of lines that fly across the screen.
● Parameter values SpanMultiMon Only affects users with multiple monitors. Setting this to 1 allows the screensaver to move between the two monitors.
The result of making changes to the system registry is shown in the screenshots below.


● Screen saver Soap bubbles
To change the Soap Bubbles screen saver settings, create and apply the following registry file:
Windows Registry Editor Version 5.00Description of parameters:
"ShowShadows"=dword:00000001
"MaterialGlass"=dword:00000000
"ShowBubbles"=dword:00000001
"TurbulenceForce"=dword:499602da
"TurbulenceSpeed"=dword:00000008
"SpanMultiMon"=dword:00000001
"SphereDensity"=dword:4153a200
"TurbulenceNumOctaves"=dword:00000055
"Radius"=dword:42294180
● Using the parameter ShowShadows You can specify whether a shadow will be displayed under the bubbles. If you set the value to 0, there will be no shadow, and if you set the value to 1, then a shadow will be displayed under the bubbles.
● Parameter ShowBubbles determines the screen color. There are also only two values available for this parameter. If you set the value to 0, the bubbles will move on a blank screen, and if the value is 1, then the user's desktop will be visible when the splash screen appears.
● Parameter TurbulenceForce affects the color of the bubbles, and when set to 0, the color of the bubbles becomes black. To set the desired color, you need to experiment with this parameter. For example, in order for all the bubbles to shimmer in different colors, you can specify the value 499602da or 1234567898 in the decimal system.
● The parameter determines the average speed at which bubbles move across the screen. TurbulenceSpeed. The parameter values can vary from 0 to 10, that is, the minimum speed is set to 0, and the maximum speed is set to 10.
● Parameter values SpanMultiMon Only affects users with multiple monitors. Setting this to 1 allows the screensaver to move between the two monitors.
● Using the parameter Sphere Density You can specify the exact number of bubbles that will move across the screen. In order to find a certain amount, you need to experiment. For example, to have only 4 bubbles move across the screen, enter the value 3d278480 or 1026000000 in decimal. The maximum value in the decimal system is 2100000000.
● Using the parameter TurbulenceNumOctaves You can specify the rate at which the color of the bubble changes. Values available for this parameter range from 1 to 255. The higher the value of the parameter, the faster the color of the bubble will change. And, accordingly, if you set the value to 1, the colors will practically not change.
● Parameter Radius is responsible for the size of the bubble. Just like with the TurbulenceForce and SphereDensity parameters, you need to experiment a little to specify the size you need. The maximum value of the parameter is 435a6e80 or 1130000000 in the decimal system.
The result of making changes to the system registry is shown in the screenshots below.


● Screen saver 3D text
To change the 3D Text screen saver settings, create and apply the following registry file:
Windows Registry Editor Version 5.00Description of parameters:
"AllScreensSame"=dword:00000000
"SurfaceType"=dword:00000002
"Specular"=dword:00000001
"SurfaceColor"=dword:0040ff00
"CustomEnvironment"=""
"CustomTexture"=""
"UseCustomColor"=dword:00000000
"UseCustomTexture"=dword:00000001
"UseCustomEnvironment"=dword:00000000
"MeshQuality"=dword:00000258
"Size"=dword:0000000a
"RotationSpeed"=dword:0000000a
"RotationStyle"=dword:00000001
"DisplayString"="site"
"DisplayTime"=dword:00000000
"FontWeight"=dword:000002bc
"FontItalic"=dword:010000ff
"FontFace"="Times New Roman"
● Parameter AllScreensSame used for computers with multiple monitors. There are only two values available for this parameter. If you set the value of this parameter to 1, then the same configuration file will be used on all monitors and an identical splash screen will be displayed.
● Using the parameter SurfaceType You can select the text surface style. To set the Solid Color style, the value should be 00000000. To set the Texture Painting style, set the value to 00000002, and for the Reflection style, set the value to 00000001.
● You can display highlights using the Specular. There are only two values available for this parameter. If you set the value of this parameter to 1, the highlights will be displayed.
●Using the parameter SurfaceColor You can specify the color of the text displayed on the screen. For example, if you specify a parameter value of 0040ff00, bright green text will be displayed.
● In a string parameter CustomEnvironment indicates the path to the image with reflection for the surface style of volumetric text in the format *.bmp.
● In a string parameter CustomTexture indicates the path to the image with the texture for the surface style of the volumetric text in the format *.bmp.
● Parameter UseCustomColor Another color. There are only two values available for this parameter. If you set the value of this parameter to 1, then the color is taken from the SurfaceColor parameter.
● Parameter UseCustomTexture responsible for whether the checkbox is checked Select texture. There are only two values available for this parameter. If you set the value of this parameter to 1, then the reflection is taken from the CustomTexture parameter.
● Parameter UseCustomEnvironment responsible for whether the checkbox is checked Select reflection. There are only two values available for this parameter. If you set the value of this parameter to 1, then the reflection is taken from the CustomEnvironment parameter.
● The text resolution level is selected using the parameter MeshQuality. This parameter can have 10 values. Namely: 00000064, 000000c8, 0000012c, 00000190, 000001f4, 00000258, 000002bc, 00000320, 00000384 and 000003e8.
● Parameter Size is responsible for the size of the displayed text. Available values are from 1 to 0a (10 in decimal).
● Parameter RotationSpeed is responsible for the speed of text rotation. Available values are from 1 to 14 (20 in decimal).
● Using the parameter RotationStyle You can specify the type of text rotation. There are 5 types of rotation – No, Torsion, Swing, Waves And Coups. To specify the type of rotation No, set the parameter value to 00000000. For type Torsion - 00000001, Swing - 00000002, Waves- 00000003, and to set the type Coups, the value should be 00000004
● Using a string parameter DisplayString You can set the text that will be displayed during the screen saver.
● Parameter DisplayTime is responsible for displaying the current time instead of text. There are only two values available for this parameter. If you set the value of this parameter to 1, the current time will be displayed during the splash screen.
● Using the parameter FontWeight, you can specify whether the text style will be regular or bold. In order for the text style to be normal, specify the value equal to 00000190, and if you need to make the text with a bold style, specify the parameter value 000002bc.
● Parameter FontItalic is responsible for italic text. In order for the text style to be normal, set the value to 01000000, and for italic style - 010000ff.
● Using a string parameter FontFace You can specify the font for the displayed text.
The result of making changes to the system registry is shown in the screenshots below.


Other screen saver settings
Using the system registry editor, you can also completely disable the screen saver, select the specified screen saver, and also prohibit its modification, set the screen saver timeout, and specify password protection.
Disabling the screensaver
Using this registry setting, you can prevent screensavers from running. To do this, create and apply a registry file with the following content:
Windows Registry Editor Version 5.00
"ScreenSaveActive"="0"
After applying the registry file, in the Screen Saver Settings dialog box, the Screen Saver section will no longer be available. As a result, you will not be able to change the screen saver settings.

Prevent changing the screensaver
Using this registry setting, you can prevent screensavers from being changed. Additionally, the setting prevents you from using Control Panel and Personalization to add, customize, or change the screen saver on your computer. However, starting the screensaver is not prohibited.
For this setup, create and apply a registry file with the following content:
Windows Registry Editor Version 5.00
"NoDispScrSavPage"=dword:00000001
After applying the registry file, if you try to open the "Screen Saver Settings" window using any of the methods described at the beginning of the article, you will receive a message Your system administrator has disabled the screen customization option in Control Panel.

Applying the specified screen saver
When using this registry file, only the screen saver that was specified in the registry file is used. Additionally, in this case, the screen saver drop-down list in the Screen Saver Options dialog box in the personalization control panels becomes unavailable. In order for the registry file to be applied correctly, you must enter the name of the screensaver file, including the extension SCR. If the screensaver file is not in the directory %Systemroot%\System32, you must enter the full path to the file.
Windows Registry Editor Version 5.00
"SCRNSAVE.EXE"="C:\\Windows\\System32\\Mystify.scr"
Screen saver timeout
Using the system registry, you can also determine the time of user inactivity, after which the screen saver starts. This setting can be set to an inactivity time value ranging from 1 second to 86400 seconds (24 hours). In the following example, the time is set to 60 minutes:
Windows Registry Editor Version 5.00
"ScreenSaveTimeOut"="3600"
Protect your screensaver with a password
In this material we want to present the most beautiful and pleasing to the eye screensavers for Windows 10, which can delight you with their originality and appearance in those moments when your PC is inactive for a long time.
At one time, screensavers were very popular and could be found on almost every Windows design site. Today the fashion for them has largely passed. This is due to the elementary lack of necessity, which disappeared a long time ago with the advent of modern monitors.

Therefore, this selection has rather aesthetic and nostalgic purposes: perhaps some of the users, like us, will be pleased to see/remember something beautiful, since some screensavers are a real work of art. By the way, despite the title, screensavers should work in any version of Windows, although we tested screensavers for Windows 10.
Alas, most, despite their advanced age by computer standards, will one way or another ask you to register, but all of them have trial versions that offer many features and for free.
How to change the screensaver in Windows 10?
First, let’s clarify one important point: in the “Personalization” interface in Windows 10, unlike previous versions of the OS, there is no section with screensavers itself, which is why it may even seem that this function has been cut out from the system. But that's not true.
Using the built-in taskbar search, start typing "screensaver" or "change screensaver" and you will see the following result:
Clicking on it will open a window that is familiar from previous versions of Windows, where you can enable, change the Windows 10 screen saver or change its settings:
One more detail: we marked the link with an arrow in the screenshot above. You may need to walk through it to increase the time after which the system automatically turns off the display. The default is 10 minutes.
If for some reason you may need a screen saver for a long time, then the interval for turning off the display will have to be increased, fortunately this can be done in just a couple of clicks:
Mechanical Clock – screensaver with a mechanical clock
We will start our short review with one very famous screensaver, which you could well see on various working devices in computer stores. This is Mechanical Clock - a clock screensaver with amazing attention to detail, simulating a clock mechanism that always displays the exact time.
This screen saver, like most screensavers for Windows 10 in our review, is far from new, but the highly detailed, literally magical picture still looks attractive to this day.
An unusual effect is created by the smooth movement of all, even the most distant elements in this mechanism.
The sound part also did not disappoint: in addition to the usual “tick-tock”, the live clock strikes every 60 minutes. This, as well as the effect volume level, can be adjusted in the parameters.
By the way, this, like some other screensavers in the review, can also be used as animated wallpaper on the Windows desktop.
Christmas Evening – New Year's screensaver
Christmas Evening is a very cute screensaver for Windows 10 on the theme of Christmas and New Year. The picture shows us a cozy corner where in the center of the table there is a miniature clock, stylized as a snow-covered house, which is surrounded by gifts, New Year's toys, candles and other decorations.
On the street, which is visible through the windows of the room, it is snowing, there is a decorated fir tree with blinking garlands, and passers-by are walking, wrapped in warm scarves. Since the graphics of this screensaver are very good, there is even a slider in the settings to weaken it, which will be useful for the weakest Windows 10 computers.
In turn, the audio series contains well-known New Year and Christmas themes, accompanied by the neat sound of a clock running. This screen saver can also be used for your desktop.
Helios Screensaver - soap bubbles in Windows
If you don’t need fancy, “heavy” screensavers like those above and below, then pay attention to a screen saver called Helios. It is free, weighs less than 300 kb, and is similar in style to the animations built into previous versions of Windows. It just looks a little more interesting.
When launched, elegant soap bubbles begin to form smoothly against a dark background, with many beautiful particles. Some, changing shape and size, slowly flow into others and vice versa, and the camera sometimes looks deep into this action.
Helios slows down and speeds up, unobtrusively changing the perspective and viewing angle. The effect of iridescent color on the bubbles themselves looks very unusual, making the screensaver more attractive.
Note that Helios, unlike other participants in the review, must be manually placed in the Windows\System32 folder. This is where screensavers are stored in Windows 10. Helios may also noticeably freeze if your graphics drivers are not installed/updated.
Marine Aquarium – aquarium screensaver for Windows 10
One of the most attractive types of computer screensavers is, of course, live aquariums with swimming fish. They are represented in our selection by the third version of Marine Aquarium - one of the most famous virtual 3D aquariums.
In the free version (enter “testfish” in the window that appears), alas, only six types of fish are available to the user. More than twenty more will open only after paid registration. In addition to the usual inhabitants of the aquarium, starfish and a moray eel living in the cave will also be available there.
The aquarium camera is not static: it smoothly moves left and right, in addition, it can be moved using the corresponding keys on the keyboard. In the settings you can adjust the music volume, bubbles, frame rate, total number and specific fish, as well as background colors. Here's the video of the intro:
In addition, you can select a playlist of your music, and replace the developer’s logo with a digital or analog clock.
Dream Aquarium – another live aquarium with swimming fish
Another stunningly beautiful aquarium screensaver for your screen. This virtual world also offers several different landscapes to choose from. By default they alternate, but you can choose one if you wish.
Settings are opened by pressing Enter directly in the splash screen itself. Here you can add and remove aquarium inhabitants. There are 26 fish to choose from, plus the ability to create your own fish with a unique coloring, and there's also a cute fiddler crab.
The remaining settings allow you to adjust the aquarium lighting, air bubbles and fish feeding. A noteworthy option is that it attaches the camera to the general view of the aquarium or dynamically moves it behind the fish. I was amused by the ability to set your own image as the background of the screensaver. So we made the title picture for this text.
Icy Christmas Screensaver – ice on the computer screen
Another type of screensaver is different in that it adds all sorts of effects to your desktop when nothing happens to it for a long time. There are many such screensavers, but, unfortunately, since most of them were made quite a long time ago, some are simply incompatible with Windows 10.
Fortunately, this does not apply to Icy Christmas, which freezes your screen. An ice crust gradually begins to appear from each corner, which slowly covers the entire space. Despite its simplicity, the screensaver has a lot of parameters: the appearance of the ice can be customized in detail, it is even possible to specify the direction of the light rays.
By default, the Windows 10 screen saver works with the desktop, but in the settings you can instead set an image or a set of images (for example, photos) that will be covered with ice while the computer is idle.
Watery Desktop 3D – rain on your desktop
This screensaver also affects your desktop in Windows 10, only it does not freeze, but floods it with rain or even submerges it under water. The effects - raindrops and waves, we note, are made very high quality. Obviously, for this reason, the options even have the ability to weaken their visual performance.
Initially, the screensaver launches a random action, but you can choose something specific. You can choose from light or heavy rain, three types of waves and storm. You can also adjust the strength of the water vibrations themselves. We repeat, everything looks very realistic, take a look for yourself:
The Lost Watch – watch under water
The Lost Watch is one of the most beautiful screensavers in our review, not only in terms of graphics, but also in general the idea itself. Here is the cutest pocket watch with a chain that ended up under water. Droplets of water fall from above, and tree leaves slowly float by.
The watch, despite its original location, always shows the exact time. They even have a working second hand. The current date and day of the week are also displayed.
In the settings, you can specify the volume level, lower the quality of graphics for not the most powerful computers, select your own composition for background music and set a screensaver on the Windows 10 desktop. A particularly interesting option: you can add a miniature pendant under the clock, where the photo you have chosen will be displayed.
In the settings, in addition to the standard options for volume level and graphics quality, it is possible to select the type of fireplace. There is a choice of stone, traditional brick and a special Victorian style fireplace (pictured above). Of course, you can put your own music and use it on your desktop.
Photo! 3D Album – unusual slideshows
The final participant in our review is not even a screensaver, but a full-fledged creative application, the result of which, among other things, can be used as a screensaver. Photo! 3D Album offers several virtual locations - galleries, parks, beaches, where various paintings can be placed on stands in neat frames.
These pictures can be images from your computer, be it any drawings or photographs. You can fit them at your discretion into the free frames that are hung around the locations. For convenience, there are options that “adjust” the picture so that it looks better in the frame.
Once everything is ready, you can launch any of the virtual worlds to which you added your images. Agree, this is many times more interesting than a regular slide show.
By default, the program “walks” there itself, looking at your illustrations, but by pressing F1 you will transfer control into your hands. This will almost resemble a computer game, where WSAD is used for movement, Shift for acceleration, etc. If you use Photo! 3D Album as a screensaver, then in its parameters you will see several additional options.
Conclusion
As we already noted at the beginning, traditional screensavers are practically a thing of the past today, since they do not have specific functions, and on modern portable devices, when the user is inactive, it is more reasonable to simply turn off the screen rather than waste the battery on a screensaver, especially if the latter itself also consumes a lot of resources.
On desktop PCs, where screen savers came to us, there are no such restrictions. However, screensavers still disappear, which is clearly seen in Windows 10, where screensaver settings are not even included in the main personalization options.
On the other hand, during the popularity of screensavers, several such good and creative works were made that users cannot forget about them to this day. We showed ten such memorable screen savers in this material. We hope you enjoyed it.
This operating system focuses on visual appeal and user comfort. The OS, by default, provides background images. Where can I find standard wallpapers for Windows 10 and how to download them?
Where are the default wallpapers stored in Windows 10?
To find background images, you need to follow these steps:
3. In the window that opens, in the list (located on the left) we find the icon for the drive C – OS (C:).
 4. In the list of folders on drive C, go to the “Windows” directory.
 5. In it we find the “Web” folder. This is what we need, as it contains all the standard Windows 10 desktop wallpapers.
The “Web” folder contains three directories:
- Screen;
- Wallpaper.

The first 4K directory contains nine identical drawings in the corporate style of dozens of Hero. They are specially made in various resolutions to ensure high-quality display on various types of screens and monitors.


"Wallpaper" contains three groups of preset image files in different resolutions.
Windows Spotlight
In addition to the usual background pictures, to ensure the operation of the “Windows: Interesting” function (automatically changes images on the lock screen), additional photographs are placed in the system. How to find them?
- Pressing the Win + R keys simultaneously will open the Run window.
 2. Enter the following command in the “Open” field:
%USERPROFILE%\AppData\Local\Packages\Microsoft.Windows.ContentDeliveryManager_cw5n1h2txyewy\LocalState\Assets
3. After clicking OK, a window with a list of files will open  9. The drawings need to be copied to some new folder.
Now their format needs to be made usable. If there are few files, they are manually renamed with the addition of the extension - .jpg. For a large number of documents, the name can be changed as follows:
- in the folder with the copied pictures, click on the address bar;
- enter the cmd command and press the Enter button;

- A command line will appear in which you need to type the combination: Ren*.* *.jpg;

- press Enter;
Everything is ready to use.
How to download standard windows 10 wallpapers
To download system background images to a storage device or other device, you need to go to the desired directory, select the file of interest and, in the standard way (Ctrl+C - copy, Ctrl+V - paste), move it to the desired address. Renamed files for the design of “Windows: Interesting” are easily downloaded to the desired device in the same way.
New versions of standard Microsoft background images can be downloaded from the company's official website. To do this, enter a query into a search engine - Microsoft help.

Enabling the screen saver or accessing screen saver settings is not much of a task in Windows 10, especially for users who have just updated to the latest version of the Windows operating system. The classic Personalization window (where we could access screen saver settings) has been removed from Windows 10, and the new Settings app also doesn't include an option to enable screen saver customization. Screen savers continue to be a part of the Windows 10 operating system. Six screen savers are available: voluminous text, ribbons, bubbles, hoax, blank (shows a black screen) and photos as a screen saver. If you have installed new screensavers, they will also appear in this list. You just need to access the settings and enable them. In this guide, we'll walk you through how to access and enable the screen saver settings in Windows 10.
How to get into the screensaver settings in Windows 10
1 way. Open Options > Personalization > Lock screen > Screensaver options.
Method 2. Let's enable or disable the screen saver through the registry. Open Registry Editor by opening Start and searching for regedit.
- In Registry Editor, navigate to the following key:
HKEY_CURRENT_USER\Control Panel\Desktop
- On the right find ScreenSaveActive and double click on it. Set value 1-enable screen saver, 0-turn off.

Installing and activating a third-party screen saver in Windows 10
If you are not satisfied with the default set of screensavers, you can download interesting ones from the Internet. However, be sure to only download from places you trust. And if you don't know where to download, DeviantArt is one such place where you can download screensaver safely. I provided a link to the site immediately showing the search for all the screensavers that are there. Select any and click on it, a new page will open for you, and at the top right click Download to download it.
To install a third-party screen saver:
- Copy the screen saver file you want to install to a safe place to make sure it won't be accidentally deleted.
- Right-click on the screen saver file and click " Install".
- Automatically opens the Screen Saver Options dialog box with the new one selected. Click the "Apply" button to apply the newly installed screen saver.
- If you have set a password for your local user account or use a Microsoft account to sign in to Windows 10, you can check the " Begin withlogin screen", to force the user to enter a password.

How to Set Photos as Screen Saver in Windows 10
Luckily, you don't need to use a third-party tool to set photos as screensaver in Windows 10. You can use the built-in screensaver feature in Windows 10 to set photos as screensaver in Windows 10. You can set one photo or multiple photos as screensaver in Windows 10: When you install multiple photos, Windows 10 will show those photos as a slideshow.
- Go to settings as described above and select "Screen saver" > Photos. On Windows 10, it will automatically start showing your photos that are in the Photos app right away. You can also specify any folder with photos to display a slide show on the screen by clicking on Options and Overview.
