Disabling the installation of Windows 7 drivers. Search in Windows Update - how to disable it? Deactivating the installation of control software through the registry
Read also
Open full size " href="http://www.winblog.ru/uploads/posts/2012-02/1330429842_13031201.jpg">
Figure A. When installing Windows 7, you need to choose one of the options for installing updates.
As is known, has a huge driver database and supports almost all known devices. After you install a driver, the operating system adds it to the watch list and can regularly check for new or updated drivers using Windows Update.
Of course, there are two schools of thought regarding the drivers provided by Microsoft. Some people believe that getting drivers from Microsoft is a good thing because they are verified and certified by Microsoft before being added to Windows Update. Others believe that getting drivers from Microsoft is bad because they are essentially a stripped-down version of the drivers from the device manufacturer.
In addition to these considerations, there are also factors of ease and ease of installation. New drivers from Windows Update are detected and installed automatically, with little or no user interaction. To update drivers manually, you need to regularly check the device manufacturer's website, download and install them yourself.
So, depending on your point of view when installing Windows 7, you could choose the "Use recommended settings" option, which ensures that drivers are updated along with the rest of the operating system, or the "Install Important Updates Only" option, which does not providing automatic driver updates. But suppose your views have changed since then - what to do? Luckily, Windows 7 has a little-known Device Installation Settings tool that lets you change how you search for and install driver updates.
In this article, I'll explain the benefits of Windows 7 automatically detecting and installing drivers, and then explain how to enable or disable this feature.
Benefits of Automatic Updates
Let's see the benefits of automatic detection and installation drivers devices using Windows 7. This allows the operating system to load not only drivers, but also high-resolution icons for devices connected to the computer, as well as detailed information about the hardware.
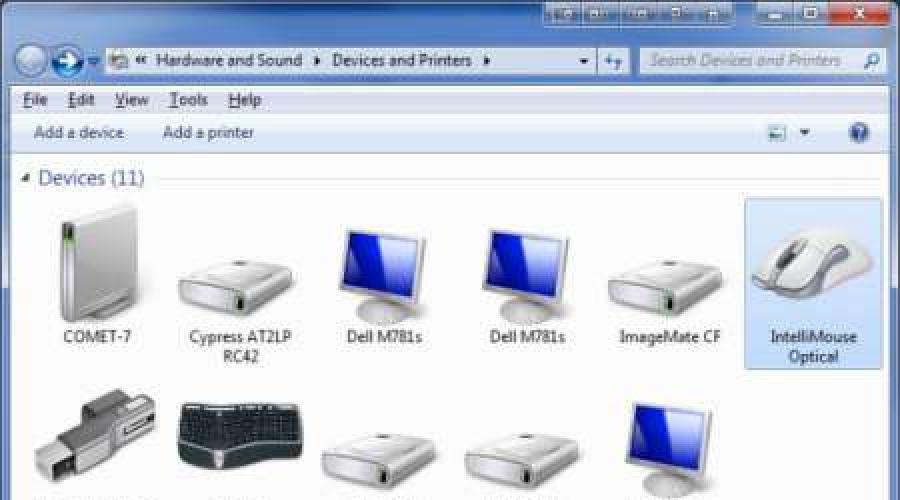
For example, if I open the Devices and Printers window from the Start menu on my test computer, I can see large icons for all the connected devices (Figure B). As you can see, the IntelliMouse Optical mouse is highlighted in the screenshot, and information about it is displayed in the status bar. Clicking on the device icon will open a window with more detailed information (Figure C and D).
Open full size " href="http://www.winblog.ru/uploads/posts/2012-02/1330429813_13031201_02.jpg"> 
Figure B: The Devices and Printers window may display large icons for connected devices.
Open full size " href="http://www.winblog.ru/uploads/posts/2012-02/1330429828_13031201_03.jpg"> 
Figure C. By clicking on the icon, you can get more detailed information about the device...
Open full size " href="http://www.winblog.ru/uploads/posts/2012-02/1330429859_13031201_04.jpg"> 
Figure D. ...with a link to the manufacturer's website.
Calling the "Device installation options" window
You can enable or disable automatic search for and installation of driver updates through Windows 7 Update in the Device Installation Options window. To call it, right-click on the computer icon in the "Devices and Printers" window. A context menu will appear with a variety of options, including Device Installation Options (Figure E).

Figure E This shortcut menu provides quick access to a variety of useful features.
When you select the "Device installation parameters" option from the context menu, a window of the same name opens (Fig. F). To allow Windows to automatically download drivers and realistic icons for devices, select the "Yes, Do This Automatically" option. For the “No, Let Me Choose What to Do” option, as you can see, there are three options available, including “Never Install Driver Software from Windows Update.” There is also an option "Replace generic device icons with enhanced icons".
Once you have made your choice, click the “Save Changes” button. You may need to confirm the operation in the User Account Control window.
So, and We have a computer and an HP LJ 1018 printer. After an unsuccessful attempt to reinstall or update the printer drivers by the client, in the menuDevices and Printers next to the printer icon yellow exclamation mark. The device refused to work normally.
Usually in such cases, I don’t waste time digging through the printer settings, but immediately completely, completely, reinstall the driver and the rest of the printer software.
First of all, I removed everything related to the HP printer from the computer, then I started installing the driver; fortunately, the client had carefully left the installation disk in the CD-ROM. But here the problems began. Well, naturally, if everything were so simple, it is unlikely that a person would seek help.
Search Windows Update. It can take some time…
When the installation program asked to connect the printer via USB, the Windows Driver Installation Wizard was launched and began to try to automatically search for a suitable driver on the Internet.
After 15 minutes of waiting there was a feeling that search for updates frozen, considering that this long search was not required in principle, because the driver was on my disk. My patience ran out and I decided to cancel the operation in order to permanently disable the automatic driver search function in Windows 7.
By the way, a situation often arises that Windows Driver Update Center installs incorrect drivers for the equipment, or even, after a very long search, reports that “ Could not find driver«.
So, my advice to you is to disable this Windows function and install drivers downloaded from the official websites of your equipment manufacturers, or, as in this case, from the disk supplied with the printer.. Subscribe!
How to disable automatic search for drivers in Windows Update 7?
So, let's begin. Let's go to the menu Start, right-click on Computer, choose Properties( Or just press the Win+Pause key combination ).

In this menu you need to select " Never install drivers from Windows Update". Don't forget to click Save.

Windows Update endlessly searching for updates - [Solved].
So, after disabling the automatic search for drivers in the update center, when connecting the USB printer cable to the system unit, Windows skipped this useless operation and immediately went on to search for the driver on the disk, where it, of course, was successfully found and installed within 20 seconds.
Printing a test page - hurray, it works!
By the way, perhaps the problem can also be solved by simply disconnecting the Internet cable. Try it, write about the results in the comments!
Very often, Windows 10 installs driver updates for your computer's hardware components even when you don't need them. However, you can always prevent Windows updates from being installed or block or hide individual updates using the Show or hide updates utility. Pro or Enterprise users can also use the Group Policy Editor to prevent device-specific drivers from being installed.

Please note that setting Group Policy for an individual device allows you to block both automatic and manual driver updates. Therefore, if you want to update the driver yourself, you will have to disable the corresponding policy, update the device, and then reinstall Group Policy.
In order to block the installation of drivers for a device, you need to complete two main steps. First, we will use the hardware ID to lookup. We will then work with the Local Group Policy Editor to set the update blocking rule that matches the device ID. Before you start setting up, make sure that a stable version of the driver is installed on your computer and that the device is working correctly.
1. Find the device ID
- The first step is to find the identifier of the device whose driver updates you want to block. To do this, we will use Device Manager. Enter the Start menu in the search bar or use the "Device Manager" item in the context menu of the Start button (called by right-clicking).

- In Device Manager, find the device whose driver updates you want to block. Right click on it and select Properties.

- Go to the tab Intelligence.
- Select an option from the drop-down list Equipment ID to display the IDs associated with the device.

- Now all that remains is to copy the identifier values so that you have access to them when configuring Group Policy rules. The easiest way is to copy the ID to a text file. Select all values by holding down the Shift key and use the familiar Ctrl + C and Ctrl + V shortcuts to copy and paste, respectively. Be sure to save your changes to a text file so you can access this information in the future.

2. Block installation and updating of device drivers
Now that we know the device IDs, you can use the Group Policy Editor to make changes. We remind you once again that this method only works in Windows Pro and Enterprise versions. In Windows Home, the Group Policy Editor is not available.
is a powerful tool that, if used incorrectly, can disrupt the performance of the system. So use with caution. If your computer is part of a corporate network, then it is likely that it is running domain rules that have higher priority than local rules.
- Sign in to the device administrator account and open the Group Policy Editor by typing gpedit.msc in the search bar of the Start menu and pressing Enter.

- In the editor window, follow the path Computer Configuration > Administrative Templates > System > Device Installation >. On the right, select the entry and double-click on it.

- In the policy settings window, select the option Included, then press the button Show.
- In the window Content output In the "Values" column, enter device IDs. You can only enter one ID at a time, so copy each ID from the text file one by one and paste it into the “Values” column. When you have completed entering IDs, click OK. If you block updates for multiple devices, you can add hardware IDs for all devices in this window.

- Then on the policy settings page, click Apply and OK to save the changes. The only way to verify that the rule is working is to try to update the driver manually or wait while Windows Update tries to install available updates. When you try to update, an error message appears.
Because the device is registered with the system, Windows Update can download driver updates for it. However, the updates will not be installed; instead, an error message will appear in the Update Center window
If at any point you change your mind and want to update your device again, go to the Group Policy Editor and disable the policy. This will need to be done even if you manually install driver updates.
When the policy is disabled, all identifiers are deleted. When you turn it back on, you will need to enter all ID values again. Therefore, if you need to install updates only for a specific device, you can exclude its identifier and leave the policy active. Also, don't forget to save all IDs to a text file.
Of course, this is not the easiest solution, but using the Group Policy Editor makes Windows 10 updates more flexible than turning them off completely.
Note: As an alternative solution, you can use the ABC-Update application, a functional tool for managing Windows updates.
Windows is improving, and along with it, the automatic installation tools built into the system are changing. Installed Windows, connected to the Internet, and the operating system will install all the necessary drivers on its own!
It would seem, what could be more convenient? But, unfortunately, quite often the equipment does not work correctly with the drivers built into Windows. And installation of drivers is required from the equipment manufacturer. But Hardware Installation Wizard in modern Microsoft Windows 7 is so “independent” that if drivers for the hardware are already in the system, it simply blocks the installation of all third-party drivers.
How to disable automatic driver installation in Windows 7?
To prevent Windows 7 from installing its drivers automatically, you need to configure the settings for installing new hardware.
Open System Properties:
Start --> Control Panel --> System.
The options window will open Systems. On the left side of the page that opens, click on the link Advanced System Settings:
In the new System Properties dialog box, go to the Equipment and click on the button Device installation options

You will see a window for changing driver installation settings for connected equipment

Check the box on the line No, give a choice.
In the submenu that opens, check the box Never install drivers from Windows Update and press the button Save.
After that in the window Properties of the system click the button OK.
It is also useful to disable Windows Update while installing the driver you need. For the changes to take effect, restart your computer. Sometimes these actions have to be carried out in Windows Safe Mode under Administrator rights.