How to make a hard drive adapter. Connecting a hard drive via USB, step-by-step instructions. You might be interested
The production of hard drives does not stand still. Technologies are actively developing: writing and reading speeds are increasing, service life is increasing, new standards and form factors are appearing, which is why many old devices are becoming incompatible with modern computers. Using IDE SATA adapters, you can make even an old machine work with new drives.
Differences between SATA and IDE
IDE (ATA) is a parallel interface for connecting storage devices or optical drives to the motherboard. Old standard from the 1990s. IDE technology uses a 40-pin connector to connect to the motherboard and a separate 4-pin power supply. Currently an almost obsolete class. The exception is old equipment, which is still in use for unknown reasons.
SATA - serial information exchange interface. Now used in all new devices. It has a number of advantages over the old system.
Main advantages of SATA:
- high speed of reading/writing information;
- increased storage capacity;
- ability to connect devices without restarting the system.
There is also a more recent variety - eSATA. The same SATA, but guarantees stable contact throughout the entire operating time. Applicable for external HDDs.
Why do you need an adapter?
There are several problems that can make you want to purchase an IDE SATA adapter. For example, you have an old 80 GB IDE hard drive at home, and you suddenly need to “pull” a photo out of it. It will not work to connect it to a new computer with SATA connectors.
- There was suddenly not enough memory on the computer, and I had an IDE hard drive of the required size at hand, which at first glance was useless.
- The situation can be the opposite: without upgrading IDE interfaces, you want to get more additional memory or restore files.
All situations have one solution - use a SATA/IDE or IDE SATA adapter. It is capable of converting data flow from one system to another, thus blurring the boundaries between different standards. The complexity of the application is nothing more than using an adapter for microSD cards.

How to choose?
The first step is to decide which adapter you need. There are as many as five options:
- IDE/SATA.
- SATA/IDE.
- IDE USB.
- SATA USB.
- IDE SATA USB.
The first two points are suitable for indoor installation. They will be useful if you want to place one or more hard drives or SSDs of different standards in a computer case. Usually these adapters do not even have a housing and are not protected in any way. They look like a regular board, where it is intuitively clear where and what to connect.
An important parameter of an adapter from IDE to SATA is the speed of reading and transferring information. In the case of a USB adapter, this may be version 2.0 or 3.0. The latter allows you to process information faster, but depends on the version of the computer ports, as well as on the capabilities of the hard drive itself.
IDE SATA with USB output
In addition to adapters for switching between IDE SATA standards, you can find IDE SATA USB adapters on the shelves. This device allows you to connect any hard drive directly to the USB port, regardless of the standard. So, it is allowed to use ordinary ones as a large flash drive. This is most useful for laptops or tablets.

There are both universal (SATA IDE adapter on one board, connecting several media of the same or different types at once) and separate (SATA or IDE only) adapters. The choice depends on your specific needs and price. An important parameter when choosing will be the presence of a built-in or additional power supply. Without it, the adapter will cost a little less, but will be less functional. It is possible to use the computer's central power supply, but this is not always convenient, and you will also have to unscrew the cover every time.
Nutrition
IDE series drives are powered by a regular Molex connector with 12v and 5v pins. It is available on all power supplies.
SATA drives require connections for 12v, 5v and 3.3v boards. To do this, you can find a regular 15-pin SATA IDE power adapter with a Molex connector. The problem is that standard Molex does not have a 3.3v wire, which means it is not able to power a certain board block. This feature was taken into account by disk manufacturers and, to some extent, resolved.

Connected via a drive powered by a Molex/Sata adapter, it will work adequately on all machines, but not all will be able to support hot-plugging technology (removing or attaching to the system during operation). Most modern power supplies have a separate output - a SATA connector, which is not Molex and includes 3.3v power. One way or another, modern SATA devices do not require a 3.3v voltage to operate.

Adapter or new drive?
There is no clear answer to this question. It all depends on your preferences and budget. Nowadays, memory prices have dropped significantly, but they are still not encouraging in some respects. Perhaps a more rational solution would be to purchase a new drive or docking station, which will allow you to quickly connect hard drives of different formats like a flash drive.
It is worth considering that buying a new hard drive may entail an upgrade of the entire system, while installing an adapter does not oblige you to anything.
Do it yourself
Most useful electronic devices can be assembled for just a few dollars with your own hands, without much electronics knowledge, but an IDE SATA adapter hardly falls into the category of easily reproducible devices. Ultimately, most likely, much more time and money will be spent than if you purchased a ready-made adapter, although it is easy to find many working diagrams on the Internet. But “technomonsters” should like this task.
The note outlines in an accessible form simple steps for adapting a USB-to-SATA converter to a form suitable for use using available tools.
Preamble
One day, for some (still unclear) reason, one of the onboard SATA nipples on a self-assembled NAS on miniITX (also an AoE server for diskless clients) failed, and since it was in the evening (and even on a long weekend ) then this imposed certain restrictions on the availability of the solution (although you can fly like a bullet to a convenience store, but laziness, as you know, is the engine of savvy minds).So, the task is this: connect a SATA screw to a miniITX system in the absence of free SATA.
Part I
Having quickly carried out an audit of the junk around the computer, we discovered the following adapter, which had been gathering dust for many years without use, because it was ordered at the dawn of the popularity of foreign online stores:As it turned out, the board is not just a USB-to-SATA converter, but is intended for devices such as laptop DVD drives that have a mating connector on board slimSATA(features an additional non-standard power supply). Thus, it was not possible to connect the adapter to ordinary SATA devices and it was thrown into a dark corner of the box for a long time.
So, the adapter contains a slimSATA connector, which includes a standard SATA 7pin female connector (as on connecting cables):

Even if you remove an additional non-standard slimSATA power connector from the board, when inserted into the HDD, the adapter will block access to the HDD power connector (SATA 15pin). There is only one way out - a SATA 7pin connector extension, for which we carefully cut off one of the ends of the standard SATA cable:
Now you can completely remove the slimSATA connector from the adapter board and solder the end of the SATA cable (without mixing up the RX - TX differential pairs!):
To impart mechanical strength to the joint between the cable and the board, it was decided to use PVC electrical tape (I abandoned the original idea of filling it with silicone sealant - it is unknown how “non-conductive” it is at 1.5 GHz):

Now let's move on to USB: since we need a replacement for the internal SATA, a two-meter skein from USB-A to USB-B inside the case will obviously be superfluous. We get rid of USB-B - unsolder a piece of the board with connectors and electrolytes (they are only needed when powering a USB DVD drive).
We will connect the adapter to the internal USB socket on the motherboard. Why do we crimp/solder (for 480Mbit/s it is better to solder) the contacts of the PLS-4 connector (it is more convenient, of course, PLD-10, so that it covers the entire comb at once, but only PLS-4 is present in the household):

After checking the pinout of the comb on the motherboard and the pins of the USB converter chip SPIF225A, we assemble:
So, after spending some time searching for the necessary pinouts, we quickly built this type of adapter, which allowed us to pick up a fallen HDD without rebooting and, as a result, thanks to its dimensions and getting rid of atavisms, it fit quite harmoniously into the interior of NASa:

Part II
After solving the problems with the NAS and its upgrade, the itching craving for perfectionism prompted me to modify the adapter. Why were the necessary connectors ordered: SATA 7pin male SMD& . We mark the seat for the SATA connector, we do it in such a way that the holes for the holder pins do not go through the signal tracks on the back side of the board (as they say - try it on seven times, cut one drill):We strip the copper and solder the holder pins on the back side of the board:
The pitch of the pins of the footprint on the board and the SATA connector is the same, as a result we get a neatly sealed connector:
Let's deal with the USB part. We mark and prepare a place on the board for landing miniUSB-B:
We solder the connector, showing virtuosity when working with a 0.65mm pitch of the miniUSB-B connector:

Some explanations are needed here, so here is the sequence of actions with miniUSB-B:
- We carefully bend the GND contact so that it does not interfere (the material of the legs is fragile - the leg of the first connector broke off when bent) and soldered it to the body - then we solder the body to the GND of the board;
- The ID pin is not used, so we simply pull it out of the connector with tweezers;
- Now it’s a little freer - there are three pins left - they need to be carefully moved apart with tweezers so that there is more space for maneuvering the soldering iron;
- We solder small extension conductors to the D- and Vbus pins, and slightly raise the inputs themselves so that they do not short-circuit to the board after installation;
- We leave pin D+ “as is” - physically, during installation, it falls on the corresponding polygon on the board;
- Now you can mount the connector on the board - we grab the housing diagonally, then carefully deal with D- and Vbus.
The second version of the adapter turned out to be much more aesthetically pleasing:

Small touch
Everything is fine. Both functionality and aesthetics, but lacking zest. Having looked through the documentation for the USB-to-SATA bridge SPIF225A, and she was found: " pin 36 - HDD Activity LED output". Great:
We unsolder the 10K resistor (PullUp to suppress interference on the TriState-pin?) and solder in a chain of series-connected R and LED. A resistor with a value of hundreds of ohms (I took 1 kOhm), an LED cathode to pin 36 of the microcircuit (determined by testing or documentation):
Bottom line
Using the example of adapting a USB-to-SATA converter, a method for quick modification using a minimum of available materials was shown (quickly restoring the functionality of diskless clients), and also demonstrated an approach to a more thoughtful and elegant solution.
Introduction.
Most laptop owners sooner or later face the problem of running out of space. As a rule, laptops with screen sizes up to 15 inches inclusive do not have a free second slot for a 2.5-inch device. Therefore, owners are forced to think about either replacing the laptop itself or replacing its hard drive. After replacing the hard drive, there is always an old drive left, which can easily be turned into an external USB drive for transferring data.
Naturally, you can purchase a mobile 2.5-inch hard drive and turn it into an external drive. Fortunately, the cost of external drives allows this. For example, at the time of writing, for a 250 GB mobile hard drive they are asking $40, and for a 500 GB device from WD they are asking only $45.
We decide on the type of hard drive.
To be fair, it should be noted that an ordinary desktop 3.5-inch hard drive can also be turned into an external drive - you just can’t call it mobile. If you have an unused 2.5 or 3.5 inch hard drive, then first of all you need to decide on the type of its interface.
Today on the market there are the following types of interface: IDE (ATA) and various SATA options. As a rule, all SATA interfaces are backward compatible with each other, and we will not dwell on their variations. The situation is completely different between IDE and SATA interfaces, which are absolutely incompatible with each other and have different connectors.
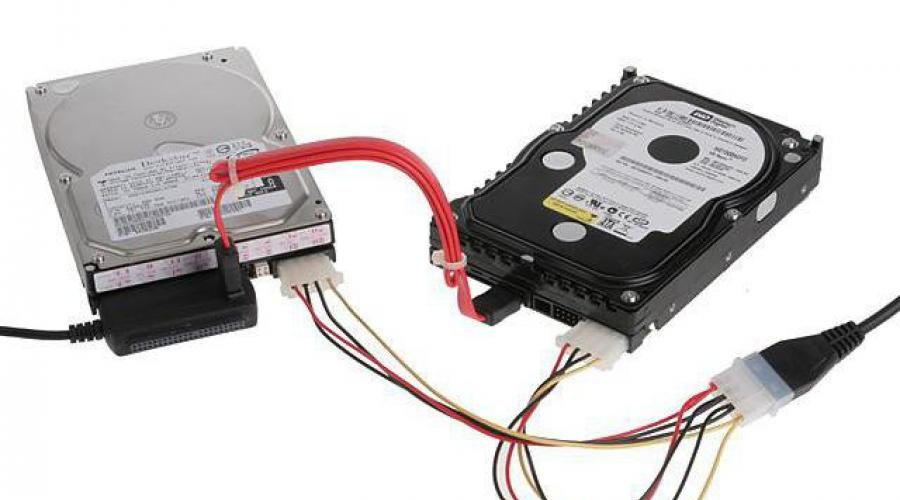
The picture is clickable --
The figure shows two hard drives with different interfaces. Hard drives have a mobile format of 2.5 inches. On the left is a hard drive with a SATA interface, on the right is a hard drive with an IDE interface.

The picture is clickable --
In our hands was a 250 GB hard drive from Western Digital Scorpio Blue series with a SATA interface. This drive was used in an Acer laptop for a long time, but its capacity became insufficient, and it was replaced with a more capacious 500 GB solution.

The picture is clickable --
Despite long-term use, the performance of the hard drive did not cause any complaints, so it was decided to use it as an external mobile drive. To do this, we had to find an external case for it, which is what we did. External case AGESTAR for 2.5 inch mobile hard drive.
Computer hardware stores offer a wide variety of external cases for 2.5-inch hard drives. Their key difference is as follows:
- body material,
- type of external port (interface),
- cost.
As a rule, stores offer various cases with a USB 2.0 interface, a much smaller number of cases with an eSATA interface, and even fewer cases with a combination of USB 2.0&eSATA. Several cases with a modern USB 3.0 interface were found on sale, but their cost exceeded the cost of the hard drive itself, so we did not consider them.
The key difference between USB 2.0 and eSATA interfaces is data transfer speed. Using the USB 2.0 interface allows for maximum compatibility, since these ports are available on all computers. A significant disadvantage of the USB 2.0 interface is its low data transfer speed, which will not allow you to unlock the full speed potential of your hard drive.
The eSATA port is more promising, but it is not widespread and is found only in expensive versions of motherboards, cases and laptops. The eSATA interface allows you to fully unleash the potential of SATA devices.
The material used can also be very different. In a simple case, it is plastic. In more expensive variations, an aluminum case with a leather cover is included.
The cost of external cases also varies. The cheapest option will cost the user $3, expensive versions will cost more than $100.
Buying a $100 case for a hard drive that costs less than $40 when new and is half the price once it's in use is, to say the least, wasteful. Therefore, for testing we were provided with a case costing a symbolic 3 dollars - AgeStar SUB2P1. Equipment and external inspection of AgeStar SUB2P1.

The picture is clickable --
We didn't expect any miracles from a device that costs three dollars, both in terms of equipment and in terms of performance. The device comes modestly packaged in a package. The front wall of the device is covered with a cardboard listing the key characteristics of the device. This includes support for 2.5-inch mobile hard drives or solid-state drives with a SATA interface, the presence of a USB 2.0 data transfer interface and various color options.
To be fair, it should be noted that our suppliers confirmed that they had not seen any other color for this case other than black.

The picture is clickable --
After opening the package, we were pleasantly surprised by the fact that the kit included an instruction manual entirely in Russian.

The picture is clickable --
The case is completely made of plastic. There are paper stickers on the front wall indicating the model, which will be erased in any case, so we recommend immediately removing them from the surface of the device.

The picture is clickable --
The material used to make the case is soft black plastic, which does not smell of anything and is uniform throughout its structure.

The picture is clickable --
The covers of the device come off in two different directions, which ensures easy removal and installation of the hard drive in an external case.

The picture is clickable --
The two sides of the outer case are secured using a plastic latch made from the material of the case. Thanks to the recesses on the walls, the lids are securely fixed and spilling any glass of liquid, or leaving the device in the rain, is unlikely to lead to any problems.

The picture is clickable --
The device is designed for SATA hard drives, which we have repeatedly emphasized. Inside there are controllers with SATA ports for power and data transfer.

The picture is clickable --
On the side wall there is a mini USB port for data transfer and power supply to the hard drive. There is no additional port to provide power to the drive, which may cause some problems for users. With a weak power supply that underestimates the voltage along the 5 volt line, you often have to deal with problems starting the hard drive. As a rule, connecting the drive directly to a port on the motherboard, and not on the system unit case, and using a high-quality USB cable allows you to forget about this problem.

The picture is clickable --
Sellers of computer components often, as an advantage of this or that external case, talk about the presence of a USB data cable in the kit or offer to purchase it separately if it is not there. We advise our users not to pay attention to this, since a mini-USB-USB cable, as a rule, is available in almost every family and is often supplied with mobile phones. In our case, we successfully used a stale data cable from a Nokia mobile phone.

The picture is clickable --
The next step was to install the hard drive into the case. This is done quite simply - by lightly pressing. The most important thing is to first correctly rotate the hard drive according to the power and SATA data ports located in the case.

The picture is clickable --
The absence of any protruding elements on the hard drive controller circuit allows you not to worry about its rear surface when transporting and using the device.

The picture is clickable --
Some users may argue that the plastic case does not provide adequate heat dissipation from the hard drive. Naturally, external cases made of aluminum cope with this task much more effectively. At the same time, we should not forget that mobile hard drives do not have such high power consumption that they suffer from overheating, and in laptops, as a rule, they are not additionally cooled with anything.

The picture is clickable --
After completing the assembly of the device, the stage of its testing and use begins. The supply of voltage to the device is accompanied by the glow of a blue LED, which also symbolizes the user about the process of data transfer. It should be noted that not everyone will have a smooth start when starting to work with the created external drive. If the hard drive has already been used, has been formatted and partitions have been created on it, you will not have any problems getting started. It works like a regular flash drive using the Plug&Play method. But those users who purchased a new hard drive without formatting and with no partitions will have a problem that will be associated with the absence of a drive letter in the “My Computer” tab.
To do this, you need to create partitions on the hard drive and format it. This can be done through various boot disks, but it’s better not to bother and do it in the Windows operating system itself.

The picture is clickable --
To do this, you need to go to the "Control Panel" through the "Start" section, then visit the "Administration" section. In this section, select “Computer Management”, where in the “Disk Management” tab you can partition and format the newly connected external drive. After creating partitions and formatting them, you will have access to them through the “My Computer” tab and you will be able to exchange with the drive as with a regular hard drive. Test configuration.
The assembled external drive was tested both on a desktop computer based on a modern Core i7 processor and an equally modern motherboard, and on an Acer Aspire 7730 laptop based on a Core 2 Duo processor. It should be noted that the level of performance on two different systems turned out to be comparable.
1. Data reading speed was tested in the HD Tach 3.0.4.0 program

The picture is clickable --
It is pleasant to note that the external drive we assembled shows a much higher level of performance than the WD My Passport Essential external hard drive we previously tested. The maximum data transfer speed was 34.3 Mb/s, and the average latency was about 17.9 ms.
2. Data reading speed in HD Tune 4.5.

The picture is clickable --
In the second synthetic test, we received data similar to the previous ones, which also turned out to be slightly better than that of the official external hard drive WD My Passport Essential.
3. Write speed of 64 MB files in HD Tune 4.5.

The picture is clickable --
Testing that is closer to practice is somewhat more valuable, by recording files of 64 MB in size. In this test, we received quite expected results, which were also limited only by the capabilities of the USB 2.0 interface.
Separately, I would like to note that throughout the entire testing, the temperature of the hard drive did not exceed 35 degrees Celsius, while a similar hard drive installed in the laptop had a temperature of about 43 degrees. Therefore, worrying about the operating conditions of the hard drive in this case on the part of users will be unnecessary.
4. Boot speed of the Windows 7 operating system.

During practical testing of the loading speed of the Windows 7 operating system image, we received results similar to other external drives with a USB 2.0 interface.
5. Assessing drive performance in Windows 7 environment.

We tested the performance of the external drive we assembled using the Windows 7 operating system. To do this, in the command line you need to call the command: “winsat disk -drive g -ran -write -count 10”, where “g” is the letter of the tested drive in the system.
From the test results it is clear that the drive we assembled received a much higher rating than the factory solution WD My Passport Essential.  Conclusion.
Based on the materials in this article, it is clear that any mobile hard drive can be turned into a good external drive without any hassle. Especially for testing, we asked for the cheapest external case, costing $3. Three dollars allows you to get an excellent external drive from a mobile hard drive, at least for data storage. Not to mention the fact that the same external case makes it easier to recover data from the hard drive of “dead” laptops.
Despite the fact that many people criticize AgeStar's products for their low quality, after many years of using them I have only a positive impression of them. First of all, it is at an affordable price. Defects occur in all manufacturers, although AgeStar has a slightly higher rate than Thermaltake. But the latter has no analogue to the presented external case for three dollars and with a 6-month warranty. We award AgeStar products with a gold medal of honor for their optimal performance/price ratio.
09.07.2015
Greetings to you friends, readers and visitors of my blog. In this article I will talk about sata cable. As you know, all computer technology manufacturers have long switched to sata power supply.
This article will describe all the nuances of creating sata cable or else it is called sata adapter, with your own hands. And so let's begin the process.
To begin with, we need a non-working one. And you need to remove the longest one from the power supply sata cable.
The longest cable is desirable, but if this is not available, of course a short one is also possible.
In most cases it happens that sata There is some other connector attached to the cable. You can leave it on and remove it if you don’t need it or get in the way for some reason.
In my case, two wires on the additional connector were cut off and in order to get rid of the unnecessary Molex connector I had to disassemble the sata adapter.
Disassembling Sata cable
This connector is very easy to disassemble. All the wires on the sat are on plastic clips that need to be lifted with the tip of a pair of scissors.
Without letting go, pull the wire back; without force and without damage, the wire is carefully removed from the connector.

To cut off the excess wires from the Molex, I use a tool in the form of wire cutters from the women's manicure set. You can also use small electrical wire cutters.

Once all the excess wires are cut off, insert the wires into place. Be careful when removing wires, do not remove them all at once, otherwise you will get confused.
Remove one wire, cut off the excess and insert it back. And we clean the cut ends of the wires for soldering.
Molex disassembly
We will connect the sata cable to our computer power supply via a molex connector

To do this you will have to disassemble the molex connector itself. We take the free Molex connector on the power supply and disassemble it. The lugs on the wires in Molex have tabs or tabs that hold them in the connector itself. To remove the four wires we need to find these tabs and bend them inside the tip. To find this ear, use a bright flashlight.
If the ear is not located, use a thin screwdriver or scissors around the tip

Once all the wires are removed, you need to solder the cleaned ends of the sata cable wires. Solder each wire by color. If for some reason you were unable to sing, you can do the following. We take the wires of the sata cable, clean their ends by about 1.5 cm and screw them onto the tip of the molex and twist them so that they do not slip.
As we said above, the tips of the Molex wires are held on the ears in the connector and therefore, before putting the wires in place, you need to bend the eye on each wire

We assemble the molex connector and connect it sata nutrition. All that's left to do is check sata adapter. In my case, everything works to this day.
How to quickly make a sata cable
There is another option to make a sata adapter. To do this, take a sata cable as usual, clean the ends by about 1.5 cm, twist the ends of the wires so that
Attention, this method is not safe since at any time the wire can jump out of the plug and short-circuit.
Do not use ordinary glues, otherwise it will be very difficult to disassemble the connector.
For what reason was the article written?
I once encountered cases where there was not enough power on my unit sata cable for power supply due to hard drives.
It would be an option to transfer the cable from one hard drive or go to the store and buy a sata adapter.
But since I like to create things with my own hands, I decided to make this cable myself. And step by step the process went along the flow.
You might be interested

To access the contents of your hard drive via USB from a PC or laptop, you will need a special device - an adapter.
The connection is not complicated, the main thing is the presence of a special device. There are several types of devices that allow you to connect the hard drive (hard drive, HDD) of a desktop computer or laptop to USB and open its contents. Here are the two most popular: a universal USB controller (for example, AGESTAR FUBCP) or a case adapter (SATA External case, ITEC MySafe Advance and others).
In China you can buy the following devices that are built-in instead of a laptop disk drive:
There are also combined options with a complete set (adapter, cord, power supply).
The advantages of the first one are that such a device is cheaper than a case adapter, and often supports several types of connections (SATA, IDE). However, using a regular hard drive as a portable drive with it is problematic, since it will not be protected by anything.
The second option is a case adapter, which is specifically designed to turn a hard drive into a portable memory device with a sufficiently large capacity, since the case will reliably protect it from dust and mechanical damage. But at the same time, the versatility of the device suffers: before purchasing, you will have to decide which connector the purchased adapter will support.
Using a hard drive in a cased version is a fairly simple procedure, so let’s look at how to connect and open a hard drive via USB using a universal adapter (using the example of AGESTAR FUBCP).
Connection procedure
The first thing you need to do is determine the type of HDD connector that you plan to connect via USB. Plugs come in the following types:
SATA (a more modern connector, used in newly built PCs and laptops);
IDE (can be found mainly in “experienced” PCs).
We will consider the connection using the example of AGESTAR FUBCP, since it supports both “old” and modern HDDs. The average cost of such a device in Russian electronics stores is about 1,500 rubles.
The device is equipped with three interfaces (plugs):
- SATA (7-pin plug).
- IDE 40pin (40-pin plug, for IDE 3.5″).
- IDE 44pin (respectively, 44-pin plug, for IDE 1.8″/2.5″).
Description of AGESTAR FUBCP connectors below.
Step-by-step connection of HDD to computer
So, we have determined the connector of the connected hard drive; now it needs to be connected to the corresponding connector on the device. After that, insert the USB connector for data transfer (black) into the USB port of your computer or laptop. If we are working with a laptop hard drive (2.5”), we can turn on the adapter, and the HDD should appear in the list of computer drives. Sometimes, with such a connection, the hard drive may not have enough power and will not be detected by the system. In this case, turn off and connect the red USB connector of the adapter to any of the computer ports and turn on the adapter again.
If the connected hard drive was previously installed in a PC (3.5” format), the power supply from your PC’s USB will not be enough for it. The AGESTAR FUBCP comes with a power supply for 3.5" hard drives. To open the hard drive via USB, first connect it to the appropriate connector (IDE/SATA), then insert the black USB cable into one of the USB ports of the computer, then connect to the adapter a power supply that operates on 220 V (plug it into a power outlet) .
After all cables are securely connected, turn on the adapter. The connection is complete, the hdd will be detected by the computer, and you can work with it.