Installing a second Windows on another partition or disk from a running first Windows using the WinNTSetup program. Installing a second Windows on another partition or disk from a running first Windows using the WinNTSetup program How to reboot Windows from the mouth
Read also
So, you have decided to install the new Windows 8 operating system, but you don’t know how to do it correctly.
Let's start with the fact that it is better to install it on an empty hard drive, where there is currently no other operating system. Why? This is because if you install Windows 8 incorrectly, you may lose access to the previous OS. If everything is correct, then at the beginning of the launch you will be asked to select a system.
But, if you don’t like Windows 8 and want to use the old one, you’ll have to install it again, or do a restore. Since you will use the bootloader from Windows 8, and if you want to remove it completely, then you will also have to get rid of the bootloader (selection of operating systems).
Possible mistakes
During the installation of Windows 8, various errors often occur. And in order not to run into them, and not to waste time starting the installation again, you need to immediately consider them and eliminate them, if any.
Error 0xc000035a
This error occurs if you install Windows 8 on a virtual machine, and during the setup process you specified an incorrect item in the machine configuration. That is, for example, if you want to install Windows 8, but in the settings you set, for example, Windows XP or something similar. This may result in an error.
If you are installing on a real computer, then the problem is due to the fact that your processor does not support 64-bit architecture. That is, you install 64-bit Windows, but your processor can only work with x32.
Error 0xc0000260
The problem is again related to the processor. More precisely with the processor settings. You need to enable PAE/NX technologies in the BIOS. If you install on a virtual machine, then all this is there in the settings.
In addition, you need to activate support for 3D and 2D video. If you want to install 64-bit Windows, then also enable VT-X.
Error 0x0000005D – the most common
This error is related to your processor. More precisely, because it is not supported, or some functions are disabled. To install Windows 8, build 8400 and older, NX/XD technology must be enabled on the processor. In addition, it must support SSE2. In other words, it is not possible to install a new operating system on very old processors.
The interesting thing is that in the 8250 build, the old processors were suitable, and the system was installed without problems. This change is explained by the fact that Microsoft developers added some different functions and “features” that can only work on new processors.
Processor requirements for installing Windows 8
Most importantly, technologies such as SSE2, NX Bit, PAE must be supported. If your processor supports all this, then you need to go into the BIOS and enable NX Bit.
How it's done? (Usually by pressing the “Delete” key). Next, select Advanced BIOS Features. If it is not there, then look for something similar. Then we find CPU Functions there (in some BIOS versions - CPU Feature).
Once you are in the right place, you need to activate the following options: NX, XD, NX Bit. In order to make them active, On, 1 or Enabled must be indicated next to them.
We reboot the computer and can safely install Windows 8, since now there will be no problems with the processor.
Installing Windows 8
You will need to start the installation after setting up the BIOS. Then, to install the operating system, we need a disk with Windows 8. If you install from an image, then during installation the function of setting up local disks will not be available. That is, you will not be able to format it and install Windows 8 on top of another OS. Therefore, we use a real disk.
Turn on the computer. Insert the disk and start booting from it. To do this, you need to open the BIOS and specify your optical drive in the device settings as First Device. To start the BIOS you need to press the Del or Delete button. Depends on your BIOS versions.
Or, press F2 or F12 (depending on versions) and launch the Boot menu. Here you can select the device once and boot from it. If you specify it in First Device and not in the Boot menu, then you will always boot from the drive first. The boot menu is a one-time download.
Start installation
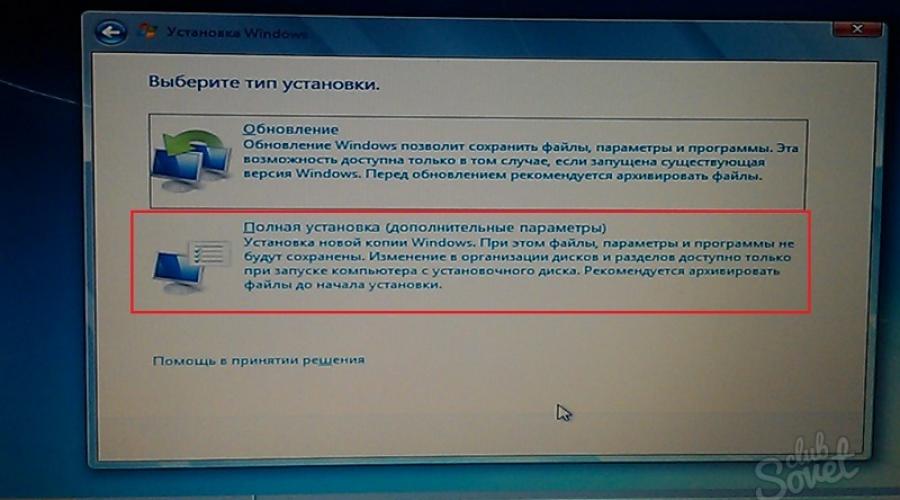
Once the installation starts, you will see the following:
The loading process, or rather the loading indicator, has changed a lot. Things were different in Windows 7. This new “window” has become something of a symbol of the new version of Windows.
It is worth noting that they do not shine with creativity and design abilities here. Many expected something beautiful and new, something that had never happened anywhere else. Everyone was expecting something more, but alas. But, despite the fact that they “rested” during the installation process, they worked hard on the operating system itself.
You will immediately remember your native Windows 7. Everything here is a copy, almost the same, only the inscription 7 was changed to 8, and a new window was added.
Select the language you need. Everything is simple here. Of course, the “Russian” input method does not mean that you will not have an English layout. This parameter determines which language will be first. When you start any program, or the computer itself, the language that is indicated here will first appear. It can be changed later.
First, all files required for installation are copied. This happens very quickly. Here is the next step - “Preparing files for installation”, which takes longer.
Since preparation is taking place, and not just copying, some files are unzipped, some settings are made, and so on. All this should not be of interest to the average user. We wait until all necessary actions are completed.
Then “Preparing Devices” will occur. You need to wait.
The next step is to install applications. As you can see, again the screen, or rather the background, shimmers in different colors. At almost all preparatory stages, the background of the installation changes in almost all possible colors. It’s beautiful and a little distracting from the tedious moment of waiting.
You will then be asked not to turn off your computer. If you turn it off, some applications may not install correctly and you will experience various errors in the future. To avoid this, just sit and wait. It happens that during installation, users turn off or restart their computer on their own, and then wonder why something isn’t working right for them.
We wait a little more until the Windows installation is completed and some final moments are configured.
That's it, ready. The new Windows 8 operating system is installed.
You can switch the original view to the normal desktop. To do this, click on the corresponding icon.
Let's open "My Computer". Everything here is almost the same as before in Windows 7. Only the icons have changed a little, namely, the same window has been added.
Explanation of some points
As you can see, the screenshot shows that there is only one local drive C on the computer.
You may have noticed that there was no point during the installation process where you were asked to specify a local drive for installation. Previously, in Windows XP, 7 and others, even if you had only one disk, you were still prompted to indicate the one you needed. In Windows 8 the installer is smarter. If he sees that there is only one disk and it is empty, then the installation wizard does not ask anything and immediately installs the operating system on this local disk.
For this article and demonstration, I used an empty hard drive with nothing on it. That’s why they didn’t even ask us where exactly we should install the new Windows 8.
If suddenly you have something different, then don’t worry, because there are various assemblies and distributions of operating systems that differ in some ways. In addition, do not forget about amateur assemblies, where something was cut out and something was added.
Formatting your hard drive (hard drive) before installing the operating system is a necessary measure for the correct operation of Windows 7 on your computer. Neglecting this condition leads to system malfunctions or complete failure. How and with what to format the hard drive, you will find in the article.
To format something is to completely delete files from the device and return the internal parameters to the original value set by the manufacturer. If you are installing the operating system for the first time, that is, on a “bare” hard drive, formatting is not necessary. If you are reinstalling Windows 7, “then cleaning” is necessary. Let's get started. Insert the operating system media and run the installation file. A window will appear where we click the “Install” button.


Make sure that the file system of the local disks is NTFS. Choose full formatting. If you are not sure that you can cope with such a task, take your computer to a service center. We wish you success!
In some cases it may be necessary start or boot your computer using the Windows 7 installation disk or USB flash drive if you need to do the following:
- Install or reinstall Windows 7. For more information about installing Windows 7, see Installing and reinstalling Windows 7.
- Recovering Windows 7 after a serious error. If Windows won't start on your computer at all, you can use the recovery tool and other tools in the System Recovery Options menu on your Windows 7 installation disk or USB flash drive. These tools can help you get Windows 7 back up and running. For more information, see Recovery FAQ and What is it? recovery Windows computer operating system?
Note Note: If you are using a tablet or other touch-screen computer, you may need to connect a keyboard and mouse to launch the recovery tool and other tools in the System Recovery Options menu.
Starting Windows 7 from the installation disc
- Turn on your computer, insert the Windows 7 installation disk or USB flash drive, and then turn off your computer.
- Start your computer.
- Press any key when prompted and follow the instructions displayed.
- On the page Windows installation that appears on the screen, click Install now to begin the installation process, or Restore your computer to open a list of system recovery options.
- Follow the instructions.
If the Windows installation page does not appear
If the Windows Setup page does not appear and you are not prompted to press any key, your DVD drive or USB flash drive may need to be set as the first boot device. To do this, you must change the computer's Basic Input/Output System (BIOS) settings.
Note: Most newer computers can boot from a USB device, but older computers may not have this capability. For more information, see your computer's documentation or your computer's manufacturer's website.
Changing boot options in the BIOS
Before you make changes to the BIOS settings, check your computer's documentation or the computer manufacturer's website to see if this option is available.
The procedure for entering the BIOS and making changes to its settings may differ depending on the computer manufacturer, or you may be able to select a boot device without changing the BIOS settings.
Attention! Change BIOS settings carefully. The BIOS is designed for advanced users, and changing settings may prevent your computer from starting properly.
- Turn on your computer, insert the Windows 7 installation disk or USB flash drive, and restart your computer.
- Modern computers usually display a boot menu. From the boot menu select BIOS setup, BIOS settings, or an item with a similar name.
The procedures may vary depending on the BIOS manufacturer. Usually you need to press a specific key (for example, F2, F12, Delete, Esc) or a combination of keys immediately after turning on the computer, but before launch Windows. If the Windows logo appears on the screen, you should try again by waiting for the Windows login prompt to appear and restarting the computer again.
How to install a second Windows on another disk partition from a running first Windows? In order not to languish while waiting for the installation media to load while system files are copied from it to the hard drive, installing a second Windows can be simplified using the free WinNTSetup program.
1. About WinNTSetup
WinNTSetup is a small program designed for a narrow range of tasks: it allows you to install Windows in a simplified mode on other partitions and hard drives of the computer, as well as on virtual VHD disks. Additional features of the program include a small selection of tweaks for the installed system and the ability to integrate your own drivers. If in the usual case WinNTSetup only saves time on installing a second operating system, then for cases where there is neither a DVD drive nor a flash drive, it is also the optimal solution to the problem.
All that is required to install Windows on another disk partition from a running current system is a downloaded ISO image of the Windows distribution and, in fact, the WinNTSetup program itself. WinNTSetup works on this principle: certain parameters are set in its window, after which the system installation process starts in the background. At the same time, you can continue to work with the computer as if background tasks were being performed by any other minimized program. Once the process of installing Windows on the second partition of the disk is complete, all that remains to be done in normal mode, booting from the newly installed Windows, is to go through the final stages of the installation process: wait for the drivers to be installed, set the region, keyboard layout and other parameters, create a local profile or connect your Microsoft account. Let's look at all this in more detail.
First of all, of course, you need to make a backup of your current Windows. Not so much for its own sake, but for the sake of the boot sector, where, naturally, during the installation of the second system, changes will be made to another partition of the disk. Having an emergency bootable disk with a backup program is welcome.
2. Download WinNTSetup
You can download WinNTSetup from its official website. This is a portable program that does not require installation on the system. After launch, you immediately need to agree to download some data.
3. Connecting an ISO image of a Windows distribution
WinNTSetup takes installation files for the second Windows either from the installation DVD in the drive or from an ISO image downloaded from the Internet. The downloaded ISO image must be mounted into a virtual drive. In Windows 8.1 and 10 systems, this is done normally using the “Connect” option in the context menu on the ISO image.

In Windows 7, you must use third-party programs like Daemon Tools to mount ISO images.
4. Installing Windows on another disk partition
WinNTSetup will start with the installation tab active for versions of Windows starting with Vista. In the first paragraph of the program window, you need to specify the path to either the instal.wim file or install.esd as part of the Windows distribution. Depending on the build of Windows, its distribution will contain an “install” file with either one or another extension. Click the “Select” button.

And we indicate the path to the file, it is located on the installation disk in the “sources” folder.

The second item in the WinNTSetup window specifies the disk partition that will serve as the boot sector of the Windows installation. In Windows 8.1 and 10, a certain partition Z is specified by default. As partition Z, WinNTSetup defines a small technical partition (350-500 MB) of these versions of Windows called “System Reserved”.

There is no need to change anything here.

In Windows 7, this item will default to drive C, since in this version the boot sector is placed on the same partition along with the operating system itself. And in this case, too, we do not change the presets, we leave drive C.

We go down to the next point and use the “Select” button to indicate the very second partition of the hard drive where we are going to install the second Windows.


If the disk partition selected for the second Windows was not previously formatted, this can be done without leaving the WinNTSetup window. When you press the “F” button, the standard function of formatting disk partitions will start.

Basic information about the system being installed has been entered; now you can begin to start the installation process. But before you click the button at the bottom of the “Install” window, you can delve into the program settings. In the lower block of the window, the path to your drivers is indicated and tweaks are applied to the installed system.


After clicking the “Install” button, we additionally confirm the start of the Windows installation process on the second disk partition by clicking “Ok”.

After which you can minimize the program window and go about your business. WinNTSetup will notify you of the completion of the operation with the following notification.

This means that the launch of only installed Windows will begin during the preparation of the operating system for deployment. After the computer restarts, we will be greeted by a bootloader menu with a choice of operating systems to launch. We select, accordingly, the newly installed Windows. And we go through the steps of Windows deployment - specifying regional data, keyboard layout, network settings, creating an account, etc.

5. Installing Windows on another hard drive
The process of installing a second Windows on another hard drive is a little more complicated, since for Windows 8.1 and 10 systems you will have to manually create a separate partition for the bootloader. For Windows 7, you just need to make active the partition of another disk on which you plan to install the system. Launch the standard disk management utility by pressing the +R keys and enter:
If the other hard drive is unpartitioned, we create partitions on it. On the first section, call up the context menu and click “Make section active”.

We make sure that the section is active, remember its letter.

In the WinNTSetup window, specify the path to the installation file, as shown in the previous paragraph of the article. And we indicate the prepared active partition as the bootloader partition and the partition of Windows 7 itself. And we start the installation process.

For Windows 8.1 and 10, you need to prepare both the system partition and the bootloader partition - the same technical partition that is not displayed in the system explorer, but in disk space managers it is listed as a “System Reserved” partition. If the first partition of another hard drive has already been created, you need to delete it and create a new one in its place. In the context menu on the unallocated space of the remote partition, select “Create a simple volume”.

We go through the steps of the wizard, specifying at the stage of determining the partition size for the installed Windows 8.1 - 350 MB, and for Windows 10 - 500 MB.


From the remaining unallocated space we form a partition for the system.

We carefully check that the first small section is active, and remember the letters of both sections.

In the WinNTSetup window we indicate the newly prepared partitions: in the second paragraph - a small partition, in the third - a partition of the system itself. And we start the installation process.

After WinNTSetup completes its work, you need to restart your computer, enter the BIOS, set the boot priority, respectively, from another hard drive and go through the Windows deployment steps.
Have a great day!
Answers:
Yuri Alexandrovich Peysakhovich:
Formatting the hard drive is necessary in extremely rare cases - for example, when bad sectors appear.
D.A.E.M.O.N.:
Is it possible not to format, just first delete the Windows folder (or another folder, depending on where the OS is installed) from the disk? Program Files and Documents ang settings. You just need to do this by booting from the installation disk. It’s easier not to delete anything, as this will take a lot of time, but simply format the partition and install it into it. If the computer is new or newly purchased, the (full) formatting procedure before installing Windows is desirable, as it allows you to identify possible HDD defects.
Umnik:
Can be formatted. You can do it differently: do not format. "What can you do?" - "I can dig." - “Can you do anything else?” - "I can't dig."
Shurovik:
If you want to update the system, then don't. And if you want to install from scratch, it’s a must.
Forward:
If for a complete reinstallation, then it is advisable, but you can simply install the new system on disk (in the Windows setup program, select the option “Leave the current file system unchanged”), and after installation, delete the old folders (Windows, Program Files and Documents and Settings) and edit the boot.ini file in the root of the system disk, removing the link to the old operating system from it.
TU-154:
It’s not at all necessary - you can first simply delete the Windows folders from the disk (Windows, Program Files and Documents and Settings) by booting into another OS. Although, if there are several partitions on the disk and all the data is on other partitions, it is faster to format the system partition using the Windows XP installation program.