Acronis formatting hard drive. How to format a hard drive before installing Windows in four different ways - step-by-step instructions. "Tools" for working with hard drives
Read also
Formatting refers to the process of applying special marks to the drive. It can be used for both new and used drives. It is necessary to format a new HDD to create markup, without which it will not be perceived by the operating system. If there is already any information on the hard drive, it is erased. For these reasons, formatting may be relevant in different cases: when connecting a new HDD to a computer, to completely clean the disk, when reinstalling the OS. How to do this correctly and what methods exist? This is what this article will discuss.
HDD formatting is required for several reasons:
- Creating basic markup for further work with the hard drive. This is performed after connecting the new HDD to the PC for the first time, otherwise it simply will not be visible among the local drives.
- Clearing all saved files. Over the years of operation of a computer or laptop, a huge amount of unnecessary data accumulates on the hard drive. These are not only user files, but also system files that are no longer needed, but are not deleted on their own.
As a result, the drive may become overfilled and operation may become unstable and slow. The easiest way to get rid of garbage is to save the necessary files to cloud storage or to a flash drive and format the hard drive. This, in some way, is a radical method of optimizing the operation of the HDD.
- Complete reinstallation of the operating system. For a better and cleaner OS installation, it is best to use a blank disk.
- Error correction. Fatal viruses and malware, bad blocks and sectors, and other problems with the hard drive are often corrected by creating a new partition.
Types and Types of Formatting
This procedure is divided into 2 types:
- Low level. The term "low-level formatting" originally meant a slightly different process, and was adapted for users. In the usual sense, this is a complete and irreversible erasure of information, as a result of which all disk space is freed. If damaged sectors are found during the process, they are marked unused in order to eliminate future problems with writing and reading data.
On older computers, the Low Level Format feature was available directly in the BIOS. Now, due to the more complex structure of modern HDDs, this feature is not available in the BIOS, and real low-level formatting is done only once - during manufacturing at the factory.
- High level. This method is in fact the only one available among users. During this process, the file system and file tables are formed. After this, the HDD becomes available for data storage. High-level formatting is performed after partitioning; data on the location of all files recorded on the hard drive is erased. After it, you can fully or partially restore data, unlike low-level data, where the information is completely erased.
In addition, there are two types that are used to format the internal and external HDD:
- Fast. It doesn’t take very much time, since the whole process boils down to erasing data about the location of files. At the same time, the files themselves do not disappear anywhere and will be overwritten with new information - as a result of the operation, an empty space is designated where new files can be written in the future, “displacing” the old ones. The structure is not optimized, and if there are problems, they are overlooked and not corrected. However, such a process usually takes up to 1 minute depending on the volume, and the data can be recovered partially or completely using special software.
- Complete. All information is completely deleted from the hard drive - sectors are overwritten with zeros, at the same time the file system is checked for various errors, bad sectors are corrected (more precisely, they are marked as unsuitable for further storage of information). All this takes much more time, up to several hours. However, this way your information will be securely deleted, and it will not be possible to recover it later even with special programs.
Formatting an SSD
Nowadays, more and more often, users began to purchase laptops with built-in SSD drives, as well as buy these devices separately and replace them with morally, and perhaps physically, obsolete hard drives. The operating principle of these data storage devices differs significantly from each other, since in hardware they represent two different components, which in fact perform the same function. We will not dwell on this topic in detail; for general purposes, we suggest reading our separate material.
Due to the dissimilarity between a magnetic disk and a solid-state drive, the question of formatting the latter remains open. To find out whether this procedure is necessary and, if so, how to do it, read the article at the link below.
HDD formatting methods
Formatting a drive can be done using different methods. For this, built-in Windows tools and third-party programs are used. If you want to carry out this procedure and clean the HDD, use one of the suggested options.
Method 1: Using formatting programs
There are both small utilities and powerful programs that perform additional tasks besides the main one, for example, partitioning the hard drive and checking for errors. To format OS partitions, you will need to create a bootable USB flash drive with the program installed.
Option 1: Acronis Disk Director
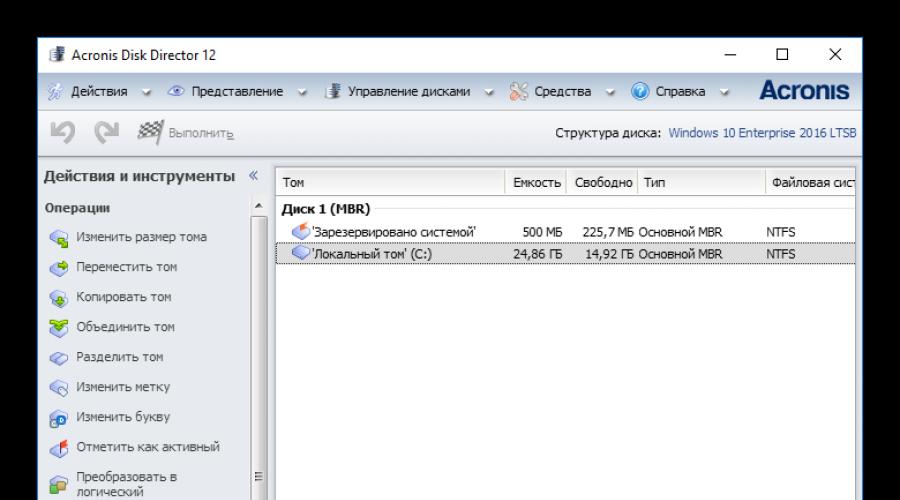
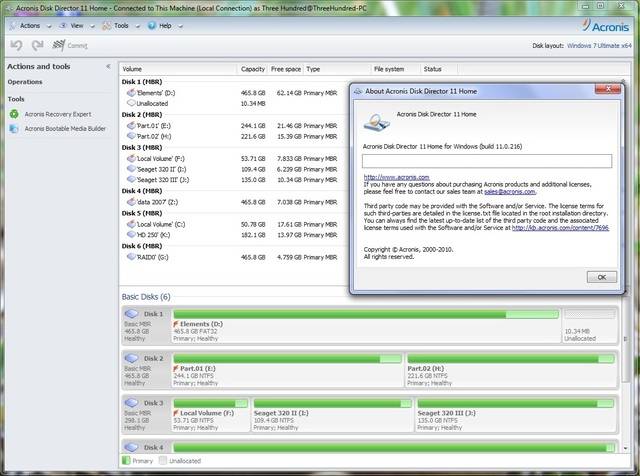
One of the most famous utilities that works with physical disks and their partitions. Acronis Disk Director is a paid program, but very powerful, as it has many features and functions. Allows you to format a hard drive by changing the file system, cluster size and volume label. The interface resembles a standard Windows program "Disk Management", and the operating principle is correspondingly similar.


Method 3: Via BIOS and command line
To format the HDD in this way, you will need a bootable USB flash drive with a recorded OS. All data, including Windows, will be deleted, so if you need to format a drive with an installed OS, this procedure will not be possible using the previous method.
When everything you need has been prepared, follow these steps:
- Connect the flash drive to your computer.
- Restart your PC and go into BIOS. To do this, after start, press the enter key - usually this is one of them: F2, DEL, F12, F8, Esc or Ctrl+F2(the specific key depends on your configuration).
- Using the keyboard, change the device from which the computer will boot. To do this, go to the section "Boot" and the list of boot devices in first place ( "1st Boot Priority" or "First Boot Priority") insert your flash drive.

If the BIOS interface is like the screenshot below, go to "Advanced BIOS Features"/"BIOS Features Setup" and select "First Boot Device".

- Click F10 to save the settings and exit, to confirm your actions, select the option "Y" / "Yes". After this, the PC will boot from the selected device.
- In the running Windows 7 environment, at the very bottom, click on the button "System Restore.

In the options window, select "Command line".

In Windows 8/10, also select "System Restore".

Then press the buttons in sequence "Diagnostics" > "Troubleshooting" > "Command line".

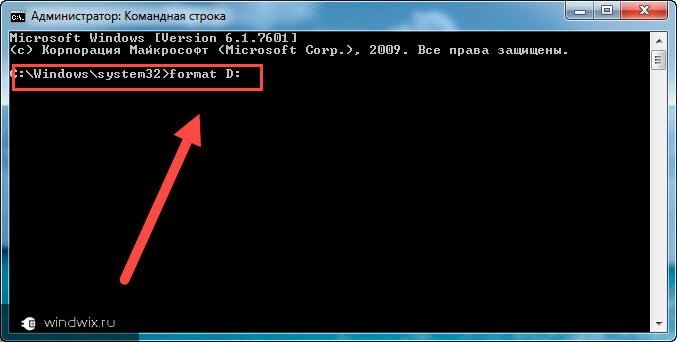
- Determine the drive that will need to be formatted. The fact is that when starting a PC from a bootable flash drive, the letter designations of the drives may differ from those that you are used to seeing in Windows, so first you need to find out the real letter of that hard drive. To do this, write the following command on the command line:
wmic logicaldisk get deviceid, volumename, size, description
The easiest way to determine a HDD is by its size - it is indicated in bytes.
Once the letter has been identified, "Command line" write this (instead of X use the letter HDD):
format /FS:NTFS X: /q - with changing the file system to NTFS;
format /FS:FAT32 X: /q - changing the file system to FAT32;
or just
format X: /q - quick formatting without changing the file system.All modern hard drives use NTFS. FAT32 is suitable only for very old PCs with minimal storage capacity and completely outdated operating systems.
Confirm your command entry by Enter. You can assign a volume label (disk name in Windows Explorer) by adding the parameter at the end /v:IMYA DISKA.
Please note that due to differences in BIOS versions, menu item names may vary. If your BIOS does not have the specified parameter, look for the most suitable name.

Method 4: Formatting before installing the OS
To correctly install a new version of the operating system, formatting is necessary. To complete it, repeat steps 1-5 from the previous method.
If you are upgrading while preserving user data, and do not plan to perform a full installation, you do not need to use formatting!

Now you know what formatting is, what it is, and how it can be done. The method depends on which drive needs to be formatted and what conditions are available for this. For simple and quick formatting, the built-in Windows utility, which can be launched through Explorer, is sufficient. If it is impossible to boot into Windows (for example, due to viruses), the formatting method via BIOS is suitable and "Command line". And if you are going to reinstall the operating system, formatting can be done through the Windows Installer. Using third-party utilities, for example, Acronis Disk Director, makes sense only if you additionally perform other manipulations with hard drives and this program is already installed on the PC. Otherwise, it’s a matter of taste - to use a standard tool from Windows or a program from another manufacturer.
All new hard drives are already low-level formatted by the manufacturer and do not require reinitialization. In practice, under normal circumstances, you are unlikely to need to perform low-level formatting on your hard drive, since technically only the manufacturer can perform this kind of real formatting.
What computers call low-level formatting is actually more of an initialization and testing of the disk surface, as the process writes and reads to all sectors of the disk. If there are no problems with the disk, there is no need for a full initialization or surface check.
What is low level formatting?
First, let's understand the concepts of low- and high-level formatting.
Low level format- an operation during which servo marks (information that is used to position the hard drive heads) are applied to the magnetic surface of the disk. It is performed during the manufacturing process of the hard drive, using special equipment.
When the process of low-level formatting a hard drive is started for the first time, the hard drive platters are empty, that is, they contain absolutely no information about sectors, tracks, and so on. This is the last moment when the hard drive has completely empty platters. Information recorded during this process will never be rewritten again.
Old hard drives had the same number of sectors per track and did not have built-in controllers, so the low-level formatting was handled by the external hard drive controller, and the only information it needed was the number of tracks and the number of sectors per track. Using this information, the external controller could format the hard drive. Modern hard drives have a complex internal structure, including changing the number of sectors per track when moving from external to internal tracks, as well as built-in servo information to control the head drive.
Due to this complex data structure, all modern hard drives are low-level formatted only once - at the factory.
There are two types of high-level formatting:
Formatting in normal mode – a process that consists of creating a master boot record with a table of partitions and (or) empty file system structures, setting the boot sector, and similar actions. The formatting process also checks the integrity of the media to block bad sectors.
Quick format – the same process as formatting in normal mode, only without checking the media for bad sectors.
The use of the term low-level formatting in relation to hard drives has given rise to many myths. For example, there is an opinion that it is impossible to perform low-level formatting of a hard drive and that attempting such an operation will lead to the destruction of the disk. In principle, there is some truth in this misconception. It consists in the fact that when low-level formatting old disks from the late 1980s, the optimal settings for the bevel of heads and cylinders established by the disk manufacturer, as well as the map of disk defects, were violated.
All this had a negative impact on the performance of the devices. The problem described has long been resolved, and all devices using zone recording (with a variable number of sectors per track) are immune to any problems that low-level formatting may cause, since real markers cannot be replaced by a sector.
So low-level formatting of discs made in the 1990s and later will prevent it from disturbing its settings.
At the same time, there is often a real need to perform low-level formatting of ATA and SCSI drives. Now we will talk about programs that will help you do this.
Programs for low-level formatting of ATA disks (SATA, PATA, etc.)
ATA drive manufacturers defined and standardized extensions to the original WD1002/1003 hard drive controller, creating the AT bus interface (known as the ATA interface). The ATA specification is implemented for unique vendor-specific commands that are an extension of the standard. To avoid performing incorrect low-level formatting, many ATA devices have special commands that must be sent to the device to enable formatting procedures. These commands vary by device manufacturer, so you'll need to look for low-level formatting and defect management programs created by the drive manufacturer.
These programs are most often intended not only for devices from a specific manufacturer, but also for their individual models. So before performing a search, make a note of the manufacturer name and model number of your hard drive.
Modern hard drives are protected from the possibility of changes in the skew factor or defect map, since they are always in conversion mode. Devices with zone recording are always in this mode and are thus fully protected.
Most hard drives have an additional set of commands that are used during the formatting process, and the standard ATA specification commands do not work (especially for ATA devices with zone recording).
Spare sectors can also be allocated automatically using programs provided by the device manufacturer. Without knowing the correct manufacturer-specific commands, it is impossible to replace defective sectors with spare ones, specially allocated in modern devices for these purposes. A detected defective sector is replaced in the distribution structure by the closest spare sector.
Some hard drive manufacturers offer low-level formatting programs. They can be found at the following addresses.
- Seagate
ftp://ftp.seagate.com/techsuppt/seagate_utils/sgatfmt4.zip
http://www.seagate.com/support/seatools - Hitachi/IBM
www.hgst.com/hdd/support/download.htm - Maxtor/Quantum
http://www.maxtor.com/softwaredownload/default.htm - Samsung
www.samsung.com/Products/HardDiskDrive/utilities/hutil.htm
www.samsung.com/Products/HardDiskDrive/utilities/sutil.htm
www.samsung.com/Products/HardDiskDrive/utilities/shdiag.htm - Western Digital
http://support.wdc.com/download/
First of all, you should try the programs provided by the device manufacturer. All of them are free and often allow you to work at a low level in a way that large-scale programs do not allow.
If the drive manufacturer does not offer an initialization/verification/formatting program, you can use the Drive Fitness Test program from Hitachi (formerly IBM). This program works great with drives from other manufacturers and performs detailed, full testing of the entire hard drive. This is one of the best general purpose programs because it allows you to perform a non-destructive test. Although it can test any device, there is one limitation: destructive read/write tests can only be performed on Hitachi and IBM drives.
Advice!
All of the listed programs for initializing, testing and formatting a hard drive, as well as many others, can be found in the Ultimate Boot CD (UBCD) collection of utilities. This is a fantastic collection of diagnostic tools contained in one downloadable CD! A copy of this CD can be downloaded from www.ultimatebootcd.com.
Non-destructive formatting tools
I strongly advise against using BIOS-level non-destructive formatting tools such as Calibrate (formerly included with Symantec Norton Utilities) when low-level formatting is truly needed. Such funds are characterized by a number of limitations and problems that reduce their effectiveness. They perform low-level formatting on individual tracks using BIOS functions; This backs up and restores individual tracks.
These programs also do not create a defect map, as low-level formatting programs typically do. Moreover, they can remove defect map markers added by standard low-level formatting programs. As a result, it becomes possible for data to be stored in bad sectors, which in some cases may void the warranty.
Another limitation is that these programs can only be used with hard drives that have been previously formatted using BIOS functions.
A low-level format program created by drive manufacturers bypasses the system BIOS and passes commands directly to the controller. Therefore, many such programs are designed to work with specific controllers. Having one such program that could be used when working with different controllers is almost impossible to imagine. Many hard drives may be incorrectly identified as defective simply because the wrong program was used.
Low-level formatting of Western Digital HDD and SSDs
Let me make a reservation right away that in this case, low-level formatting means testing the disk surface for bad sectors through reading and writing. As mentioned above, factory low-level formatting of a modern hard drive can only be done by the manufacturer.
Hard and solid state drives can be formatted at a low level using several methods. Let's consider one of them, applicable to PC. Mac computers are not suitable for this example.
To low-level format a hard drive we need:
- The hard drive, in this case, is from Western Digital (in this example, the Maxtor drive was tested, and the procedure was successful)
- Data Lifeguard Diagnostics Software for Windows
Before the formatting process, connect the device to the computer. This can be done either through the IDE, SATA, USB or Firefire interface. In this case, low-level formatting will be carried out in the Windows system, without first loading using special boot disks. This is the easiest method for the average PC user.
Once the device is connected:
1. Download Windows Data Lifeguard Diagnostics from http://support.wdc.com/product/download.asp?groupid=113&sid=3&lang=en
2. After downloading the application, launch it and follow the installation wizard.


If after installation a dialog box appears with a message stating that the program cannot be started, close it and click the OK button. The program must be launched in a different way.

3. A program shortcut will appear on the desktop, double-click on it.

4. Check the box next to I accept this... and click the Next button.

The program will display all connected drives. Despite the fact that in my example, the Maxtor test hard drive was formatted, and it was successful, I recommend that you use this program only for Western Digital drives, to avoid possible problems with the media. If you have a Seagate hard drive, use a similar program from Seagate.
5. Select the disk that needs to be diagnosed and click on the to run tests button. BE SURE to double-check that you have selected exactly the right disk, otherwise you will lose all data on this media, without the possibility of recovering it, since this process is destructive and irreversible.


7. In the next window, select the EXTENDED TEST option and click the Start button.

8. Close all files that are open on the selected hard drive and click the OK button.

9. The testing procedure on a 20 GB hard drive took approximately 10 minutes. At the end of testing, click on the Close button.

10. But that's not all. Now again click on the to run tests button and in the dialog box select the WRITE ZEROS option and click on the Start button. This procedure will overwrite all sectors with zeros.

10. Depending on the condition of the drive, you will receive one or two prompts reminding you that this action will destroy all data currently on the drive. Click the Yes button.


10. Then choose which method you would like to use to write the zeros. The QUICK ERASE option is much faster, but does not completely erase the disk. This is suitable for users who plan to rewrite the disc multiple times. A FULL ERASE erases the disk completely. This takes longer, but ensures that no data on the drive can later be recovered using data recovery methods. This method is designed for people who need to permanently delete data from their drive, such as hackers ;).
Once you have determined which method you would like to use, select the OK button to begin the formatting process. I recommend choosing FULL ERASE.

11. Start of the rewriting process. For example, it took me about 10 minutes to overwrite a 20 GB hard drive.

12. After the process is completed, click again on the to run tests button and in the dialog box, select the VIEW TEST RESULT option and click on the Start button.

13. The window will display information about the hard drive and the tests that have passed. To be honest, the information in this report is very sparse.

14. If the process was successful, the low-level formatted hard drive will not be available in the system. Now it needs to be initialized, partitioned, and formatted at a high level.
14. Open Start -> All Programs -> Accessories -> Run and enter the command in the window diskmgmt.msc .

15. The Disk Management program will launch and the Initialize Disks window will automatically appear, where the required disk will be selected. Specify the Master Boot Record parameter and click the OK button.


This completes the low-level formatting process.
A similar process can be used for media on hard drives from other manufacturers. For example, Seagate offers a very convenient diagnostic tool for its media.
In conclusion, I will give an example of how the Data Lifeguard Diagnostics program displays a failed drive. As an example, a Fujitsu hard drive was taken. The program has determined that the media is faulty, as indicated by SMART STATUS.

Using EXTENDED TEST, the program showed that bad sectors were found on the disk.

The program tried to fix them, but nothing worked.

There may be two reasons for this: firstly, the hard drive and the diagnostic program are from different manufacturers, so some commands may not be processed correctly, and secondly, this disk cannot be restored, since it has begun to “crumble,” i.e. physical damage appeared on the surface of his discs; it was already on my inspection table before.
First of all, you need to understand what formatting is. This is a process by which your drive is cleared of the information on it. It is most often used in cases where it is necessary to quickly empty the disk of its contents and write other data to it. Or before installing the operating system. How can such an operation be performed? There is a program for this: Before using it, take care of the safety of the necessary files and documents, copy them, for example, to an external drive.
Formatting using the Control Panel
The very first way to perform drive cleaning is to use the computer's own capabilities. To use them, you need to use the control panel of your device. In this section, select “Disk Management” and see all the available options: assign labels and names, create partitions, perform the formatting we need, etc.
We find the drive or partition we need, hover the mouse over it, right-click and select “format”. This option is convenient because we initially see all the drives connected to the computer, even those that are inactive and we will not see them in the Explorer window. Before starting the procedure, the window that appears allows you to make some settings. You can change the volume label, that is, the name of the selected drive, and select the file system type. It is necessary to pay attention to the fact that these parameters have already been pre-configured and set, so you don’t need to touch them, except in cases where there is an exact purpose for the changes.
Next, the program for formatting the hard drive offers you to choose full formatting or quick formatting, which differ significantly from each other. If the first option deletes data as efficiently as possible, without the possibility of recovery, then with the second the disk will be recognized as empty, but if desired, information from it can be recovered. It is recommended to use it if you are confident that the media is fully functional.
Using the Explorer window

The method described above is not the only solution to the problem assigned to us. It is possible to format the disk even more quickly. To do this, it is quite enough to open “My Computer”, get to all active ones. Then select the one we need, right-click to open the menu and click on the “formatting” item.
Here is another program for formatting a hard drive. Using the window with additional settings that opens, you can adjust various parameters of the operation. Please remember that the actual disk capacity is less than the data provided to us by the manufacturer. For example, a 2TB drive will actually have 1.81TB of available space.
How to format a system disk?
If there is an operating system on the disk, then it, of course, cannot erase itself, so other methods have to be used. Why do this? This procedure is performed if a new one is installed on the system disk with the current OS. To do this, insert the installation disk with the operating system into the computer/laptop. It will launch and prompt you to start the installation. All you have to do is follow the instructions for performing this operation.

First, of its two types, we select installation from scratch, ignoring the option of updating the system. On the hard drive you are using, you can create and delete logical partitions and perform accelerated formatting. Then we continue to install the OS or, after removing the disk, we continue working on the computer.
We looked at Windows OS version 7. In the Windows Vista and Windows XP operating systems, all actions are similar. But if you are servicing the system drive, then it is preferable to use third-party ones called Live CD.
Free hard drive formatting program
To format any storage devices, including hard drives connected to the device, you can use the HDD Low Level Format Tool program. System utilities are, of course, a good thing, but high-quality cleaning is better done using third-party software. The above utility is small, convenient, and supports working with different interfaces, for example, SATA, IDE, USB, Fir, SCSI. We can service devices from the following manufacturers: Seagate, Maxtor, Fujitsu, Samsung, Quantum, Toshiba, IBM. Also works with flash cards.

What else is good about this program? hard drive is its main merit. It destroys absolutely all data that is recorded on the media, without skipping boot sectors with separated logical partitions. Please remember that deleted information cannot be recovered.
How does HDD Low Level Format Tool work?
Download the distribution, launch and install. This is done so simply that we will not dwell on it in detail. Then we read and choose: use the free version or pay an additional three dollars and thirty cents and get an updated and faster program. We choose the first option. The only disadvantage of this utility is that every time you start it, you will have to see and delete the window asking you to pay extra money.
The interface is very simple. You will immediately see which storage devices are connected to the computer and are ready for use. Various data about these devices and various reference information are available.
Let's do some testing. We will not experiment with a hard drive; for this we will use a regular flash drive with a capacity of 4 GB. Select it from the list and click the “Continue >>>” button. We will see the characteristics of the flash drive and the start/stop formatting buttons. Before starting the process, the program will clarify whether you really want to start it. In the window you can monitor the progress of the operation.

The free version has a low speed (4.3 Mb/sec), so everything will last about 10 minutes. HDD Low Level Format Tool will not only format your drive, but will also be able to “repair” it if the computer does not see the flash drive.
How else can you format a hard drive?
One of the most powerful and functional utilities for this is Acronis. This program for formatting your hard drive is updated regularly and keeps up with the times. It is paid, but also has a free trial version. So if you like the utility, you can purchase the full version. The system requirements are not too large, so it can be installed on almost every computer.
There are many options offered, the choice is yours.
Greetings to all readers of my blog, Denis Trishkin here.
If you use your computer for a long time, sooner or later you will need to reinstall Windows. This can be done in several ways. The correct one is the one before which you need to format the hard drive. In this article I will tell you exactly how this happens, and also introduce you to the main concepts.
So what is formatting? Even at school, this process was presented as a division into sectors and tracks, with the loss of all information previously recorded on the storage medium. In the realities of today's technological world, formatting is the process of marking up an electronic storage medium, regardless of its shape and structure, be it an optical or hard disk, memory card, flash drive.
To put it simply, the process involves erasing all existing files in a specified area. At the same time, when new ones appear, they are already placed on top in a seamless manner. Because of this, access to them will be easier in the future, and, consequently, the speed of processing requests will decrease. The OS and individual programs will run faster.
File system types( ^)
Before moving directly to familiarization with the process itself, it is important to introduce you to such a concept as file system and its types. So, it is a table that indicates the order of storing, recording and naming information on media. In other words, it is responsible for all processes related to transferring and reading data.
There are several most famous and used types:

Formatting process( ^)
We immediately need to clarify that we are talking about formatting before installing Windows. Therefore, we will talk about working with hard drives, and not with other data storage devices.
This process consists of three stages:
tracks (tracks);
information management program.
1 Low-level formatting is considered the main one. During this process, the information storage area is marked. This is carried out directly during the manufacture of the hard drive. With low-frequency formatting, all the structures necessary for operation are created in the corresponding area. These include:
In the future, during the entire use of the media, this markup does not change. Many utilities that claim to be capable of low-level formatting do not actually do this. At best, they only prescribe a new management program.
2 Partitioning. During this process, the entire volume of the hard drive is divided into logical parts (most often they are called letters of the Latin alphabet: C, D, E and others). This is done by built-in services of the operating system itself or by third-party programs. The process is optional - you can skip it - the media will only have one partition. But due to the fact that modern hard drives have large amounts of memory, they are usually divided into logical partitions.
increase
3 High-level formatting. During the process, logical structures are formed that are responsible for storing files. This type is divided into two types:

Formatting methods before installing a new system( ^)
There are only a few ways to format before installing a new Windows:
using built-in capabilities;
command line (use the same tool);
third-party programs (most often these are Acronis Disk Director);
use another computer.
Step-by-step instructions for formatting with built-in capabilities( ^)
It should be noted right away that I will talk about Windows 7, 8, 10, since Microsoft no longer supports previous versions. So, when, during the installation of a new operating system, you reach the disk selection point, you need to:

The built-in tool allows you to format the disk only in a quick way.
However, it does not provide additional functions. That is why many specialists use special formatting programs that work even without an installed operating system. The above is considered the most convenient Acronis Disk Director. This application is paid, although there is the possibility of temporary use.
Formatting using Acronis Disk Director( ^)
To use the application you need:
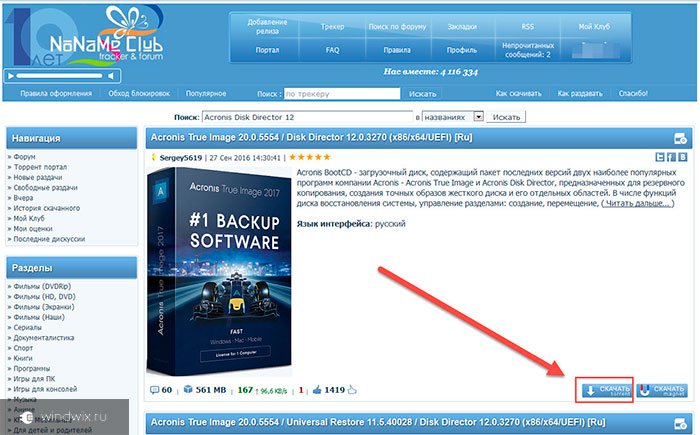
1 Download the program image file using a torrent tracker.
increase
2 Write the downloaded image to a USB flash drive

increase
3 Using the BIOS, check that the system boots first from the flash drive, press the F10 button and agree.

increase

increase
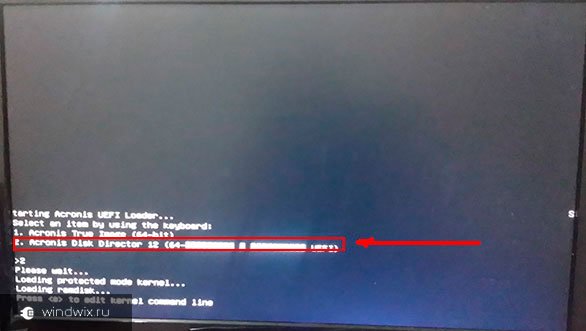
4 After rebooting, confirm working from the flash drive.
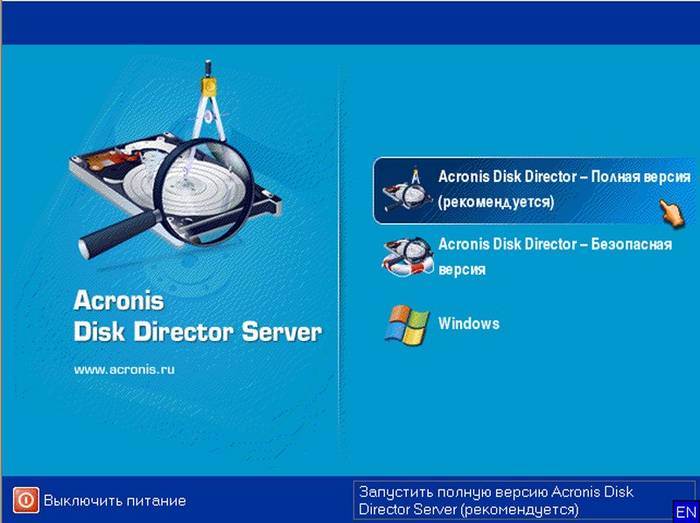
5 A black screen appears where you need to select the full version Acronis Disk Director.
increase
6 On the pop-up window, mark “manual” mode.
7 After this, select the section and click on the item in the left menu.
increase
increase
9 After this, the program sends us to the initial partition selection window. This is necessary to make additional changes. But since we are only formatting the disk on which Windows will later be installed, we click on the checkbox.
increase
increase
10 We are waiting for the process to complete. After this, you can exit the program and continue installing the OS. In this case, there is no longer any need to format the disk with the built-in program.

increase
Formatting via the command line( ^)
Almost no one uses this method, since the methods described above are sufficient for most. But sometimes there are still situations when he remains the only one.
To call the command line, before copying the new version of Windows to your computer, when the first installation window appears, press the key combination “ Shift+F10" After this, a black window will appear. It contains the command “ format" along with the letter of the partition that needs to be formatted (this could be C, D, E and others). After this you need to confirm the action: “ Yes" Or write " No» if you made a mistake with the letter of the section or simply changed your mind.
Formatting a hard drive through a third-party computer( ^)
Several times I encountered situations where malicious software (aka a virus) damaged system files on the hard drive. As a result, the operation of important mechanisms is disrupted, which leads to a formatting error in the standard utility. It turns out that in order to cope with the “infection”, you need to install a new Windows. And it won't make sense without formatting.
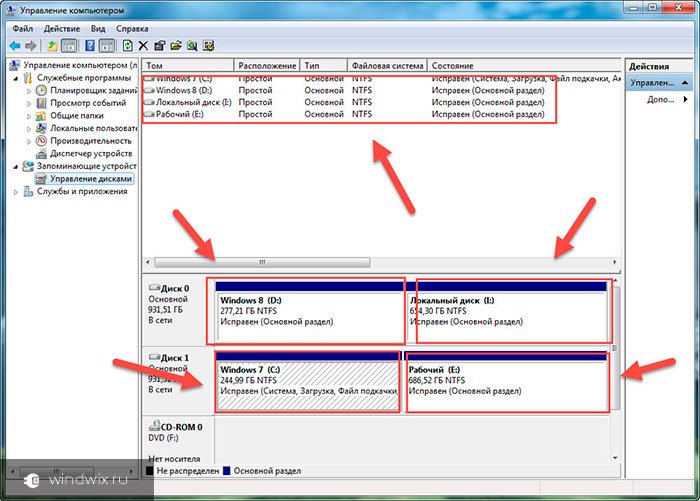
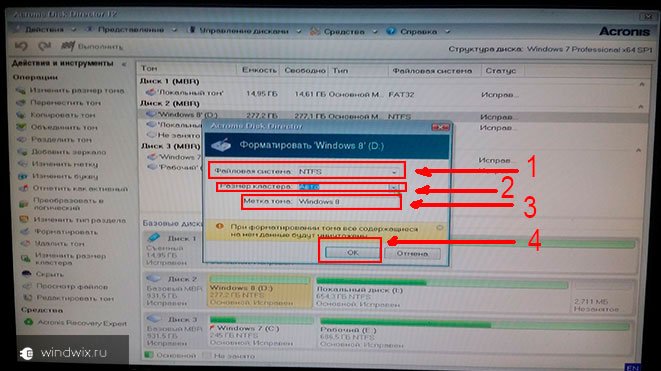
The situation can be resolved using a third-party computer. The infected hard drive is connected to it and cleaned in a standard system. To do this, after booting the system in the section " My computer“You need to select the damaged partition, right-click on it, and then select the appropriate menu. Specify the file system, cluster size, and volume label.

increase
After formatting, the hard drive is installed on the original computer and Windows is installed. Sometimes during this, the system requires you to re-divide the partition into sectors and tracks. Don't worry - this is normal.
Formatting your hard drive before installing Windows is an important step. If this is not done, the new version will work with errors and most likely not for long.
I hope this article will clarify for you the main issues that are associated with the formatting procedure. Subscribe, recommend me to your friends and along with you become computer literate.
When you need to transfer partitions without losing data or format a hard drive, it is better to resort to auxiliary tools. Now there are many packages for data recovery and formatting work. Naturally, you can take advantage of the capabilities of Windows, but sometimes you can’t do without auxiliary programs. We will consider one of these below.
What opportunities does it provide?
The formatting function allows you to start the “life” of your computer on the selected device from scratch. It erases absolutely all information located on the media: user profiles, previously installed programs, OS. But the most important thing is that viruses come with them.
Thanks to this somewhat radical method of cleaning a USB storage device, you can install a new OS on a formatted device or reinstall the old one.
By its nature, this process is divided into two subtypes:
- high-level (software);
- low-level (hardware).
In the first case, the file system and tables are re-formed.
In the second, information about the position of the sectors (clusters) located in it is applied to the surface of the hard drive at the hardware level.
This allows the head of your HDD (Hard Disk Drive) to be oriented on its surface with greater accuracy.
Video: format your hard drive
Working with HDD using Windows
High-level formatting is easily carried out using standard Windows OS tools. In order to carry out a similar procedure on any external device, just insert it into the USB connector and right-click.
In the context menu that appears, select the formatting function, then select the file system, and start the cleaning process. This method is the fastest possible solution.

However, in order to remove an operating system from a hard drive, if it is present on the computer in a single copy, you will need a little more knowledge: its removal is possible only through debugging mode and using special command line operators ( cmd), which not everyone can do.
It is performed in several steps:

From now on, we have two options for further action:
- using the available set of tools, using the program, click settings, and then formatting;
- or press a combination of two keys - Shift and F10. A standard command prompt will open.
And again a series of actions:

After successful formatting, we will need to update information about the existing disks and re-set their partition sizes.
But high-level cleaning of the hard drive is not the best option, especially if it has bad sectors: performance is significantly reduced, and periodic freezes and other “delights” become an integral part of the work. And only special applications will help with low-level formatting.
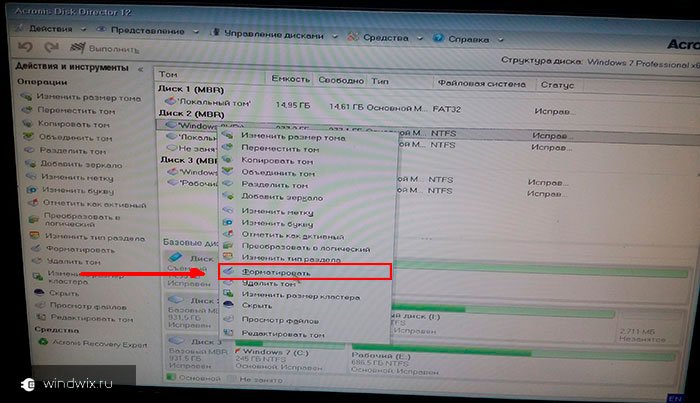
Hard drive formatting program Acronis Disk Director Acronis Disk Director is perhaps the best program for formatting a hard drive today.

A user-friendly interface, high reliability and high-quality results make this application the No. 1 tool in preventing “illnesses” of your HDD.
Used by professional computer gurus, it allows you to perform many operations when working with a storage medium. Delving into the very structure of the program, it is easy to understand why it is so loved and even revered by many people whose activities are, in one way or another, related to the computer craft.
Acronis is a complete and, importantly, convenient tool for working with a hard drive, known to the public for many years.
Let's find out why.
Program features The Acronis Disk Director arsenal is aimed at maximizing the user's communication with the computer hardware. This is manifested in everything: detailed tips will help beginners who are just mastering it, so they won’t stumble during this process, and the ability to have absolute control over their actions will allow professionals to achieve exactly what they want in the end.
Acronis Disk Director is a universal program for deep formatting a hard drive.
Thanks to it, partitioning disks will not seem as complicated as it would be with the same standard Windows tools.
- You can always, with mathematical precision, allocate for a future disk exactly as much space as you think will be enough. In addition, it is possible to transform ready-made sections into:
- primary- those from which the operating system will be loaded, first of all;
- active- acting as a repository for programs, data and other personal information.
Functions
The previous section is not enough to fully reveal the potential of this program, because in addition to its capabilities, it also has a number of useful functions.
We invite you to take a closer look at them:
- free conversion of HDD partitions between static and dynamic volumes;
- saving a backup copy of the current operating system: having an archive with a backup copy on external media, you can avoid the need to install programs again after cleaning - you just need to unzip the file and your system will be up and running again;
- recovery of previously deleted partitions;
- Convert boot record from MBR to GPT and back without using the command line.
Looks good, doesn't it? However, what is striking is the fact that all this really works, without fail, and is equipped with fairly detailed instructions and help that will help you find a solution to almost any question posed to the program.
Work process
As mentioned earlier, clearing a disk of data on it can occur both at the hardware and software levels. But how exactly it happens is a small mystery, but quite interesting.
Let's start from smallest to largest. The high-level option comes in two types: fast and full. With fast, the file system of the storage medium is completely rewritten.

The most modern standard is the NTFS file system, which is characterized by high performance and ease of data storage.
Full high-level formatting pre-scans the entire hard drive for bad sectors and then tries to fix them. And only then the file tables are written to the device itself.
The low-level option redistributes the available space on the disk surface, re-creating tracks (tracks), onto which the control program is subsequently reinstalled. This method takes the most time, but is considered popular for the most effective restoration of solid-state media.
After carrying out one of the procedures described above, there is only one file system on the disk - all partitions will have to be created manually, manipulating the free space of your hard drive.
Acronis Disk Director is the best solution for this task. It is possible to run this program both from under the OS shell and by booting from a flash device. If everything is clear with the first option, then for the second we will need to enable support for booting the computer from drives in the BIOS. How to do this was described above in the section “Formatting the HDD using Windows”.
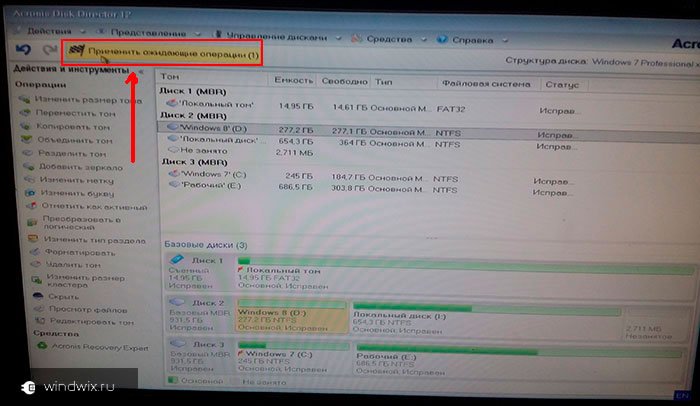
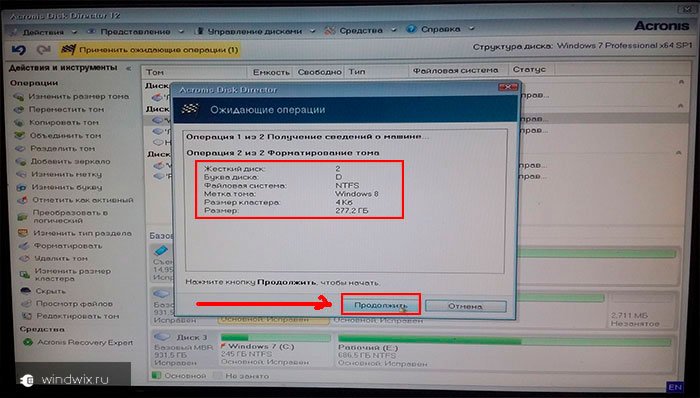
Let's look at the whole procedure step by step:

Pros and cons of Acronis
The program is paid, but the developer has provided the possibility of using a trial (demo) version of its own product. It is noteworthy that, despite the limited period of use, there are no restrictions as such: the user can enjoy the full functionality of this program for the entire period. The only downside is the fairly “decent” cost of the program for the average user.
The advantages include:

Taking into account all the capabilities of Acronis Disk Director, it is impossible not to highlight that this particular application will help you most effectively clean external or internal storage devices of any level, split them into partitions and much, much more.
>